I was standing in my kitchen at 2 a.m., staring at a half‑melted chocolate bar that had somehow escaped the confines of its wrapper and was now stuck to the ceiling fan. The smell of burnt cocoa wafted through the apartment, and I thought, “If I’m going to ruin a night, I might as well turn this disaster into a dessert.” That moment of pure, chaotic inspiration birthed what I can confidently call the Best No‑Bake Chocolate Cheesecake – Quick, Creamy, and Delicious! No oven, no fuss, just a silky‑smooth chocolate dream that sets itself while you binge‑watch your favorite series. I dare you to taste this and not go back for seconds – it’s that good.
Picture this: a glossy, dark chocolate top that cracks just enough to reveal a cloud of whipped cream, while the crust underneath crunches like fresh‑baked shortbread that’s been kissed by a buttery breeze. The aroma? A deep, earthy chocolate scent that wraps around you like a warm blanket, punctuated by the faint buttery whisper of graham crackers. When you cut into it, the filling slides like velvet, and the first bite is an explosion of rich cocoa meeting tangy cream cheese – a contrast that feels like a high‑five between two old friends. The texture is so perfectly balanced that you’ll swear you’ve discovered a new element on the periodic table of desserts.
Most recipes get this completely wrong. They either over‑sweeten, under‑cook the crust, or use cheap chocolate that tastes like a cardboard box. I’ve tried every shortcut under the sun – from microwave‑melted chocolate to pre‑made crust mixes – and each one fell short of the silky perfection I was chasing. The secret? A few unexpected tricks that turn humble pantry staples into a gourmet masterpiece, plus a dash of confidence that only a night‑owl with a busted fan can muster.
One technique I’ll reveal will have you questioning why you ever bothered with a traditional baked cheesecake in the first place. It’s a simple, almost lazy step that packs a punch of flavor and texture, and you’ll wonder how you ever lived without it. So, buckle up, because I’m about to walk you through every single step – by the end, you’ll wonder how you ever made it any other way.
What Makes This Version Stand Out
- Flavor Bomb: Dark chocolate meets tangy cream cheese, creating a deep, complex taste that’s richer than any store‑bought version.
- Texture Harmony: The crust is buttery and crunchy, while the filling is airy yet dense enough to hold its shape without a bake.
- Simplicity: Fewer than ten ingredients, no oven, and under an hour from start to finish – perfect for lazy weekends.
- Unique Twist: A splash of hot water transforms the cocoa powder into a glossy ganache that coats the cheesecake like satin.
- Crowd‑Pleaser: Even the most stubborn dessert skeptics admit this cheesecake is “the best thing they’ve ever eaten without a oven.”
- Ingredient Quality: Using real dark chocolate (70% cacao or higher) makes all the difference – it’s the backbone of the flavor.
- Make‑Ahead Magic: Set it the night before, and the flavors meld into a single, unforgettable bite.
- Zero Guilt: No need for a hot oven, which means you save on energy and keep the kitchen cool – a win for summer gatherings.
Inside the Ingredient List
The Flavor Base
The dark chocolate is the hero of this cheesecake. I use a solid 5‑ounce bar of 70% cacao dark chocolate because it provides a robust, slightly bitter backbone that balances the sweetness of the sugars. If you opt for a lower cacao percentage, the cheesecake will taste more like a candy bar and lose that sophisticated depth. A quick tip: always snap the chocolate into pieces before melting – it ensures an even melt and prevents scorching. If you’re allergic to dairy, you can swap the chocolate for a high‑quality dairy‑free dark chocolate, but expect a subtle shift in texture.
The Texture Crew
Graham cracker crumbs and salted butter form the crust, delivering that buttery crunch you crave. The crumbs should be fine, not chunky; a quick pulse in a food processor does the trick. The butter is melted and mixed with a tablespoon of white sugar, which caramelizes slightly as the crust sets, adding a hidden layer of flavor. Skipping the butter or using margarine will result in a dry, crumbly base that falls apart the moment you lift a slice.
The Unexpected Star
Unsweetened cocoa powder paired with hot water creates a glossy ganache that coats the cheesecake like a midnight sky. The hot water “blooms” the cocoa, unlocking its aromatic oils and preventing a grainy texture. If you’re feeling adventurous, add a pinch of sea salt to the ganache – it intensifies the chocolate flavor and adds a subtle surprise on the palate. Too much water, however, will make the ganache runny, so measure carefully.
The Final Flourish
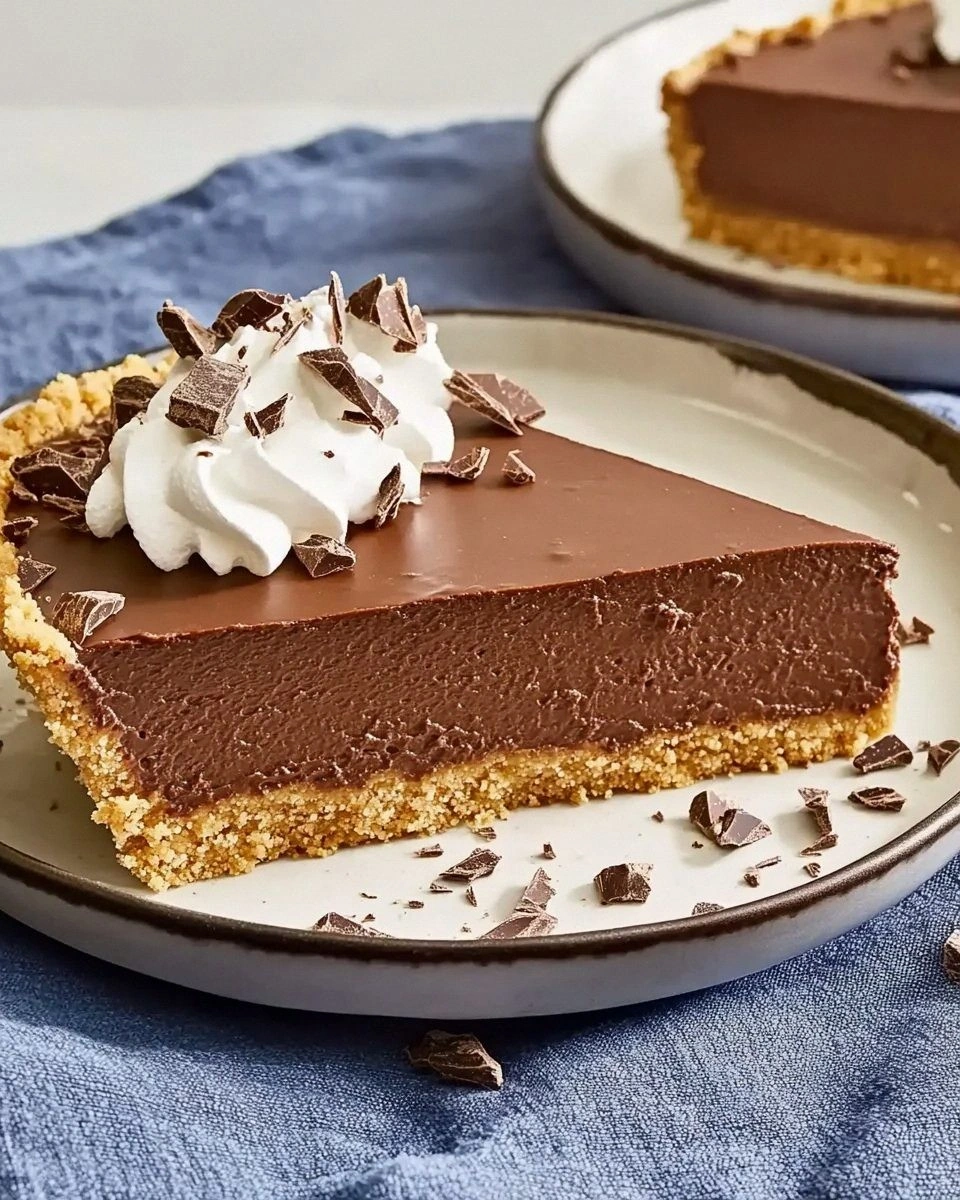
Cream cheese and heavy cream are the heart of the filling, delivering that luxurious, melt‑in‑your‑mouth feel. Choose full‑fat cream cheese for the richest texture; low‑fat versions become grainy once set. The heavy cream is whipped to soft peaks and folded in, which lightens the mixture without adding extra sugar. Finally, a topping of whipped cream, chocolate shavings, and fresh berries adds visual appeal and a burst of freshness that cuts through the richness.
Everything’s prepped? Good. Let’s get into the real action…
The Method — Step by Step
Start by gathering all your ingredients and setting a large mixing bowl in the freezer for about ten minutes. This cold surface will keep the butter from melting too quickly when you combine it with the graham cracker crumbs. While the bowl chills, melt the dark chocolate in a heat‑proof bowl over a simmering pot of water (a double boiler). Stir constantly until the chocolate is smooth, glossy, and just a touch cooler than body temperature – you’ll know it’s ready when a thin ribbon forms as you lift the spoon.
In a separate medium bowl, combine the graham cracker crumbs, melted butter, and 1 tablespoon of white sugar. Use a fork or a small spatula to press the mixture together until it resembles wet sand. Press this crumb mixture firmly into the bottom of a 9‑inch springform pan, creating an even layer about a half‑inch thick. Place the pan on a sheet of parchment paper and refrigerate for at least 15 minutes so the crust sets solid.
This next part? Pure magic. Whisk together the cream cheese and ½ cup of white sugar until the mixture is silky and free of lumps. It’s crucial to beat the cheese on medium speed for about two minutes – this aerates the filling, giving it that airy mouthfeel later on. Once smooth, gently fold in the whipped heavy cream, being careful not to deflate it. The mixture should look light, fluffy, and slightly glossy.
Now, for the ganache: In a small saucepan, whisk together 2 tablespoons of unsweetened cocoa powder with 2‑3 tablespoons of hot water until a thick, glossy paste forms. Immediately pour the melted dark chocolate into this cocoa‑water mixture, stirring vigorously until you have a velvety ganache that shines like midnight oil. Add a pinch of sea salt if you like a salty‑sweet contrast; this tiny addition amplifies the chocolate flavor dramatically.
Combine the ganache with the cream cheese mixture, pouring it over the chilled crust. Use a spatula to spread the filling evenly, smoothing the top with a gentle back‑and‑forth motion. At this point, you’ll notice the filling starts to firm up as the chocolate cools – that’s the signal that the chemistry is working.
Cover the pan with plastic wrap and place it in the refrigerator for at least 30 minutes, though I recommend an hour for the best set. During this time, the flavors meld, the crust hardens, and the ganache solidifies into a glossy sheen. If you’re impatient (I get that a lot), a quick 20‑minute chill in the freezer works, but be careful not to let the edges freeze.
While the cheesecake is chilling, whip the heavy cream with a pinch of sugar until soft peaks form. This step is optional if you love extra fluff, but I swear by it – the whipped topping adds a cloud‑like contrast that feels like a celebration in every bite. Transfer the whipped cream to a piping bag fitted with a star tip, and pipe a generous swirl over the set cheesecake just before serving.
Finish with a generous shower of chocolate shavings and a handful of fresh berries. The shavings add a slight bitterness that cuts through the richness, while the berries bring a bright, acidic pop that balances the dessert. Slice with a hot, wet knife for clean cuts; the heat prevents the ganache from cracking. Serve immediately, or keep refrigerated for up to three days – the flavor only deepens with time.
That’s it — you did it. But hold on, I’ve got a few more tricks that’ll take this to another level…
Insider Tricks for Flawless Results
The Temperature Rule Nobody Follows
Never, ever pour hot ganache over a warm filling. The temperature differential can cause the cream cheese to seize, resulting in a grainy texture that feels like sandpaper on your tongue. Let both the ganache and the filling sit at room temperature for about 10 minutes before combining – this small patience step makes the final texture silky smooth. I once tried to speed things up by microwaving the ganache for 10 seconds; the result was a lumpy mess that ruined the whole batch.
Why Your Nose Knows Best
When the chocolate is melting, trust your nose more than a timer. A faint, buttery aroma signals that the chocolate has reached the perfect melting point. If you smell a burnt note, you’ve gone too far and the flavor will be bitter. This sensory cue is why I always keep the kitchen window open – a fresh airflow helps me detect subtle changes in scent.
The 5‑Minute Rest That Changes Everything
After you’ve folded the whipped cream into the filling, let the mixture rest for five minutes before pouring it over the crust. This short pause allows any trapped air bubbles to rise to the surface, resulting in a smoother top. Skipping this step often leads to a slightly uneven surface that looks less polished. My friend tried to skip it once – the cheesecake ended up with a wavy top that looked like a stormy sea.
Crust Crunch Boost
If you love an extra‑crunchy crust, toast the graham cracker crumbs in a dry skillet for two minutes before mixing with butter. The light toasting adds a caramelized note that elevates the entire dessert. Just be careful not to burn them; a light golden hue is all you need.
Berry Balance
Fresh berries add acidity, but they also release water as they sit. To avoid a soggy top, pat the berries dry with a paper towel before sprinkling them on the cheesecake. If you’re using frozen berries, thaw them, drain excess juice, and then give them a quick toss in a little sugar to revive their brightness.
Creative Twists and Variations
This recipe is a playground. Here are some of my favorite ways to switch things up:
Mint‑Chocolate Fusion
Add a teaspoon of peppermint extract to the ganache and garnish with crushed peppermint candies. The cool mint cuts through the richness, making it perfect for holiday parties.
Espresso Infusion
Dissolve 1 tablespoon of instant espresso powder in the hot water before mixing with cocoa powder. The coffee notes deepen the chocolate flavor, creating a mocha‑loving experience.
Nutty Crunch
Stir in ¼ cup toasted chopped hazelnuts or almonds into the crust before pressing. The nutty bite adds texture and a subtle earthy flavor that pairs beautifully with chocolate.
White Chocolate Swirl
Melt 4 oz white chocolate and swirl it into the chocolate ganache before folding into the filling. The pale ribbons create a marble effect and a sweet contrast.
Coconut Dream
Replace half of the graham cracker crumbs with toasted coconut flakes and use coconut‑flavored whipped cream. This tropical twist transports you to a beachside cabana with every bite.
Storing and Bringing It Back to Life
Fridge Storage
Cover the cheesecake tightly with plastic wrap and store it in the refrigerator for up to three days. The cool environment keeps the ganache firm and the crust crisp. If you notice condensation on the surface, simply wipe it with a paper towel before serving.
Freezer Friendly
For longer storage, wrap the entire springform pan in a double layer of aluminum foil and place it in a freezer‑safe bag. The cheesecake freezes well for up to two months. When you’re ready to enjoy it, move it to the fridge overnight to thaw gradually – this prevents water from forming on the surface.
Best Reheating Method
Although it’s a no‑bake dessert, you can gently warm slices in the microwave for 10‑15 seconds if you prefer a softer, melt‑in‑your‑mouth experience. Add a tiny splash of water (about a teaspoon) before microwaving; the steam revives the ganache’s glossy sheen without making it runny.