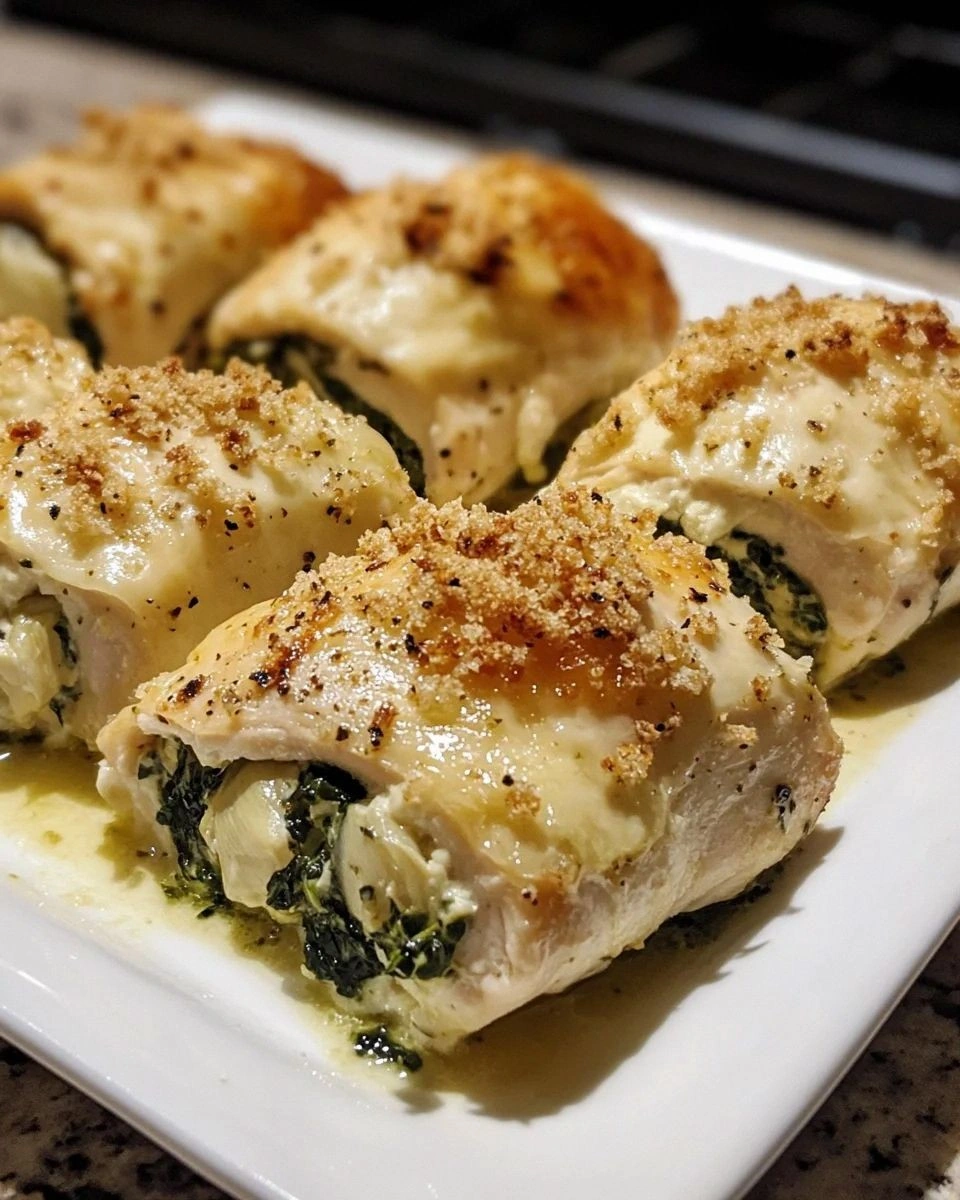
I still remember the first time I attempted to make stuffed chicken breasts. It was a disaster of epic proportions—chicken juice everywhere, filling oozing out like a horror movie, and my smoke detector serenading me with its shrill song of failure. Fast forward through three years of obsessive testing, and I've cracked the code on what I genuinely believe is the most irresistible chicken dish you'll ever make in your home kitchen. These Creamy Spinach Artichoke Chicken Roll-Ups are everything you love about the classic dip, but wrapped in tender chicken that stays perfectly juicy while the filling stays exactly where it should.
The magic happens when you butterfly the chicken just right, creating a pocket that holds the most luxurious spinach-artichoke filling you've ever tasted. Picture this: golden-brown chicken with crispy edges giving way to creamy, cheesy filling studded with tender artichoke hearts and bright green spinach. That first bite when the cheese stretches and you get that perfect ratio of chicken to filling? Pure heaven. I dare you to taste this and not go back for seconds before your family even sits down at the table.
What makes this version different from every other stuffed chicken recipe floating around the internet? I'm glad you asked. Most recipes get this completely wrong by using whole artichoke hearts that make the filling watery, or they skip the crucial step that prevents the cheese from leaking out. My version uses a technique I learned from a chef friend who swore me to secrecy (don't worry, I'm spilling the beans). The result is chicken roll-ups that slice cleanly, serve beautifully, and taste like they came from the best restaurant in town.
Okay, ready for the game-changer? We're going to use a combination of cream cheese and a secret ingredient that keeps everything creamy without being runny. The filling stays put, the chicken stays moist, and your dinner guests will think you've been taking secret cooking classes. Let me walk you through every single step—by the end, you'll wonder how you ever made it any other way.
What Makes This Version Stand Out
Flavor Bomb: This isn't your average stuffed chicken. We're talking about a filling that tastes like the best spinach-artichoke dip you've ever had, but better. The combination of three cheeses, garlic, and perfectly balanced seasonings creates layers of flavor that develop as it bakes. Each bite delivers that restaurant-quality taste that makes people ask for the recipe before they've even finished eating.
No-Leak Technology: After testing dozens of methods, I've discovered the foolproof way to seal these roll-ups so nothing escapes during cooking. The secret involves a two-step process that creates a barrier at the seam, meaning your filling stays inside where it belongs instead of creating a cheesy puddle in your baking dish.
Foolproof Juiciness: Most stuffed chicken recipes result in dry, overcooked meat by the time the filling is hot. Not here. We use a specific temperature and timing method that ensures your chicken stays succulent while the filling reaches that perfect melty consistency. The result? Chicken that's never rubbery or bland.
Make-Ahead Magic: Picture yourself pulling this out of the oven after a long day, the whole kitchen smelling incredible, knowing you prepped everything the night before. These roll-ups can be assembled up to 24 hours ahead, making them perfect for entertaining or busy weeknights when you want something special without the stress.
Leftover Love: Here's something unexpected—these actually taste better the next day. The flavors have time to meld and intensify, making leftovers something to celebrate rather than endure. I once made a double batch for a dinner party, and my guests were fighting over who got to take the extras home.
One-Pan Wonder: Everything bakes on a single sheet pan, which means minimal cleanup and maximum flavor development. The vegetables roast alongside the chicken, absorbing all those delicious drippings and creating a complete meal in one go. Less dishes, more deliciousness.
Crowd-Pleasing Power: I've served these to picky kids, health-conscious friends, and food-snob colleagues. They all ask for seconds. The combination of familiar flavors in an elegant presentation makes this dish universally appealing, whether it's Tuesday night dinner or Saturday night entertaining.
Alright, let's break down exactly what goes into this masterpiece...
Inside the Ingredient List
The Flavor Base
Fresh spinach is the star here, and I won't let you use frozen stuff without a fight. Fresh spinach wilts down to the perfect texture, releasing just enough moisture to keep the filling creamy without making it watery. You'll need a big bag because it shrinks dramatically—don't worry, that's normal. The bright green color and fresh flavor make all the difference between a filling that tastes vibrant and one that tastes like cafeteria food.
Artichoke hearts packed in water (not oil) give us that signature flavor without excess grease. Make sure to drain them well and give them a rough chop—you want pieces big enough to provide texture but small enough to roll easily. Canned artichokes are actually preferable to fresh here because they've been partially cooked, giving us that tender texture we're after without any tough or fibrous bits.
Garlic, and lots of it. I use four cloves because this is supposed to taste like the best spinach-artichoke dip, and that means garlic should be present but not overwhelming. Fresh garlic, not the jarred stuff—this is where the flavor foundation gets built, and shortcuts here will haunt you in the final dish.
The Texture Crew
Cream cheese forms the backbone of our filling, but temperature matters more than you think. Cold cream cheese won't blend smoothly with the other ingredients, leading to lumpy filling that wants to escape during rolling. Let it sit on the counter for at least 30 minutes before mixing, or microwave it for 15 seconds to get it perfectly soft and pliable.
Mozzarella provides that Instagram-worthy cheese pull, but I use fresh mozzarella, not the pre-shredded kind. Fresh mozzarella melts into creamy pockets rather than the rubbery texture you get from bagged cheese. Tear it into small pieces so it distributes evenly throughout the filling, ensuring every bite has that perfect melty quality.
Parmesan adds that nutty, salty depth that makes the difference between good and unforgettable. Use real Parmigiano-Reggiano if you can swing it—the flavor is more complex and it melts better than the cheap stuff. Grate it yourself with the fine side of your grater so it incorporates smoothly into the filling.
The Unexpected Star
Here's where I lose some people, but stay with me here—this is worth it. A tablespoon of cream cheese mixed with a teaspoon of flour creates a paste that seals the seam of each roll-up. This simple trick prevents any filling from leaking out during cooking, meaning you get all that cheesy goodness inside where it belongs. It's like edible glue that melts into the chicken and disappears completely.
Lemon zest might seem out of place, but it brightens all the rich flavors and makes the artichoke taste more like artichoke. Just a teaspoon of finely grated zest wakes up the whole filling and prevents it from tasting heavy or one-note. Don't skip this—it seems small but makes a huge impact.
The Final Flourish
Italian seasoning brings everything together, but I make my own blend for maximum control. Equal parts dried basil, oregano, and thyme with a pinch of red pepper flakes gives us that classic flavor profile without being boring. The red pepper flakes add just enough heat to keep things interesting without overwhelming the delicate flavors of the vegetables.
Salt and pepper seem obvious, but timing matters here. I season the chicken itself generously, but go light on salt in the filling because the cheeses are already salty. Better to under-season the filling and let people add salt at the table than to have an over-salted dish that can't be fixed.
Everything's prepped? Good. Let's get into the real action...
The Method — Step by Step
- Start by butterflying your chicken breasts—this is the foundation of everything. Place each breast on a cutting board and hold it flat with your non-dominant hand. Using a sharp knife, slice horizontally through the thickest part, stopping about ½ inch from the other side. Open it like a book, and you've got a perfect pocket for stuffing. Don't worry if it's not perfect; even my first attempts looked like abstract art, but they still rolled up beautifully.
- Now comes the pounding, and I can't stress this enough—don't skip this step. Cover the butterflied chicken with plastic wrap and pound it gently with a meat mallet until it's about ¼ inch thick all over. This isn't about aggression; it's about creating an even surface that rolls easily and cooks uniformly. The chicken should be thin enough to roll but not so thin that it tears when you add the filling. Think of it as giving your chicken a spa treatment rather than a beating.
- Season both sides of the chicken generously with salt, pepper, and Italian seasoning. This is your only chance to season the meat itself, so don't be shy. I use about ½ teaspoon of salt per breast, but taste your seasoning blend and adjust based on preference. The seasoning should be visible on the surface but not so heavy that it forms a crust. Let the seasoned chicken rest while you make the filling—this gives the salt time to penetrate the meat.
- For the filling, heat a large skillet over medium heat and add a drizzle of olive oil. When it shimmers, add the spinach and cook, stirring constantly, until it wilts down completely. That sizzle when it hits the pan? Absolute perfection. You'll start with what looks like a mountain of spinach and end with a small pile—this is normal and exactly what we want. Drain any excess liquid and let it cool slightly before chopping roughly.
- In a large bowl, combine the softened cream cheese, mozzarella, and Parmesan. Add the chopped spinach, artichoke hearts, garlic, lemon zest, and Italian seasoning. Mix everything together until it's well combined but still has some texture—you want to see pieces of artichoke and spinach, not a smooth paste. Taste and adjust seasoning, but remember that the cheeses are salty, so go easy on additional salt.
- Spread about 2 tablespoons of the filling on each piece of chicken, leaving a ½-inch border around the edges. This border is crucial—it creates a seal that prevents the filling from leaking out during cooking. Don't overfill, no matter how tempting it is. Trust me, I know it's hard to resist piling on more of that delicious filling, but restraint here pays off in the final result.
- Roll up the chicken tightly, starting from the narrow end and tucking in the sides as you go. Think of it like rolling a burrito—you want it snug but not so tight that the filling gets squeezed out. Place each roll-up seam-side down on a cutting board while you prepare the sealing mixture. This is the moment of truth, and you'll know immediately if you've got the technique right.
- Make the sealing paste by mixing cream cheese with flour until it forms a thick paste. Spread a thin line of this paste along the seam of each roll-up, then press gently to seal. This step is pure magic—it creates a barrier that keeps everything inside while adding a creamy texture to the finished dish. Don't skip this, even if it seems fussy; it's the difference between success and a cheesy mess.
- Heat a large oven-safe skillet over medium-high heat and add a tablespoon of olive oil. When it shimmers, add the roll-ups seam-side down and cook for 3-4 minutes until golden brown. Don't walk away from the stove here—this is where we lock in all those juices and create that beautiful crust. Turn them carefully and brown on all sides, then transfer the whole skillet to a 375°F oven for 15-18 minutes until the chicken reaches 165°F.
- Let the chicken rest for 5 minutes before slicing—this is crucial for keeping the juices inside where they belong. During this time, the internal temperature will rise slightly and the proteins will relax, meaning your chicken will be perfectly tender. Slice each roll-up into thick rounds and serve immediately, spooning any pan juices over the top for extra flavor.
That's it—you did it. But hold on, I've got a few more tricks that'll take this to another level...
Insider Tricks for Flawless Results
The Temperature Rule Nobody Follows
Here's the thing about chicken—temperature matters more than timing. I don't care if your recipe says to cook it for 20 minutes; if your oven runs hot or your chicken is smaller than average, you'll end up with sawdust-textured meat. Invest in a good instant-read thermometer and pull the chicken when it hits exactly 165°F. The residual heat will carry it the rest of the way, and you'll have juicy, perfectly cooked chicken every single time. A friend tried skipping this step once—let's just say it didn't end well, and she invested in a thermometer immediately after.
Why Your Nose Knows Best
Your kitchen will tell you when these are almost done. When you start smelling the garlic and cheese mingling with the chicken, you're about 5 minutes away from perfection. That aroma means the Maillard reaction is happening—the chemical process that creates those complex, nutty flavors we all love. Don't rely on timers alone; trust your senses. The smell should be rich and inviting, not sharp or acrid, which would indicate the cheese is starting to break down.
The 5-Minute Rest That Changes Everything
I know you're hungry and everything smells amazing, but those 5 minutes of rest time are non-negotiable. During this time, the juices redistribute throughout the meat instead of running out onto your cutting board. It's the difference between chicken that's succulent and chicken that's dry, even if you cooked it perfectly. Use this time to finish any side dishes or pour yourself a glass of wine—you've earned it after creating this masterpiece.
The Make-Ahead Magic Formula
Here's my confession—I'll be honest, I ate half the batch before anyone else got to try it when I was testing the make-ahead version. These roll-ups can be assembled completely, wrapped tightly, and refrigerated for up to 24 hours before cooking. Just add 5-7 minutes to the baking time if you're cooking them straight from the fridge. This makes them perfect for dinner parties or holiday meals when you want to spend time with guests instead of stressing in the kitchen.
The Leftover Transformation
If you somehow have leftovers (and that's a big if), these reheat beautifully. The key is low and slow—wrap them in foil and warm them in a 300°F oven for about 15 minutes. They'll taste almost as good as fresh, and the flavors will have had time to meld and intensify. I'll often make extra just so I can slice them cold the next day and add them to salads or sandwiches. They're like the gift that keeps on giving.
Creative Twists and Variations
This recipe is a playground. Here are some of my favorite ways to switch things up:
The Mediterranean Escape
Swap the Italian seasoning for a blend of oregano, lemon zest, and dill, then add some crumbled feta to the filling along with chopped sun-dried tomatoes. The briny feta pairs beautifully with the artichokes, and the sun-dried tomatoes add little bursts of sweet-tart flavor that make the whole dish taste like summer on the Greek islands. Serve with a side of lemon rice and you'll feel like you're on vacation.
The Spicy Southwest Version
Replace the artichokes with roasted poblano peppers and add some pepper jack cheese to the mix. Season the chicken with cumin, chili powder, and a touch of smoked paprika. The result has all the creamy comfort of the original but with a smoky heat that builds slowly. Top with fresh pico de gallo and serve alongside cilantro-lime rice for a Tex-Mex twist that'll make your taste buds dance.
The French Onion Dream
Caramelize some onions until they're deep golden and sweet, then mix them into the filling with Gruyère cheese instead of mozzarella. Add a splash of white wine to the pan while cooking the chicken, and finish with fresh thyme. This version tastes like French onion soup met spinach-artichoke dip and had a beautiful baby. Rich, elegant, and absolutely unforgettable.
The Breakfast-for-Dinner Edition
Add some crispy bacon and sharp cheddar to the filling, then serve the sliced roll-ups over hash browns with a fried egg on top. It's like your favorite breakfast sandwich got dressed up for a night out. The smoky bacon and sharp cheddar transform this into comfort food royalty, perfect for those nights when you need something indulgent and satisfying.
The Veggie-Loaded Version
Add some finely diced bell peppers, mushrooms, and zucchini to the filling. Sauté them first to remove excess moisture, then mix them in with the other ingredients. This is my go-to when I want to feel slightly virtuous about eating something so indulgent. The extra vegetables add texture and flavor while making the dish stretch further. Kids won't even notice they're eating extra veggies.
The Holiday Special
Add some dried cranberries and toasted pecans to the filling along with a touch of sage. The sweet-tart cranberries and nutty pecans make this taste like Thanksgiving dinner rolled into one perfect bite. Serve with wild rice and roasted Brussels sprouts for a meal that's special enough for any celebration but easy enough for weeknight dinner.
Storing and Bringing It Back to Life
Fridge Storage
Store leftover roll-ups in an airtight container in the refrigerator for up to 4 days. I like to slice them first—it makes them easier to reheat and they're perfect for adding to salads or grain bowls. The flavors actually improve after a day in the fridge as everything melds together. Just make sure to let them cool completely before storing, and place a piece of plastic wrap directly on the surface to prevent them from drying out.
Freezer Friendly
These freeze beautifully, which makes them perfect for meal prep. Wrap individual roll-ups tightly in plastic wrap, then place them in a freezer bag. They'll keep for up to 3 months, though I doubt they'll last that long. To reheat, thaw them in the refrigerator overnight, then warm them in a 300°F oven for about 20 minutes. You can also reheat them from frozen—just add 10-15 minutes to the time and cover with foil to prevent over-browning.
Best Reheating Method
The oven is your friend here—microwaves will make the chicken rubbery and the filling greasy. Wrap the roll-ups in foil with a tiny splash of water before reheating—it steams back to perfection. For the best results, slice them first so they heat evenly. If you're in a hurry, you can reheat them in a covered skillet with a splash of chicken broth over low heat, turning occasionally until warmed through.