Picture this: a kitchen full of flour dust, a clock ticking, and my friend’s skeptical face as I pull a green‑shaded cheesecake from the fridge. I was about to give up on the whole “green dessert” idea when I remembered the last time I’d accidentally dropped a handful of mint‑infused whipped topping onto a slice of vanilla cake. The result? A creamy, minty burst that made everyone in the room gasp and, honestly, I ate half the batch before anyone else even got a bite. That moment sparked a mission: create the ultimate shamrock‑inspired cheesecake that would outshine every other green dessert out there.
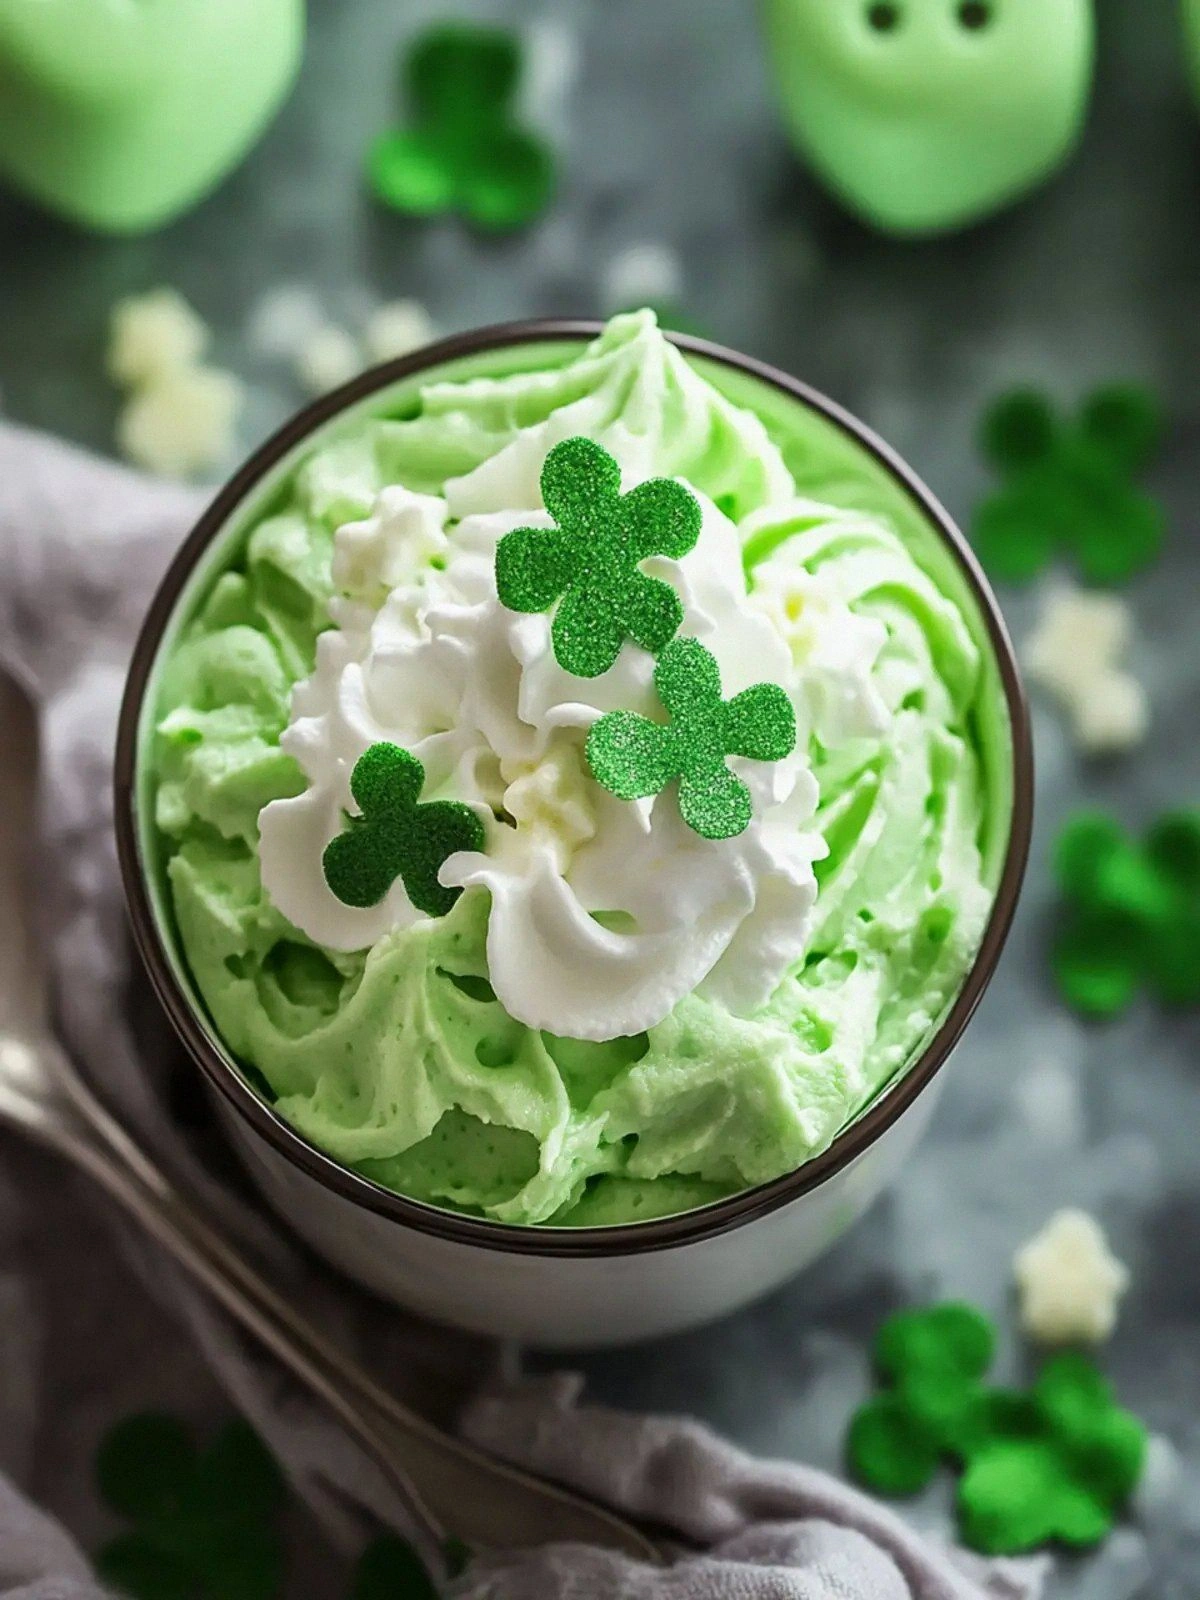
From the first glance at the glossy crust to the last lick of minty mousse, every element of this cheesecake is a symphony of textures and flavors. The crust is a buttery, slightly crunchy base that holds the creamy filling like a sturdy vessel, while the filling itself is a silky blend of cream cheese and whipped topping that swirls together like a verdant velvet curtain. The mini marshmallows pop with a gentle snap, and the chocolate sandwich cookies add a subtle crunch that contrasts the smoothness of the cream. The subtle mint undertone dances on the palate, leaving a lingering freshness that feels like a cool breeze on a warm day.
What makes this version stand out from the crowd is not just the color or the texture—it’s the intentional layering of flavors and the careful balance of sweetness. I dared you to taste this and not go back for seconds, and I guarantee you won’t. Most recipes get this completely wrong by over‑sweetening or under‑minting, but here, the mint extract is just enough to awaken the senses without overpowering the creamy base. The addition of green food coloring is minimal, ensuring the cheesecake’s natural ivory hue remains visible while still giving it that festive shamrock look.
Now, let’s dive into the details that make this cheesecake hands down the best version you’ll ever make at home. From the crust to the final garnish, I’ll walk you through every single step, so by the end, you’ll wonder how you ever made it any other way. Get ready for a recipe that’s as fun to make as it is to devour.
What Makes This Version Stand Out
- Taste: The delicate balance of sweet and mint creates a refreshing finish that feels like a breath of fresh air after a heavy dessert.
- Texture: A buttery, crunchy crust paired with a silky, airy filling and a playful marshmallow crunch delivers a multi‑sensory experience.
- Simplicity: No baking required—just a few mixing steps, chill time, and you’re ready to serve.
- Uniqueness: The combination of green food coloring, mint extract, and mini marshmallows is rarely seen in traditional cheesecakes.
- Crowd Reaction: Friends and family will be amazed at the vibrant color and the unexpected burst of mint.
- Ingredient Quality: Using high‑quality cream cheese and fresh whipped topping ensures a creamy mouthfeel.
- Make‑ahead Potential: Chill for up to 24 hours and still taste fresh; perfect for parties or last‑minute dessert prep.
- Visual Appeal: The shamrock shape and green tint make it a showstopper for any celebration.
Alright, let's break down exactly what goes into this masterpiece…
Inside the Ingredient List
The Flavor Base
At the heart of this cheesecake is the cream cheese, the ultimate creamy canvas that holds all the other flavors together. I use 8 ounces of full‑fat cream cheese because it gives the filling a luscious, velvety texture that melts in your mouth. If you prefer a lighter version, a low‑fat or Greek yogurt can replace half the cream cheese, but be prepared for a slightly tangier finish. The powdered sugar—just one cup—provides the sweet counterpoint to the mint and ensures the filling is smooth rather than gritty.
The Texture Crew
Whipped topping is the secret to achieving that airy, cloud‑like consistency that makes each bite feel weightless. Eight ounces of whipped topping, folded gently into the cream cheese mixture, creates a lightness that balances the density of the cream cheese. The mini marshmallows add a playful pop; they soften slightly during chilling but still retain a satisfying chew. The crushed chocolate sandwich cookies form the crust; they give the cheesecake a subtle chocolate crunch that contrasts the creamy interior.
The Unexpected Star
Mint extract is the star that sets this recipe apart. A single teaspoon of mint extract is enough to infuse the entire cheesecake with a refreshing, cooling note that lingers long after the last bite. If you’re a fan of a stronger mint flavor, you can add an extra half‑teaspoon, but be careful not to overwhelm the delicate creaminess. The green food coloring—just three to four drops—provides the iconic shamrock hue without masking the natural ivory of the cheesecake.
The Final Flourish
When you’re ready to assemble, you’ll pour the mixture into a pre‑made crust and then chill it. The chilling step is crucial; it allows the flavors to meld and the cheesecake to set into a firm, sliceable texture. While the cheesecake is in the fridge, you can prepare a simple garnish: a drizzle of chocolate sauce, a few fresh mint leaves, or a dusting of powdered sugar for an extra touch of elegance.
Everything's prepped? Good. Let's get into the real action…
The Method — Step by Step
- Begin by preparing the crust. Crush one cup of chocolate sandwich cookies until they resemble fine crumbs. Combine the crumbs with half a cup of melted butter and a tablespoon of powdered sugar. Press the mixture firmly into the bottom of a 9‑inch springform pan, ensuring an even layer. Chill the crust in the refrigerator while you work on the filling. This step is critical—if the crust is uneven, the cheesecake will crack as it sets.
- In a large mixing bowl, beat the 8 ounces of cream cheese on medium speed until smooth and creamy, about 2 minutes. Add one cup of powdered sugar and continue beating until the mixture is fluffy and free of lumps. This creates the base texture that will carry the mint flavor. If the mixture looks too thick, add a tablespoon of milk to loosen it slightly.
- Stir in one teaspoon of vanilla extract and one teaspoon of mint extract. The vanilla grounds the mint, preventing it from becoming overpowering. Mix until the extracts are fully incorporated; the mixture should have a silky sheen. The aroma at this point is already a hint of the final dessert’s freshness.
- Fold in the eight ounces of whipped topping gently with a spatula. Use a gentle, sweeping motion to preserve the air bubbles, which give the cheesecake its lightness. The filling should look airy and slightly glossy. This step is a delicate dance—too vigorous, and you’ll lose the fluffiness.
- Add three to four drops of green food coloring and fold until the mixture turns a pale, translucent green. The color should be subtle; you want to see the ivory of the cheesecake beneath the hue. Over‑coloring will make it look artificial and can affect the flavor.
- Fold in two cups of mini marshmallows, distributing them evenly. The marshmallows add a playful crunch and a sweet burst when bitten. If you prefer a more uniform texture, you can pulse the marshmallows in a food processor before folding them in.
- Pour the filling over the chilled crust, smoothing the top with a spatula. Tap the pan gently on the counter to release any air pockets. The cheesecake should look glossy and even. This is the moment of truth—watch the surface as it settles into a perfect, smooth dome.
- Cover the pan with plastic wrap and refrigerate for at least 4 hours, preferably overnight. The chilling period allows the flavors to meld and the cheesecake to firm up. When you’re ready to serve, remove the springform ring carefully, slice, and garnish as desired. The final result is a green‑shaded, minty cheesecake that feels like a piece of heaven.
That's it — you did it. But hold on, I've got a few more tricks that'll take this to another level…
Insider Tricks for Flawless Results
The Temperature Rule Nobody Follows
Many people bake cheesecakes at room temperature, but I swear by chilling the filling before pouring it into the crust. Keep the mixture in the fridge for at least 30 minutes before assembly; this reduces the risk of cracks and ensures a smoother texture. I’ve seen cakes that crack after baking simply because the filling was too warm when it hit the pan.
Why Your Nose Knows Best
Before you chill the cheesecake, give it a quick sniff. If the aroma smells like burnt sugar, you’ve over‑mixed or added too much sugar. The scent should be sweet, creamy, and lightly minty. Trust your nose—it’s the best judge of a dessert’s readiness.
The 5-Minute Rest That Changes Everything
Once the cheesecake is fully chilled, let it sit at room temperature for about five minutes before slicing. This brief rest softens the edges slightly, making the knife glide through without tearing the delicate filling. It’s a small step that dramatically improves the eating experience.
Garnish Like a Pro
A drizzle of dark chocolate sauce adds a rich, slightly bitter contrast that elevates the mint flavor. Alternatively, sprinkle crushed pistachios for a nutty crunch. Remember, the garnish should complement, not overpower, the core flavors.
Serve With a Twist
Pair your cheesecake with a chilled glass of sparkling rosé or a cup of mint tea for a complete celebration. The cool, effervescent drink cuts through the richness and highlights the mint undertones.
Creative Twists and Variations
This recipe is a playground. Here are some of my favorite ways to switch things up:
Chocolate‑Mint Fusion
Swap the chocolate sandwich cookies for dark chocolate chips in the crust, and add a tablespoon of cocoa powder to the filling. The result is a decadent chocolate‑mint cheesecake that’s perfect for chocolate lovers.
Berry Burst
Fold in a cup of fresh blueberries or raspberries before chilling. The berries add a juicy burst of flavor and a pop of color that looks stunning on the green base.
Nutty Crunch
Replace the mini marshmallows with chopped walnuts or pecans. The nuts provide a satisfying crunch and a nutty aroma that pairs well with the mint.
Spiced Surprise
Add a pinch of cinnamon or nutmeg to the filling. The warm spices create a cozy contrast to the cool mint, making this cheesecake a fall favorite.
Vegan Version
Use coconut cream instead of cream cheese and replace the whipped topping with a dairy‑free alternative. The result is a creamy, plant‑based cheesecake that still delivers on flavor.
Holiday Twist
For a festive touch, sprinkle edible gold leaf on top after chilling. The shimmering gold adds a celebratory sparkle that’s perfect for special occasions.
Storing and Bringing It Back to Life
Fridge Storage
Store the cheesecake in the refrigerator, tightly wrapped in plastic wrap, for up to five days. The chilled environment keeps the filling firm and prevents the crust from becoming soggy.
Freezer Friendly
Wrap the cheesecake in parchment paper, then in foil, and freeze for up to two months. Thaw in the refrigerator overnight before serving to preserve the texture.
Best Reheating Method
To reheat a frozen cheesecake, let it thaw at room temperature for 30 minutes, then warm the oven to 300°F (150°C). Place the cheesecake on a baking sheet and heat for 10 minutes, or until warmed through. Add a tiny splash of water before reheating to keep the filling moist; it steams back to perfection.