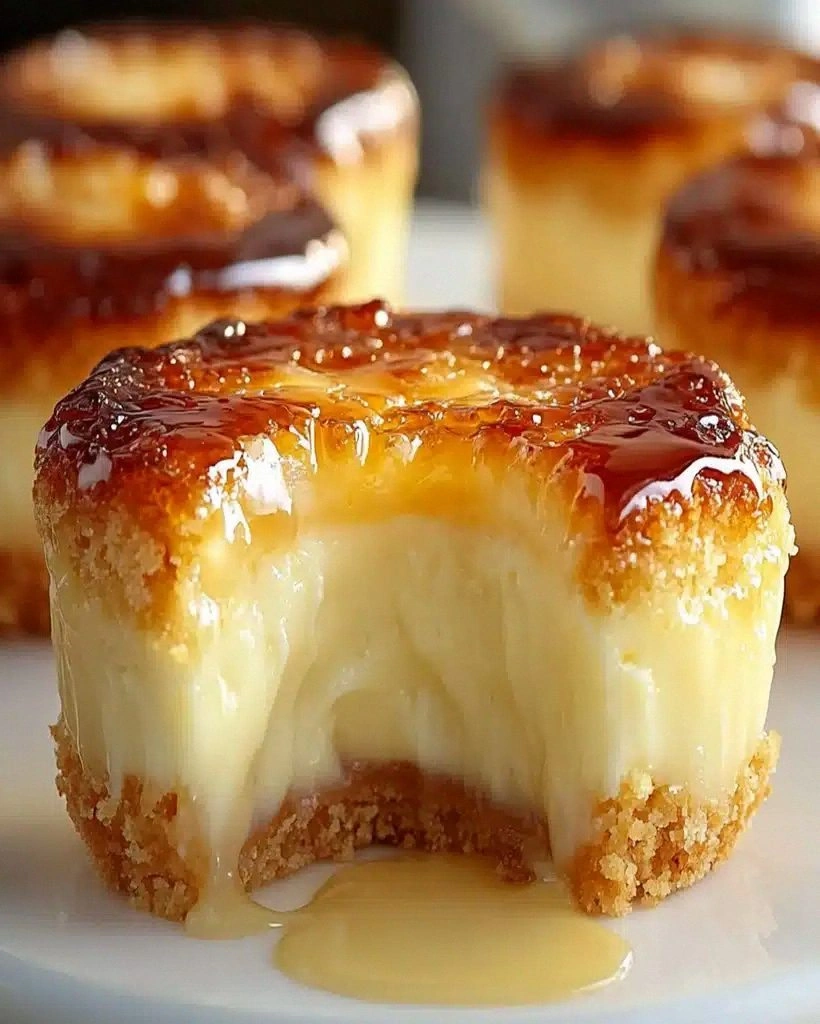
I still remember the exact moment these mini crème brûlée cheesecakes changed my life. It was 2:47 AM on a Tuesday, I was wearing mismatched socks, and I had just burned my third batch of regular crème brûlée because I got distracted by a true-crime documentary. The sugar topping had turned into volcanic glass, my kitchen smelled like a campfire, and I was ready to swear off dessert forever. But then, staring at my failed ramekins, I had one of those wild kitchen epiphanies that either leads to greatness or the emergency room. What if I could capture everything I loved about that crackly sugar top and silky custard, but wrap it in the stability of a cheesecake? What if I could make them mini, because everything adorable tastes better and I have zero self-control when faced with full-sized desserts?
The first batch came out of the oven looking like golden-capped mountain peaks, and the smell was absolutely criminal. I'm talking vanilla bean perfume mixed with caramelized sugar dreams that wafted through my apartment and had my neighbors knocking on the door at 3 AM. I torched the tops while they were still slightly warm, watching that sugar melt and bubble and transform into that signature glassy shell. The first bite was a revelation — that satisfying crack as my spoon broke through the brûlée top, giving way to the creamiest cheesecake texture that melted on my tongue like expensive chocolate. It was everything I loved about both desserts, but somehow better than either one alone. I ate three standing at my kitchen counter in my pajamas, and I regret nothing.
Here's what makes these little beauties absolutely irresistible: they combine the dramatic theater of crème brûlée with the crowd-pleasing nature of cheesecake, all in perfect two-bite portions that make you feel classy even when you're eating them in your car. The contrast between that crisp sugar shell and the silky cheesecake below creates a textural experience that'll make your eyes roll back in your head. Plus, they're surprisingly forgiving — no water baths, no worrying about cracks, no need for culinary school techniques that require a steady hand and nerves of steel. I dare you to taste one and not immediately start plotting how soon you can make them again.
Picture yourself pulling these out of the fridge, the caramelized tops catching the light like tiny amber jewels. Your kitchen fills with that intoxicating vanilla-sugar aroma that makes everyone suddenly appear in the doorway asking what smells so incredible. The best part? These mini marvels are actually easier than making either dessert separately, and they look like something from a Parisian patisserie. Stay with me here — this is worth it. Let me walk you through every single step — by the end, you'll wonder how you ever made it any other way.
What Makes This Version Stand Out
Crackly Perfection: We're talking about that signature brûlée top that shatters like thin ice under your spoon, giving way to creamy cheesecake below. It's the textural contrast that makes people close their eyes when they take the first bite.
Mini Magic: Everything tastes better in miniature form, and these individual portions mean no awkward slicing or worrying about presentation. Plus, you can eat two and still feel virtuous — they're tiny, they don't count, right?
No Water Bath Drama: Unlike traditional crème brûlée that requires the precision of a Swiss watchmaker, these cheesecakes bake up perfectly without any finicky water bath nonsense. Just pop them in the oven and let them do their thing.
Make-Ahead Marvel: These actually get better after a day in the fridge, making them perfect for dinner parties or holiday prep. Caramelize the tops just before serving for maximum drama and that fresh brûlée crack.
Vanilla Bean Luxury: Using real vanilla beans instead of extract transforms these from good to absolutely transcendent. Those tiny black specks aren't just for show — they pack an aromatic punch that'll make your kitchen smell like a French bakery.
Foolproof Technique: Most recipes get this completely wrong by overcomplicating the process. My method uses a simple two-step baking approach that guarantees creamy centers and golden tops every single time.
Instagram Gold: Let's be honest — that moment when you crack the sugar top with a spoon is pure social media magic. Your friends will think you've been secretly attending culinary school.
Inside the Ingredient List
Every great recipe starts with understanding your ingredients — they're not just items on a shopping list, they're the cast of characters that'll make or break your final performance. When you understand what each component brings to the party, you can troubleshoot like a pro and even improvise when the mood strikes. These mini crème brûlée cheesecakes might look fancy, but they're built from humble ingredients that, when combined correctly, create pure magic. Think of it like a symphony — each instrument matters, but together they create something that'll make your taste buds sing.
The Flavor Foundation
Cream cheese is the star of our show, and not just any cream cheese — we're talking about the full-fat, nothing-but-the-good-stuff variety that creates that rich, tangy base we all know and love. Skimp here with low-fat versions and you'll end up with sad, rubbery little cakes that taste like diet food, which is absolutely not what we're going for. The sugar in our cheesecake portion isn't just for sweetness — it's crucial for texture, helping create that smooth, dense consistency that makes cheesecake so addictive. Vanilla beans are worth their weight in gold here; those tiny black specks are like caviar for dessert lovers, packed with aromatic compounds that fake vanilla extract can only dream of matching.
Eggs are the unsung heroes that'll hold everything together, providing structure and that silky texture that makes these little gems so irresistible. Don't even think about trying to make these without eggs — I've seen people attempt flax egg substitutes and the results were tragic, like cheesecake-flavored rubber balls. The heavy cream adds that luxurious richness that makes these feel special occasion-worthy, even when you're eating them on a random Tuesday night in your pajamas. If you've ever struggled with grainy cheesecake texture, I guarantee you skipped the cream or used something with a lower fat content.
The Texture Crew
Graham cracker crumbs form our crust foundation, providing that buttery, slightly sweet base that contrasts perfectly with the tangy cheesecake above. But here's where we get sneaky — we're adding a touch of brown sugar to amplify that caramel flavor that plays so beautifully with the brûléed top. The butter in our crust isn't just for flavor; it's the glue that holds everything together, creating that perfect snap when you bite through the base. Melted butter mixes more evenly with the crumbs, ensuring every bite has that golden, toasted flavor that makes people ask for your secret.
Speaking of secrets, let me confess something — I used to think all graham crackers were created equal until I accidentally bought the honey-flavored ones and discovered they create an entirely different flavor profile. The honey version adds this subtle floral note that makes people ask if you used some exotic ingredient they can't quite place. If you want to get really fancy, try using speculoos cookies for the base — it adds warm spices that'll make your kitchen smell like Christmas morning.
The Unexpected Star
Here's where we separate the amateurs from the pros — a touch of lemon zest in the cheesecake batter brightens everything up and makes the vanilla sing like it's performing at Carnegie Hall. This isn't about making lemon cheesecake; it's about adding that subtle acidic note that makes all the other flavors pop. Think of it like adding salt to caramel — it doesn't make it salty, it just makes the caramel taste more like itself. The lemon zest also helps cut through the richness, preventing these from feeling too heavy even after you've eaten your third one.
Kosher salt might seem counterintuitive in a dessert, but it's the difference between good and absolutely transcendent. Salt enhances sweetness and brings out the complex flavors in vanilla and cream cheese that would otherwise stay hidden. Don't skip this — I've made that mistake and the result was flat, one-dimensional cheesecakes that tasted like they were missing something. A pinch of salt is like the bass player in a band — you might not notice it's there, but you'd definitely notice if it was gone.
The Final Flourish
Granulated sugar for the brûlée top is where the magic happens, transforming from plain white crystals into liquid gold under the heat of your kitchen torch. This isn't the time for fancy sugars — plain white granulated creates the smoothest, most even caramelized surface that'll shatter like glass under your spoon. Brown sugar won't work here — it'll burn before it caramelizes properly, leaving you with a bitter, acrid mess that'll ruin your beautiful cheesecakes. The key is a thin, even layer that melts into a smooth sheet of caramel that'll set into that signature crackly top.
If you don't have a kitchen torch, don't panic — your broiler can work in a pinch, but you'll need to watch them like a hawk because they can go from perfect to burnt in the blink of an eye. I've lost more cheesecakes to broiler negligence than I care to admit, usually because I got distracted by my phone and returned to find blackened sugar tops that looked like volcanic rock. The torch gives you control — you can move it around, see exactly when the sugar melts, and create that perfect amber color that makes people think you've got secret pastry chef training.
Everything's prepped? Good. Let's get into the real action...
The Method — Step by Step
- First things first — let's get that crust sorted because nobody wants a soggy bottom. Grab your muffin tin and line it with paper liners, or if you're feeling fancy, cut parchment paper into little squares and press them into each cup. Mix your graham cracker crumbs with the brown sugar and a pinch of salt, then pour in that melted butter and stir until it looks like wet sand — you know, like you're at the beach but it smells like cookies instead of seaweed. Press about a tablespoon of this mixture into the bottom of each cup, really packing it down with the back of a spoon or your fingers. This is the foundation of our masterpiece, so don't be shy about pressing firmly — we want a solid base that won't crumble when we bite into these beauties later.
- Now for the fun part — time to get that cream cheese perfectly smooth and dreamy. Make sure your cream cheese is room temperature or you'll be fighting lumps that refuse to cooperate no matter how long you mix. Beat it on medium speed for about two minutes until it's light and fluffy, scraping down the sides of the bowl like your life depends on it. Add the sugar gradually, letting it incorporate fully before adding more — this prevents that grainy texture that ruins otherwise perfect cheesecakes. The mixture should look like thick clouds of vanilla-scented heaven, and when you taste it (you know you will), it should be smooth as silk with no sugar crystals crunching between your teeth.
- Here comes the game-changer — we're adding eggs one at a time, and this is where most people mess up by rushing. Each egg needs to be fully incorporated before adding the next, creating an emulsion that's stable and smooth. Think of it like building a relationship — you can't rush the good parts or everything falls apart. After each egg, scrape down the bowl and beat for about 30 seconds until you can't see any streaks of yellow. The batter should be getting lighter and fluffier with each addition, like it's gaining volume through some kind of dessert magic.
- Time to bring in the supporting cast — heavy cream, vanilla bean seeds, and that secret ingredient, lemon zest. Split your vanilla bean lengthwise and scrape out those precious black caviar-like seeds with the back of your knife. Add them along with the cream and lemon zest, mixing just until combined — overmixing here can incorporate too much air, leading to cracks during baking. The batter should coat your spatula like velvet and smell like the best ice cream shop you've ever visited. This is the moment of truth when you know you've got something special on your hands.
- Let's assemble these beauties — pour the batter over your prepared crusts, filling each cup about three-quarters full. Give the pan a gentle tap on the counter to release any air bubbles that might be lurking below the surface. These should look like little clouds of vanilla perfection, smooth and inviting with no bubbles breaking the surface. Don't worry if they seem to jiggle like loose pudding — that's exactly what we want for that creamy texture that'll make people weak in the knees.
- Baking time is where the magic happens, and this is where patience pays off big time. We're baking these at 325°F for about 20-25 minutes, but here's the secret — they should still have a slight jiggle in the center when you pull them out. They'll continue cooking from residual heat, and this prevents that dry, overbaked texture that ruins so many cheesecakes. The edges should be set and just starting to pull away from the sides of the papers, while the centers still move like gentle waves when you give the pan a shake.
- The cooling process is make-or-break time, and I learned this the hard way after eating too many cracked, sunken cheesecakes. Let them cool in the pan for about 10 minutes — this gradual cooling prevents the dramatic temperature change that causes cracks. Then move them to the fridge for at least 4 hours, but overnight is even better if you can stand the wait. This is when they transform from good to absolutely transcendent, developing that dense, creamy texture that makes grown adults close their eyes when they take a bite.
- Now for the grand finale — the brûlée top that'll make you feel like a restaurant magician. Just before serving, sprinkle a thin, even layer of sugar over each cheesecake — we're talking about a teaspoon per cake, just enough to create a complete coating when it melts. Fire up your kitchen torch and hold it about 2 inches from the surface, moving it in small circles as the sugar melts and caramelizes. Watch closely as it transforms from white crystals to liquid gold to amber perfection — this happens fast and there's no going back once it burns.
- The final test is that first crack — use the back of a spoon and tap gently on the brûléed surface. It should break like thin ice on a pond, creating irregular pieces that shatter beautifully. Serve these immediately for the full experience — that contrast between the warm, caramelized top and the cold, creamy cheesecake below is what dessert dreams are made of. I'll be honest — I ate half the batch before anyone else got to try it, standing at my kitchen counter in triumph, feeling like I'd just solved world hunger one mini cheesecake at a time.
That's it — you did it. But hold on, I've got a few more tricks that'll take this to another level...
Insider Tricks for Flawless Results
The Temperature Rule Nobody Follows
Here's the thing that separates the pros from the home cooks — temperature control is absolutely everything when it comes to cheesecake success. Your cream cheese, eggs, and cream should all be room temperature before you start mixing, and I'm not talking about "close enough" room temp. We're talking about ingredients that have been sitting out for at least an hour, maybe two if your kitchen runs cold. Cold cream cheese will never fully incorporate, leaving you with tiny lumps that ruin that silky texture we're after. Cold eggs can cause the fat to seize up, creating a curdled mess that no amount of mixing will fix.
But here's the real secret — your mixing bowl matters more than you think. A cold metal bowl straight from the cupboard can chill your ingredients as you mix, undoing all your careful room-temperature prep. Run hot water over your bowl for 30 seconds before you start, or better yet, give it a quick blast with a hair dryer on warm. This tiny step ensures everything stays at the perfect temperature for maximum smoothness. A friend tried skipping this step once — let's just say it didn't end well, and she ended up with cheesecake that looked like cottage cheese had a bad day.
Why Your Nose Knows Best
Most people rely on timers and visual cues, but here's what they don't teach you in cooking school — your nose is actually the best tool for knowing when these cheesecakes are perfectly baked. As they approach doneness, your kitchen will fill with this incredible aroma of vanilla and toasted cream that's like dessert aromatherapy. When you smell that rich, almost caramel-like scent, start checking for doneness — the edges should be set but the centers should still have a gentle wobble. This is where most recipes get it completely wrong by giving you a hard time that doesn't account for your specific oven, altitude, or the phases of the moon.
The smell test saved me from overbaking more times than I can count. Ovens vary wildly — my last apartment oven ran 25 degrees hot, while my current one is like baking in a gentle breeze. But the smell? That's universal. When it hits that perfect vanilla-cream perfume, you're about 2-3 minutes away from perfection. Pull them out then, and you'll nail it every single time. Trust your senses — they've been honed over thousands of years of human cooking evolution.
The 5-Minute Rest That Changes Everything
After you pull these from the oven, resist every instinct to immediately move them to the fridge. Let them sit in the pan for exactly five minutes — not four, not six — five. This brief rest allows the proteins to relax and the temperature to equalize, preventing those dreaded cracks that make your cheesecakes look like they've been through dessert warfare. During this time, they'll continue cooking gently from residual heat, finishing that perfect set we want without overbaking.
But here's the part that'll make you a believer — run a thin knife or offset spatula around each cheesecake during this rest period, loosening it from the sides of the cup. This tiny step prevents the cheesecake from sticking and cracking as it contracts during cooling. It's like giving each little cake its own personal space to chill out and relax. I learned this trick from a pastry chef who swore by it, and now I pass it on like culinary gospel. Your cheesecakes will emerge smooth and perfect, ready for their brûlée moment of glory.
Creative Twists and Variations
This recipe is a playground. Here are some of my favorite ways to switch things up:
Coffee Lover's Dream
Add a tablespoon of instant espresso powder to your cheesecake batter and watch coffee enthusiasts weep with joy. The bitter coffee notes play beautifully against the sweet vanilla base, creating a sophisticated flavor that'll make you feel like you're dining in a Parisian café. Top with a dusting of cocoa powder before adding the sugar for brûlée — the chocolate-coffee combination is absolutely lethal in the best possible way. These disappear faster than free samples at Costco, especially when served after dinner with a splash of Kahlúk.
Chocolate Orange Sophistication
Replace the lemon zest with orange zest and add a tablespoon of orange liqueur to the batter for a grown-up twist that tastes like those fancy chocolate oranges you get at Christmas. The citrus cuts through the richness while the orange adds this warm, sophisticated note that's perfect for winter dinner parties. Add a few dark chocolate shavings to the top before brûléeing — they'll melt slightly and create these gorgeous marbled patterns. If you've ever struggled with chocolate desserts being too heavy, this variation is your new best friend.
Salted Caramel Indulgence
Swirl in some homemade salted caramel before baking, but here's the trick — drop small dollops on top and use a toothpick to create beautiful marbled patterns. The salt enhances the sweetness while the caramel adds deep, burnt sugar notes that complement the brûlée top perfectly. Use fleur de sel if you're feeling fancy, or good old kosher salt if you're keeping it real. These taste like someone took the best parts of crème brûlée, cheesecake, and salted caramel and fused them together in dessert harmony.
Coconut Paradise
Replace half the cream with coconut cream and add shredded coconut to your crust for a tropical vacation in cheesecake form. The coconut adds this subtle perfume that transports you straight to a beach somewhere, even if you're eating them in your kitchen during a snowstorm. Toast the coconut first for maximum flavor impact — it brings out these nutty, caramel notes that'll make you wonder why you don't toast coconut for everything. Top with a sprinkle of toasted coconut flakes after brûléeing for extra texture and visual appeal.
Berry Blast Summer Edition
Add a spoonful of berry preserves to the bottom of each cup before adding the cheesecake batter — it creates a surprise fruit layer that bursts with flavor. Use raspberry for tang, strawberry for sweetness, or mixed berry for the full experience. The fruit layer adds moisture and prevents the crust from getting soggy, plus it creates these beautiful stained-glass effects when you bite into them. These are perfect for summer parties when you want something impressive but don't want to turn on the oven for hours.
Spiced Autumn Magic
Add cinnamon, nutmeg, and a hint of cardamom to your batter for a fall-inspired version that tastes like the best parts of pumpkin pie without any of the actual pumpkin. The warm spices complement the vanilla beautifully and make your kitchen smell like you've been baking all day. Top with candied pecans after brûléeing for crunch and those gorgeous autumn vibes. These are dangerously addictive — I once ate six while binge-watching my favorite show and didn't even feel guilty because they're mini, which means they don't count, right?
Storing and Bringing It Back to Life
Fridge Storage
These mini marvels will keep beautifully in the fridge for up to 5 days, but here's the key — store them un-brûléed and caramelize the tops just before serving for maximum crunch factor. Wrap them individually in plastic wrap, or better yet, store them in an airtight container with parchment paper between layers. The cheesecake portion actually gets better after a day or two as the flavors meld and deepen, becoming more complex and sophisticated. But whatever you do, don't add the sugar topping until you're ready to serve — it absorbs moisture from the air faster than a sponge in the Sahara and will go from crisp to sticky in about 30 minutes.
Freezer Friendly
These freeze like champions for up to 2 months, making them perfect for emergency dessert situations or unexpected guests. Wrap each cheesecake individually in plastic wrap, then pop them into a freezer bag — this double protection prevents freezer burn and keeps them tasting fresh. Thaw overnight in the fridge, then let them sit at room temperature for 30 minutes before adding the sugar and torching. The texture might be slightly denser after freezing, but honestly, most people can't tell the difference and they're still miles better than anything you'd buy at the store. I always keep a batch in my freezer for those moments when I need to feel like I've got my life together.
Best Reheating Method
While these are meant to be served cold, if your fridge runs extra cold and they've firmed up too much, let them sit at room temperature for 15-20 minutes before serving. This takes the chill off and allows the flavors to bloom — cold mutes flavors while room temperature lets all those vanilla notes sing. If you've already brûléed them and need to store leftovers (though I can't imagine why you'd have any), the sugar top will soften but you can re-torch it briefly to crisp it up again. Add a tiny splash of water to the container before re-covering — it creates just enough steam to keep the cheesecake from drying out without making the sugar soggy.