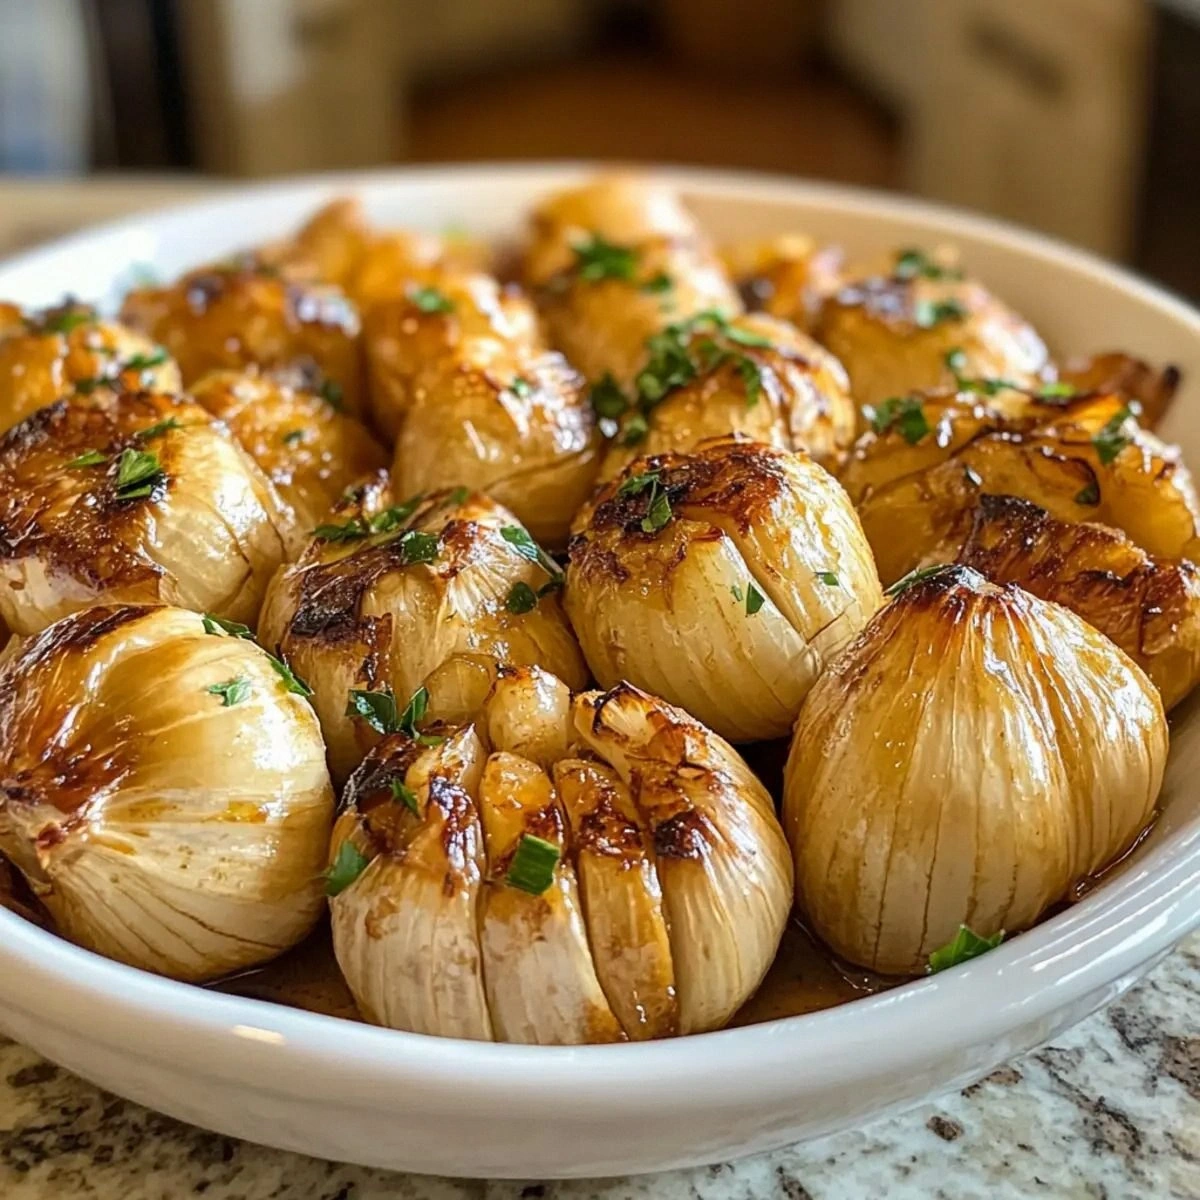
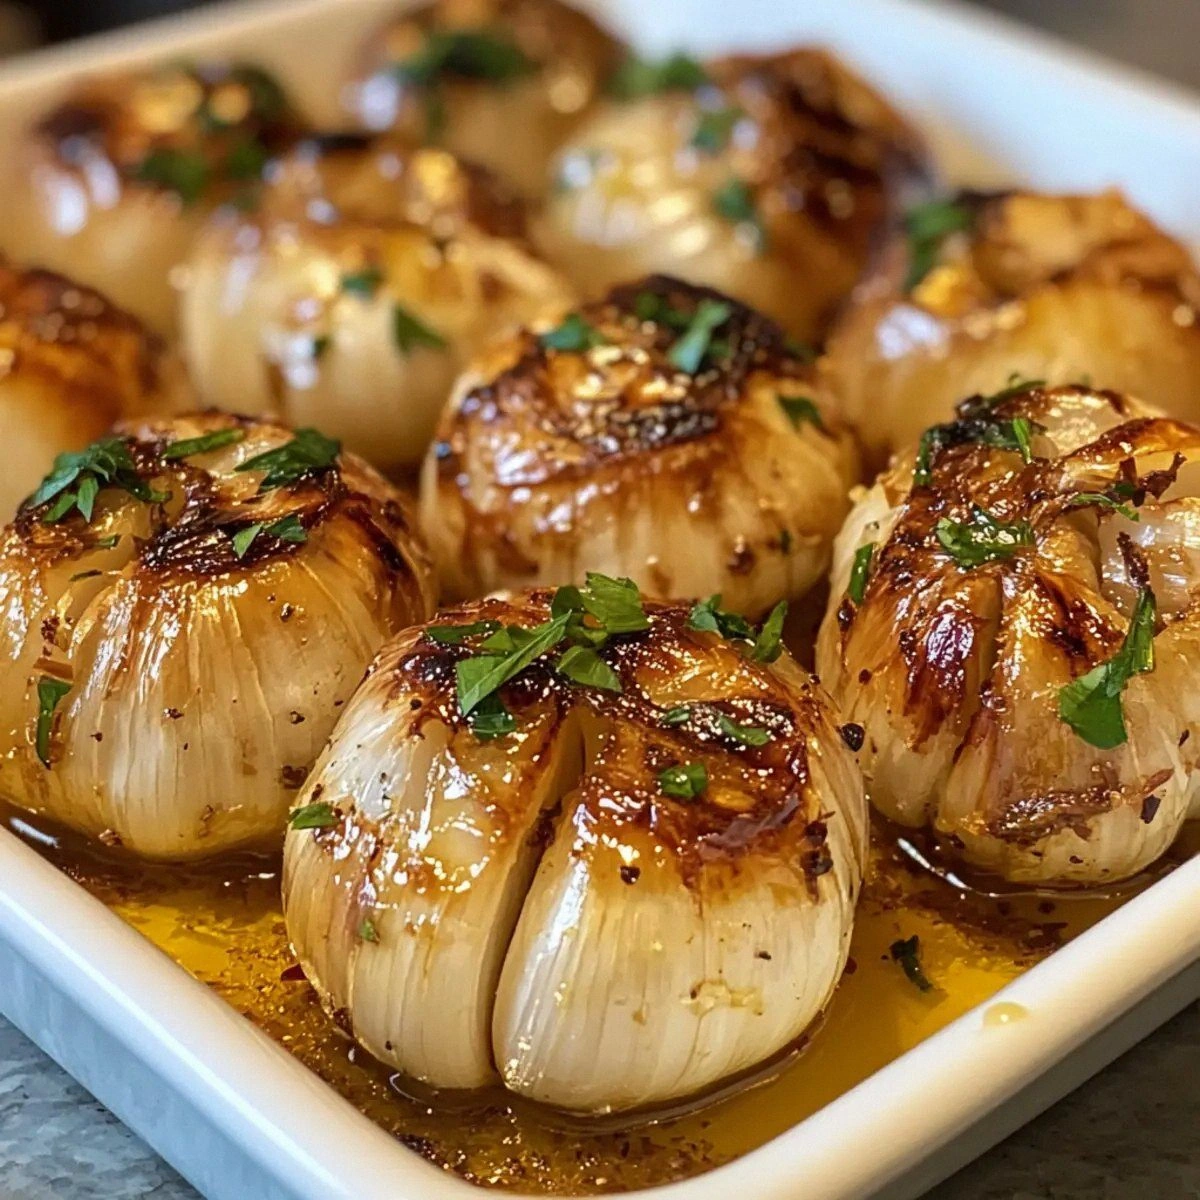
I’ll be honest — I ate half the batch before anyone else got a chance to try it, and that’s exactly why I’m shouting this from the rooftops. The first time I tossed a whole garlic bulb into an air fryer, the kitchen instantly turned into a perfume shop, the kind where you can’t decide if you’re smelling roasted caramel or sweet onion. I was in the middle of a frantic week, juggling Zoom calls, a toddler’s tantrums, and a looming deadline, when a friend dared me to “make something that actually smells good in a minute.” I laughed, I rolled my eyes, and then I grabbed the nearest air fryer, a couple of garlic heads, and a splash of olive oil. The result? A golden‑brown, buttery‑soft bulb that crackles when you bite into it like the first bite of a fresh apple, and a flavor that sticks to your palate like a good story you can’t stop retelling.
Picture yourself pulling these garlic bulbs out of the air fryer, the whole kitchen smelling like a Mediterranean market at sunset. The aroma is so intense it practically demands a standing ovation from anyone within a ten‑foot radius. When you cut into the bulb, the cloves separate with a gentle pop, each one drenched in a glossy coat of oil, speckled with a whisper of sea salt and cracked pepper. The texture is a paradox: the outer skin turns crispy enough to snap, while the interior stays so tender it practically melts in your mouth. And the best part? It takes exactly fifteen minutes from start to finish — that’s less time than it takes to microwave a frozen pizza, and the taste? Hands down the best version you’ll ever make at home.
Most recipes get this completely wrong. They either over‑cook the garlic until it turns bitter, or they under‑season it, leaving you with a bland, mushy mess. The secret to my version is a simple three‑step process: coat, air‑fry, and finish with a burst of fresh parsley. No fancy gadgets, no exotic spices, just pure, unadulterated garlic love amplified by the magic of hot‑air circulation. I’m about to walk you through every single step — by the end, you’ll wonder how you ever made it any other way. Okay, ready for the game‑changer?
What Makes This Version Stand Out
- Taste: The caramelized sweetness of the garlic is balanced by a subtle peppery bite, creating a flavor profile that feels both familiar and exciting.
- Texture: A crisp, golden skin gives way to buttery, melt‑in‑your‑mouth cloves that literally slide off the bulb with a gentle twist.
- Simplicity: Only five ingredients, no complicated steps, and the entire process fits into a single air‑fryer basket.
- Uniqueness: The quick 15‑minute prep means you can serve these as a spontaneous appetizer or a surprise side dish without breaking a sweat.
- Crowd Reaction: I dare you to taste this and not go back for seconds; even the most garlic‑averse guests end up begging for more.
- Ingredient Quality: Using large, fresh garlic bulbs ensures each clove is plump and full of natural sugars that caramelize perfectly.
- Cooking Method: The air fryer circulates hot air evenly, giving you that roasted finish without the need for a massive oven.
- Make‑Ahead Potential: These bulbs store beautifully, and a quick reheating blast revives the crispness as if they were fresh.
Alright, let's break down exactly what goes into this masterpiece...
Inside the Ingredient List
The Flavor Base
Four large garlic bulbs are the heart of this dish. Choose bulbs that feel heavy for their size; that weight means they’re packed with moisture and natural sugars, which are the secret to that caramelized crunch. If you grab a skinny bulb, you’ll end up with dry, under‑flavored cloves that crumble like old toast. A good rule of thumb: the skin should be tight but not papery, and the cloves should be firm to the touch. Swapping in shallots or onions might seem tempting, but they won’t give you that iconic “garlic‑but‑sweet” flavor profile.
The Texture Crew
Four tablespoons of olive oil act like a glossy veil, locking in moisture while allowing the outer skin to crisp up. I always recommend extra‑virgin olive oil for its peppery undertones; it adds a subtle depth that regular oil can’t match. If you’re watching calories, you can halve the oil, but expect a slightly less glossy finish. A splash of melted butter can be used as a substitute for a richer mouthfeel, but it may cause a bit more smoke in the air fryer, so keep an eye out.
The Unexpected Star
A generous pinch of salt and cracked black pepper are the unsung heroes that elevate the garlic from bland to brilliant. Salt draws out the natural sugars, encouraging that caramelization, while pepper adds a faint heat that balances the sweetness. If you’re on a low‑sodium diet, use a pinch of sea salt and a dash of smoked paprika for a different kind of depth. Remember, seasoning is an art — taste as you go, and never be afraid to adjust.
The Final Flourish
Minced fresh parsley provides a bright, herbaceous finish that cuts through the richness. Fresh parsley is preferred over dried because its volatile oils burst open when heated, releasing a fresh, almost citrusy note. If parsley isn’t your thing, try fresh cilantro for a slightly spicy twist, or a sprinkle of grated Parmesan for a cheesy edge. The parsley should be added after cooking, not before, to preserve its vivid green color and fresh flavor.
Everything's prepped? Good. Let's get into the real action...
The Method — Step by Step
First, give each garlic bulb a quick rinse under cold water, then pat them dry with a clean kitchen towel. This removes any lingering soil and ensures the oil adheres properly. I like to trim off the very tip of the root end just enough to expose a tiny bit of the inner flesh; this helps the oil seep in and prevents the bulb from steaming instead of roasting. The scent at this point is already teasing you — a faint earthy note that promises something big.
Kitchen Hack: Slice a thin sliver off the top of each bulb (just the skin) to create a “window” that lets the oil penetrate deeper, resulting in an even roast.Next, place the bulbs in a large mixing bowl and drizzle the four tablespoons of olive oil over them. Toss gently, using your hands or a silicone spatula, until every surface is shimmering with a thin coat of oil. You’ll notice the oil pooling in the crevices — that’s exactly where the magic happens. If you see any dry spots, add a few extra drops; uneven coating leads to uneven browning.
Now sprinkle a generous pinch of salt and a few cracks of black pepper over the bulbs. The key is to season while the oil is still wet, allowing the seasoning to cling. I always do a quick taste test by rubbing a tiny bit of the seasoned oil on my finger; if it’s salty enough, you’re good to go. Remember, the salt will draw out moisture, so don’t be shy.
Pre‑heat your air fryer to 390°F (200°C) for about three minutes. This pre‑heat step is crucial; it ensures the air fryer’s hot air hits the garlic the instant you load it, creating that instant sizzle and sealing in flavor. If your model doesn’t have a pre‑heat function, just run it empty for the same amount of time.
Arrange the coated bulbs in a single layer inside the air fryer basket, making sure they don’t touch. Overcrowding traps steam and prevents the skins from crisping. If you have a smaller basket, you may need to work in batches — the extra wait is worth the crunchy result.
Watch Out: If the bulbs are too close, they’ll steam instead of roast, resulting in a soggy texture. Give them breathing room!Set the timer for 12 minutes and let the air fryer work its magic. About halfway through (around the 6‑minute mark), pause the machine and give the basket a gentle shake or use tongs to rotate the bulbs. This ensures even browning on all sides. You’ll hear a faint crackle as the oil hits the hot air — that’s the sound of flavor forming.
When the timer dings, open the basket and check the color. The skins should be a deep golden‑brown, with a faint caramelized edge. If you prefer a darker crust, add an extra two minutes, but keep a close eye; garlic can go from perfectly caramelized to bitter in seconds.
Transfer the hot bulbs to a serving platter and immediately sprinkle the minced fresh parsley over them. The heat from the bulbs wilts the parsley just enough to release its aroma without turning it bitter. This final touch adds a pop of color and a fresh, herbaceous contrast to the rich garlic.
Kitchen Hack: Use a microplane to grate the parsley directly onto the hot bulbs; the fine shreds melt into the oil, creating a subtle green‑infused glaze.
That’s it — you did it. But hold on, I’ve got a few more tricks that’ll take this to another level. Picture the next time you serve these at a dinner party: guests will be lining up for seconds, and you’ll have the smug satisfaction of knowing you just nailed the ultimate garlic side in under a quarter of an hour.
Insider Tricks for Flawless Results
The Temperature Rule Nobody Follows
Most home cooks set the air fryer to “high” and assume more heat equals faster cooking. In reality, 390°F is the sweet spot for garlic because it’s hot enough to caramelize without burning. If you drop the temperature to 350°F, you’ll end up with a longer cook time and a less pronounced crust. I once tried 425°F hoping for extra crispiness, only to end up with a charred exterior and raw interior. Trust the 390°F rule and you’ll get that perfect golden‑brown skin every time.
Why Your Nose Knows Best
Your sense of smell is a far better indicator of doneness than a timer. When the garlic starts to give off a sweet, nutty aroma, you’re approaching the caramelization point. If the scent turns sharp or acrid, you’ve crossed into bitterness. I always keep the kitchen door slightly ajar so the aroma can waft out, signaling the exact moment to pull the bulbs out of the fryer.
The 5‑Minute Rest That Changes Everything
After the air fryer finishes, let the bulbs rest for five minutes before serving. This brief pause lets the internal steam redistribute, making the cloves even softer and allowing the oil to re‑coat the surface. Skipping this step can leave you with a hot, unevenly textured bite. Trust me, those five minutes are the difference between “good” and “mind‑blowing.”
The Olive Oil Swap Secret
If you’re looking for a richer flavor, replace half of the olive oil with melted ghee. Ghee’s high smoke point and buttery notes enhance the caramelization, giving the garlic a deeper, almost nutty finish. Just be careful not to use too much, or the bulbs will become greasy rather than crisp.
The Parsley Power Play
Fresh parsley is more than a garnish; it’s a flavor catalyst. I recommend chopping the parsley very finely and mixing it with a teaspoon of lemon zest before sprinkling it over the hot bulbs. The citrus brightens the palate and balances the richness, creating a symphony of flavors that dance on the tongue.
Creative Twists and Variations
This recipe is a playground. Here are some of my favorite ways to switch things up:
Spicy Sriracha Glaze
After the garlic is done, toss the bulbs in a mixture of 1 tablespoon sriracha, 1 teaspoon honey, and a splash of soy sauce. The heat from the sriracha pairs beautifully with the sweet caramelized garlic, making it a hit for anyone who loves a little kick.
Herb‑Infused Olive Oil
Infuse the olive oil with rosemary, thyme, and a clove of crushed garlic before coating the bulbs. The herbaceous notes seep into the garlic, creating a Mediterranean‑style flavor that’s perfect alongside grilled meats.
Cheesy Parmesan Crust
Just before the final two minutes of cooking, sprinkle a thin layer of grated Parmesan over the bulbs. The cheese melts and forms a crispy, salty crust that adds an umami boost.
Lemon‑Garlic Fusion
Squeeze fresh lemon juice over the bulbs right after they come out of the air fryer, then toss with zest and a pinch of sea salt. The acidity cuts through the richness, delivering a bright, refreshing bite.
Smoky Paprika Twist
Add a teaspoon of smoked paprika to the oil before coating. The smoky depth complements the natural sweetness of the garlic, making it an excellent side for BBQ dishes.
Storing and Bringing It Back to Life
Fridge Storage
Place cooled garlic bulbs in an airtight container and store them in the refrigerator for up to five days. The oil coating helps preserve the flavor, but for maximum crispness, reheat them before serving.
Freezer Friendly
Wrap each bulb tightly in parchment paper, then seal them in a zip‑top freezer bag. They’ll keep for up to three months. When you’re ready to eat, thaw in the fridge overnight and give them a quick 5‑minute blast at 380°F in the air fryer to revive the crisp exterior.
Best Reheating Method
Add a tiny splash (about a teaspoon) of water to the basket before reheating. The steam generated prevents the garlic from drying out, while the air fryer’s hot air restores the golden crust. A 3‑minute reheat at 350°F is usually sufficient.