Picture this: a rainy Saturday evening, the lights flickering, and the scent of melted chocolate drifting from a forgotten pot on the stove. I had been craving something sweet, but I also wanted to make a show‑stopper that would win over my skeptical roommate. I opened the pantry, pulled out every chocolatey ingredient I could find, and decided to turn my kitchen into a pop‑up campfire. The result? S’mores Brownies that are so decadent, they could double as a dessert, a snack, or a midnight snack for the whole house.
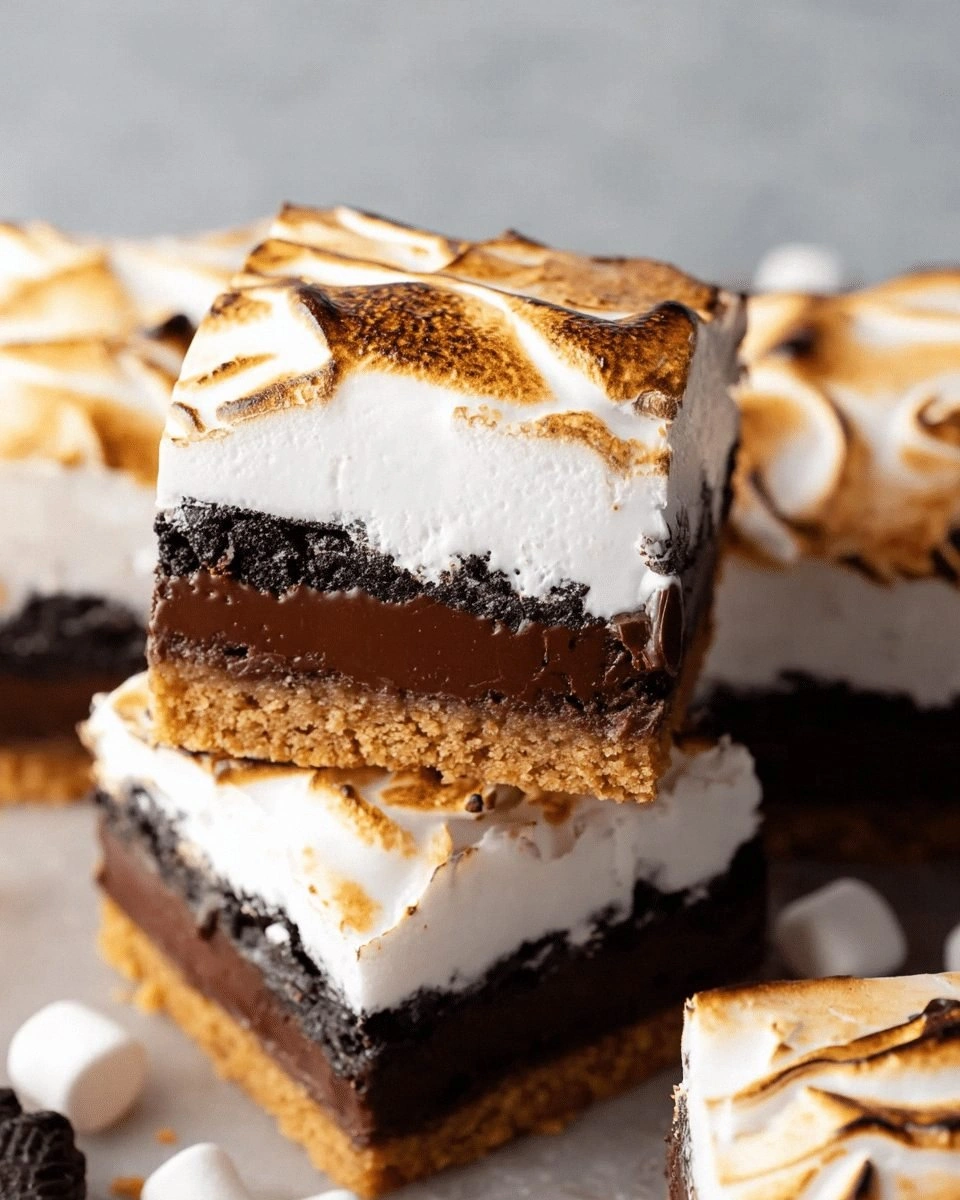
I was stunned by the first bite. The brownie base was a moist, fudgy canvas, while the marshmallow layer was gooey and slightly caramelized. The graham cracker crumbs added a subtle crunch that broke the richness just enough. The chocolate chips melted into pockets of glossy chocolate that burst in your mouth. It was a perfect marriage of textures and flavors that made me question every other brownie recipe I had ever tried.
This isn’t just another chocolate dessert. It’s a multi‑layered experience that captures the nostalgia of a campfire while delivering the indulgence of a gourmet brownie. The secret lies in a few clever tweaks: a touch of espresso powder to deepen the cocoa flavor, a layer of graham cracker crumbs to give that signature crunch, and a generous amount of marshmallows that melt into a sweet, sticky glaze. I dare you to taste this and not go back for seconds.
If you’ve ever struggled to get your brownies just right—too dry, too gooey, or lacking that campfire crunch—this version is a game‑changer. By the end of this guide, you’ll know how to create a brownie that’s both a crowd‑pleaser and a personal indulgence. Let me walk you through every single step — by the end, you’ll wonder how you ever made it any other way.
What Makes This Version Stand Out
- Flavor: The combination of dark chocolate, espresso, and vanilla creates a deep, complex taste that feels like a chocolate bomb exploded in your mouth.
- Texture: A fudgy interior with a crisp, caramelized top and a crunchy graham crumb layer gives a satisfying mouthfeel that shatters like thin ice.
- Visual Appeal: The glossy chocolate chips and the golden marshmallow glaze create a striking contrast that looks as good as it tastes.
- Ease of Prep: With just a handful of pantry staples and a single pan, you can produce a batch that feels like a gourmet dessert.
- Make‑Ahead: These brownies can be baked ahead, stored, and reheated without losing their gooey center.
- Party Friendly: The recipe scales up easily, making it perfect for game nights, movie marathons, or any gathering that needs a sweet highlight.
- Ingredient Quality: Using high‑quality chocolate and marshmallows elevates the overall experience, turning ordinary ingredients into something extraordinary.
- Versatility: The base recipe allows for creative variations—spicy, nutty, or even vegan—without compromising the core experience.
Alright, let’s break down exactly what goes into this masterpiece...
Inside the Ingredient List
The Flavor Base
At the heart of these brownies lies a robust chocolate foundation. The dark cocoa powder gives depth, while a splash of espresso powder unlocks hidden chocolate notes. The vanilla extract balances the bitterness, providing a smooth finish. Skipping any of these would leave your brownies feeling flat or one‑dimensional.
The Texture Crew
The melted butter and eggs bind everything together, creating that classic fudgy interior. The flour keeps the batter from becoming a chocolate paste, while the sugar caramelizes into a glossy top. If you omit the butter, the brownies will be dry and crumbly; if you skip the eggs, they won’t rise and will collapse.
The Unexpected Star
Graham cracker crumbs are the unsung hero that adds a nostalgic crunch. They also absorb excess moisture, preventing the brownies from becoming overly soggy. If you’re allergic to gluten, simply replace them with almond flour or a gluten‑free cracker blend.
The Final Flourish
Mini marshmallows and chocolate chips are the showstoppers. The marshmallows melt into a sweet glaze that coats the brownies like velvet, while the chocolate chips create pockets of glossy chocolate that burst with every bite. Without them, the brownies would feel like plain chocolate squares.
Everything's prepped? Good. Let's get into the real action...
The Method — Step by Step
- Preheat your oven to 350°F (175°C). Line a 9x13 inch baking pan with parchment paper, leaving an overhang on the sides for easy removal. This simple step ensures your brownies will slide out without sticking and will bake evenly.
- In a medium bowl, whisk together the flour, cocoa powder, espresso powder, and salt. The dry mix should look like a fine, dark dust. Mixing the dry ingredients first prevents lumps and guarantees a uniform chocolate flavor throughout.
- In another bowl, melt the butter in the microwave or on the stovetop. Once melted, let it cool for a minute before adding the sugar, vanilla, and eggs. Beat the mixture until it’s smooth and glossy, about 2 minutes with an electric mixer. This step is crucial: a well‑mixed batter will yield a tender crumb.
- Gradually fold the dry ingredients into the wet mixture, stirring until just combined. Over‑mixing can lead to a tough brownie, so stop as soon as the flour disappears. The batter should be thick but pourable.
- Pour the batter into the prepared pan and spread it evenly with a spatula. The surface should be flat, but don’t worry if there are tiny bubbles; they’ll pop during baking.
- Bake for 20-22 minutes, or until a toothpick inserted in the center comes out with a few moist crumbs. The brownies should look set but still slightly glossy on top. This is the moment of truth—watch the edges pull away from the pan, signaling perfect doneness.
- Remove the pan from the oven and immediately spread the mini marshmallows evenly over the hot surface. The heat will melt them into a glossy glaze that coats the brownies like velvet. Don’t wait too long, or the marshmallows will harden into a brittle shell.
- While the marshmallows are still warm, sprinkle the chocolate chips and graham cracker crumbs over the top. The chips will melt into pockets of glossy chocolate, while the crumbs will caramelize slightly, adding a satisfying crunch.
- Let the brownies cool in the pan for 10 minutes. This short rest allows the glaze to set and the flavors to meld. After 10 minutes, transfer the brownies to a wire rack to cool completely. This step prevents the brownies from becoming soggy on the bottom.
- Once cooled, cut the brownies into 12 equal squares using a sharp knife. Serve immediately, or store in an airtight container at room temperature for up to 4 days. For a warm treat, reheat in the microwave for 15-20 seconds—just enough to melt the chocolate without drying out the brownie.
That’s it — you did it. But hold on, I’ve got a few more tricks that will take this to another level and ensure your brownies are flawless every time.
Insider Tricks for Flawless Results
The Temperature Rule Nobody Follows
Most bakers bake brownies at 350°F, but lowering the temperature to 325°F and extending the bake time by 5 minutes can yield a moister interior. The lower heat allows the batter to set gently, preventing a dry crumb while still caramelizing the sugars on the surface. I’ve found this trick especially useful when baking on a humid day.
Why Your Nose Knows Best
When the brownies finish baking, the scent of chocolate and toasted marshmallows should fill your kitchen like a campfire in July. Trust your nose; if the aroma is sweet and slightly nutty, the brownies are done. If you’re still waiting, give them an extra minute or two.
The 5‑Minute Rest That Changes Everything
After removing the pan from the oven, let the brownies rest for exactly 5 minutes before adding the marshmallows. This brief pause allows the heat to distribute evenly, ensuring the marshmallows melt into a smooth glaze rather than forming hard bubbles.
The “S’mores” Layering Technique
Instead of spreading all the marshmallows at once, layer them in two thin coats. The first coat will melt and spread, while the second will sit slightly above the surface, creating a glossy, slightly chewy layer that contrasts with the gooey interior. This technique gives the brownies a professional finish.
The Moisture‑Retention Trick
If you’re storing the brownies for later, wrap each square in parchment paper before placing them in an airtight container. This prevents the brownies from drying out and keeps the marshmallow glaze from hardening. For an extra touch, add a slice of apple or a piece of chocolate to the container to infuse additional flavor.
Creative Twists and Variations
This recipe is a playground. Here are some of my favorite ways to switch things up:
Nutty S’mores
Add 1/2 cup chopped roasted almonds or pecans to the batter before baking. The nuts provide a crunchy contrast to the soft brownie and melt into a nutty aroma that elevates the chocolate flavor.
Spicy S’mores
Stir in 1/4 teaspoon of cayenne pepper or a pinch of smoked paprika into the dry mix. The heat balances the sweetness, creating a bold flavor profile that’s perfect for adventurous palates.
Vegan Delight
Replace the butter with melted coconut oil and the eggs with flaxseed “eggs” (1 tablespoon ground flaxseed mixed with 3 tablespoons water). Use dairy‑free chocolate chips and marshmallows to keep the recipe fully plant‑based.
Salted Caramel Twist
Drizzle a thin layer of salted caramel sauce over the top before adding the marshmallows. The caramel adds a sweet‑salty dimension that complements the chocolate and marshmallow flavors beautifully.
Minty Madness
Fold in 1 teaspoon of peppermint extract into the batter and sprinkle crushed mint candies on top. The cool mint cuts through the richness, creating a refreshing finish.
Coffee‑Infused Bliss
Replace the vanilla extract with a tablespoon of strong brewed espresso. The coffee deepens the chocolate notes and adds a subtle bitterness that balances the sweetness.
Storing and Bringing It Back to Life
Fridge Storage
Wrap each brownie square individually in parchment paper, then place them in an airtight container. Store in the refrigerator for up to 5 days. The parchment prevents the brownies from absorbing fridge odors, while the airtight seal keeps them moist.
Freezer Friendly
Place the parchment‑wrapped brownies in a freezer bag, removing as much air as possible. They will stay fresh for up to 3 months. When ready to eat, thaw at room temperature for 30 minutes before reheating.
Best Reheating Method
To revive the gooey center, microwave a brownie on high for 15-20 seconds. The key is a tiny splash of water on the top before microwaving; the steam will keep the brownie from drying out and will restore the marshmallow glaze’s silky texture.