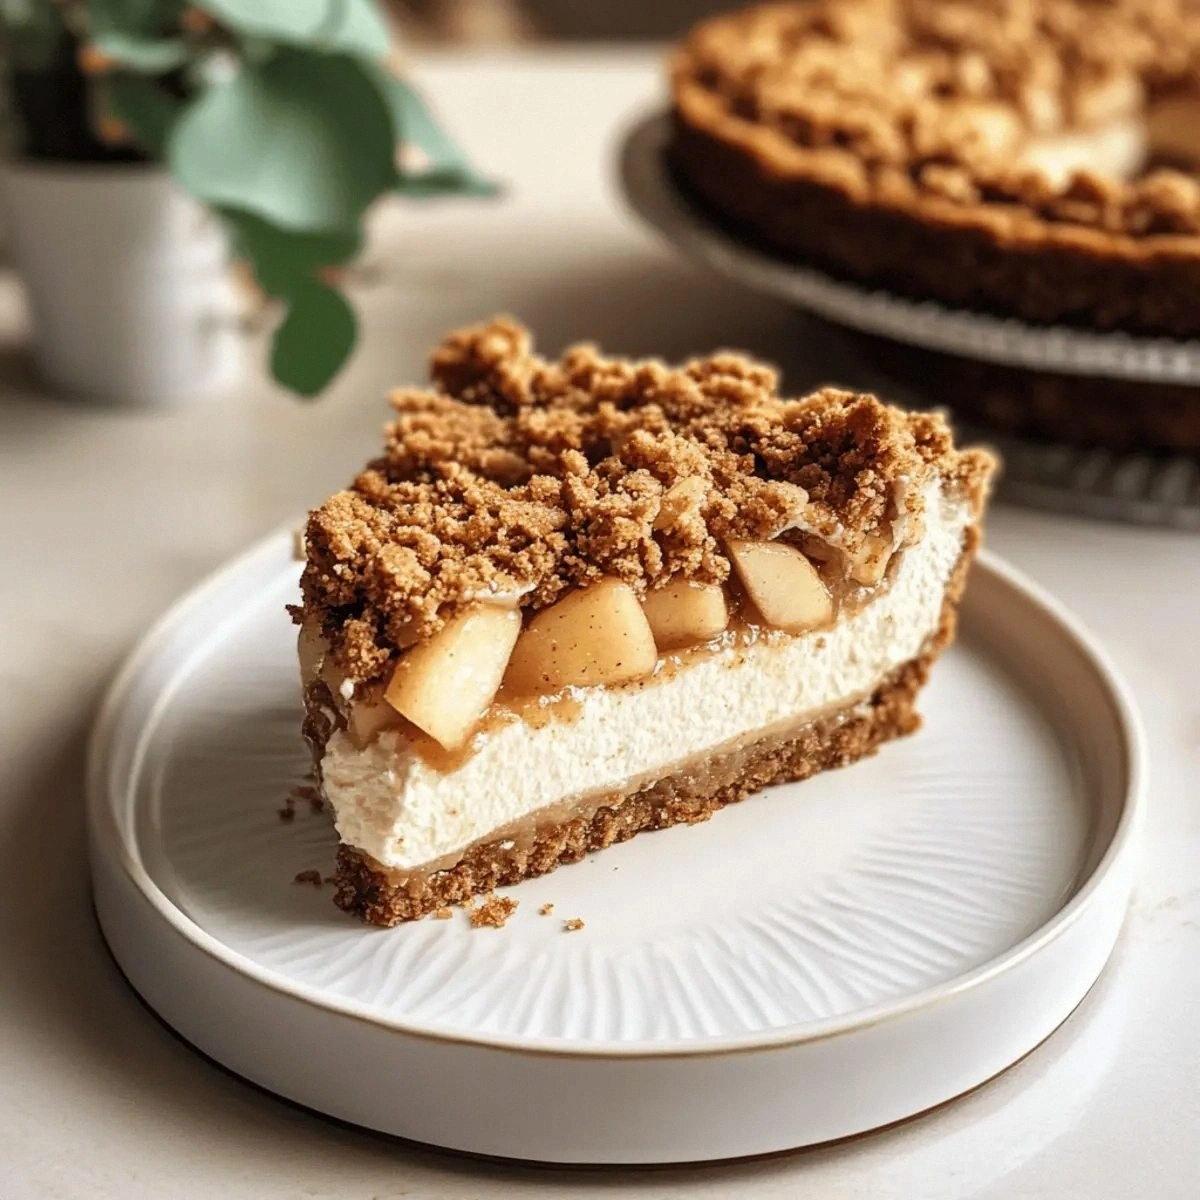
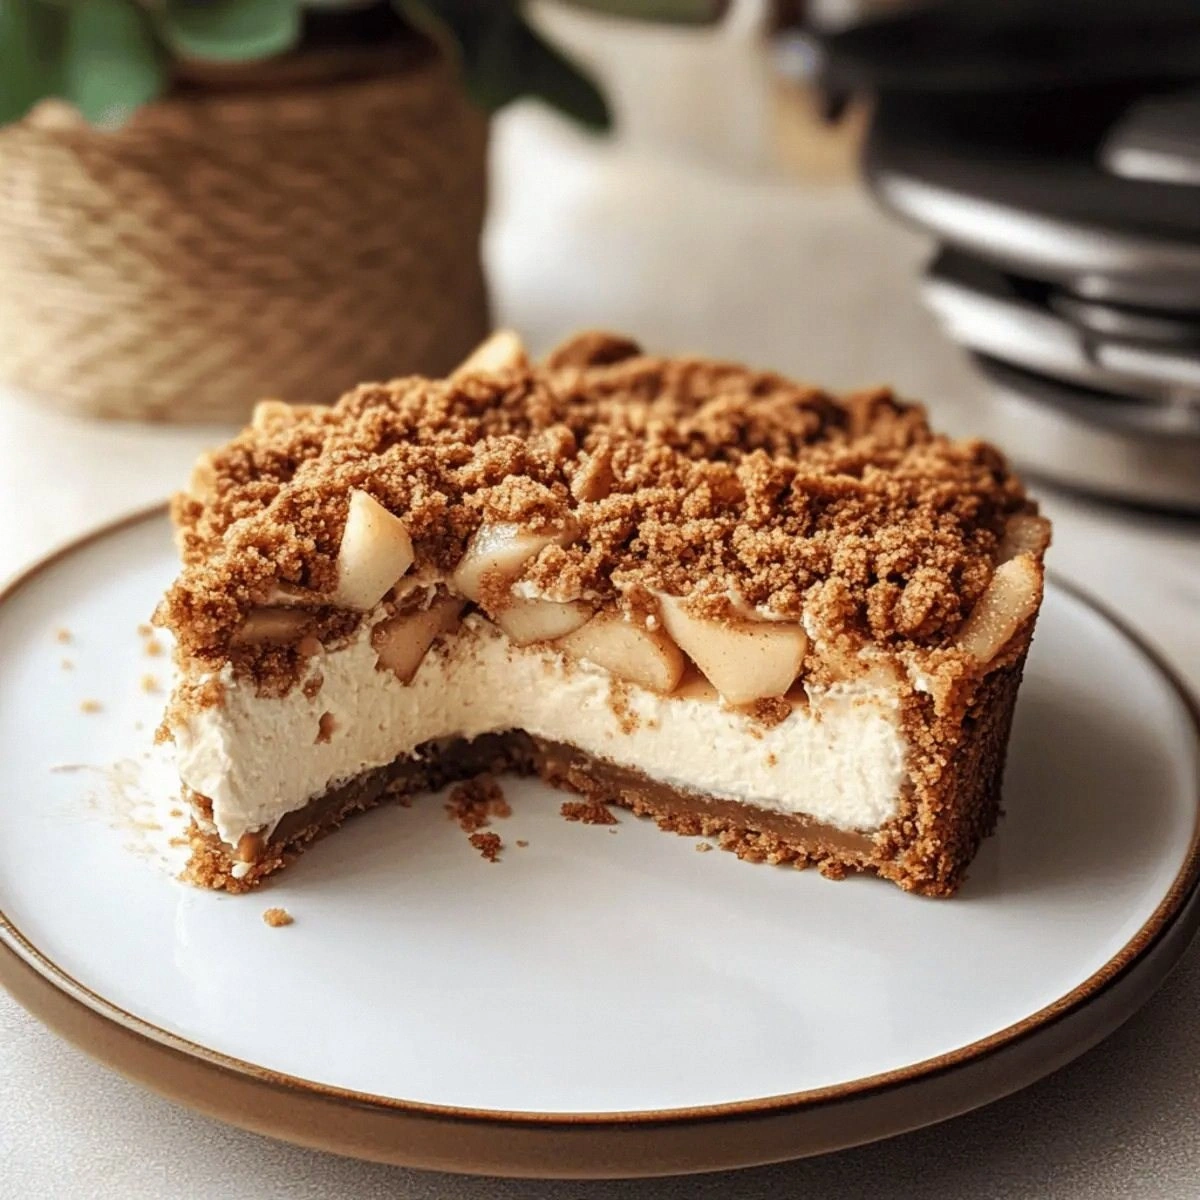
Picture this: a cold November evening, the wind howling outside like an over‑excited choir, and you’re stuck in the kitchen trying to salvage a batch of burnt apple crumble that smells more like regret than comfort. I was there, battling a sticky mess that refused to set, and in the heat of that culinary catastrophe I made a daring promise to myself – I would reinvent this dessert until it sang. The result? A cheesecake that doesn’t just sit on the plate, it performs a full‑blown autumnal symphony, with a buttery Biscoff crust, a tangy cream cheese center, and an apple crumble topping that crackles like fresh‑fallen leaves underfoot. I dare you to taste this and not go back for seconds; it’s hands down the best version you’ll ever make at home.
From the first whiff of caramelized apples mingling with warm spices, to the buttery crunch that gives way to a silky, velvety filling, this dessert is an orchestrated sensory overload. Imagine the aroma of cinnamon and nutmeg swirling around you, the sight of a golden‑brown crust that glistens like a sunrise over a pumpkin patch, the sound of the crust cracking as you slice through it, the feel of the creamy interior melting on your tongue, and the lingering taste of tart apple that makes your palate do a little happy dance. It’s the kind of dessert that makes the whole kitchen feel like a cozy cabin, with the oven acting as the roaring fireplace.
What truly separates this version from every other apple crumble cheesecake you’ve seen on a glossy Instagram feed is the secret weapon: Biscoff cookies. Those caramel‑spiced, buttery biscuits bring a depth of flavor that ordinary graham crackers could only dream of, and they create a crust that’s both crunchy and slightly chewy, like the perfect bite of a caramel apple. Most recipes get this completely wrong, using plain crumbs that drown in blandness. Here, the Biscoff base is the game‑changer, and the addition of rolled oats adds a rustic texture that feels like a warm hug.
But I’m not stopping at the crust. The filling is a balanced duet of cream cheese and Greek yogurt, giving you that classic cheesecake richness while the yogurt injects a subtle tang that cuts through the sweetness, preventing it from becoming cloying. And the apple topping? It’s tossed in cornstarch and spices, then baked until it’s just soft enough to melt in your mouth yet still holds its shape. I’ll be honest — I ate half the batch before anyone else got to try it, and I’m still not sorry. Okay, ready for the game‑changer? Let me walk you through every single step — by the end, you’ll wonder how you ever made it any other way.
What Makes This Version Stand Out
- Flavor Explosion: The Biscoff crust brings caramel‑spice notes that echo the apple topping, creating a harmonious flavor loop you’ll chase with every bite.
- Texture Symphony: Crunchy crust, creamy interior, and a slightly chewy crumble topping – each layer sings its own texture while supporting the others.
- Simplicity Meets Sophistication: Despite the impressive result, the ingredient list is short and the steps are straightforward, perfect for a weeknight treat.
- Unique Ingredient: Biscoff cookies replace bland graham crackers, giving the dessert an unexpected depth that most recipes lack.
- Crowd‑Pleaser: Even the pickiest eaters rave, because the tart apples balance the sweet crust and the creamy cheese base.
- Make‑Ahead Magic: This cheesecake can be assembled a day ahead, allowing the flavors to meld and the crust to set perfectly.
- Seasonal Vibes: The warm spices and apple base scream fall, yet the cheesecake’s richness makes it a year‑round comfort.
- Visual Wow Factor: When you pull it out of the oven, the golden crumble looks like a rustic masterpiece that begs to be photographed.
Inside the Ingredient List
The Flavor Base
First up, the Biscoff Cookies. These caramel‑spiced beauties are the backbone of the crust, delivering a deep, buttery flavor that ordinary crackers can’t match. If you skip them, you’ll lose that signature spice note that makes the dessert feel like a cozy autumn evening. As a swap, you can use speculoos cookies – they’re essentially the same thing, just a different brand.
Unsalted Butter is the glue that holds the crust together. Its richness coats each crumb, creating a melt‑in‑your‑mouth texture. Using salted butter would throw off the balance, making the crust unexpectedly salty. When buying, look for butter with at least 80% milkfat for that luxurious mouthfeel.
The Texture Crew
Rolled Oats add a rustic chew that contrasts beautifully with the smooth filling. They also absorb a tiny bit of butter, preventing the crust from becoming too dense. If you’re gluten‑free, swap in certified gluten‑free oats – the texture stays the same, and the flavor is unchanged.
All‑Purpose Flour helps bind the crust ingredients, giving the base a slight structure without making it cake‑like. You could replace it with almond flour for a nutty twist, but expect a softer crust that may need a longer chill time.
The Unexpected Star
Greek Yogurt is the secret hero of the filling. Its tang cuts through the richness of the cream cheese, keeping the overall taste from becoming cloying. If you don’t have Greek yogurt, plain full‑fat yogurt works, but strain it through cheesecloth for an hour to achieve the same thickness.
Brown Sugar adds a deep molasses flavor that pairs perfectly with the apples and spices. White granulated sugar would make the filling too sweet without the subtle caramel notes. For a healthier twist, try coconut sugar – it brings a hint of caramel and a lower glycemic index.
The Final Flourish
The spice blend – cinnamon, ginger, and nutmeg – is the aromatic heart of this dessert. Each spice contributes a distinct note: cinnamon brings warmth, ginger adds a gentle bite, and nutmeg offers an earthy sweetness. If you’re a spice‑a‑holic, feel free to add a pinch of clove for extra depth.
Eggs act as the structural backbone for the cheesecake, ensuring it sets without cracking. Over‑beating can incorporate too much air, leading to cracks; beat just until smooth. If you’re avoiding eggs, try a mixture of 1 tbsp cornstarch + 2 tbsp water per egg, though the texture will be slightly softer.
Everything's prepped? Good. Let's get into the real action...
The Method — Step by Step
Preheat your oven to 325°F (165°C). While the oven warms up, line the bottom of a 9‑inch springform pan with parchment paper – this prevents the crust from sticking and makes removal a breeze. In a food processor, blitz the Biscoff cookies and rolled oats until they resemble fine sand; this is where the magic begins. Melt the unsalted butter, pour it over the crumbs, and stir until every particle is glossy. The mixture should hold together when pressed with a finger – if it’s too dry, add a teaspoon of melted butter.
Kitchen Hack: Press the crust into the pan using the bottom of a measuring cup; this creates an even layer without any gaps.Transfer the crust mixture into the prepared pan, spreading it evenly and pressing firmly to create a solid base. Bake the crust for 10 minutes, just until it starts to turn a light golden hue. While the crust is in the oven, whisk together the cream cheese, granulated sugar, and brown sugar until the mixture is silky smooth – no lumps allowed. Add the Greek yogurt, vanilla extract, and spices, then continue mixing until everything is fully incorporated.
Watch Out: Over‑mixing the cheese filling can trap air, leading to cracks once the cheesecake cools. Stop mixing as soon as the batter looks glossy.In a separate bowl, toss the tart apple slices with cornstarch, a pinch of brown sugar, and the remaining spices. The cornstarch is crucial – it thickens the apple juices as they bake, preventing a soggy topping. Spread the apple mixture over the partially baked crust, arranging the slices in a decorative overlapping pattern. This not only looks gorgeous but also ensures even cooking.
Make a small well in the center of the apple layer and gently pour the cream cheese filling over the apples. Using a spatula, gently swirl the filling into the apple slices, creating a marbled effect that looks as good as it tastes. This is the moment of truth – you’re building the layers that will melt together in perfect harmony.
Pop the entire pan back into the oven and bake for 35‑40 minutes. The edges should be set and lightly browned, while the center will still wobble slightly – that’s exactly what you want. As the cheesecake bakes, the aroma of caramelized apples and toasted Biscoff will fill your kitchen, making it impossible to resist peeking.
Kitchen Hack: Turn off the oven, crack the door open a crack, and let the cheesecake sit for 1 hour. This gradual cooling prevents sudden temperature drops that cause cracks.While the cheesecake cools in the oven, prepare the crumble topping. Combine the remaining Biscoff crumbs, a tablespoon of melted butter, and a sprinkle of brown sugar. Toss until the mixture is evenly coated, then set aside – it will become the final golden crown once you bake it again.
After the hour‑in‑the‑oven rest, remove the cheesecake and let it cool completely on a wire rack. Once it reaches room temperature, spread the crumble topping evenly across the surface. Return the cheesecake to the oven for a final 10‑minute blast, just until the crumble turns a deep amber and releases a tantalizing caramel scent.
Refrigerate the cheesecake for at least 4 hours, preferably overnight. This chilling step lets the filling set firmly and the flavors meld into a harmonious whole. When you’re ready to serve, run a thin knife around the edge of the springform pan, release the latch, and gently lift the sides away. The result? A glossy, golden‑crusted masterpiece that looks like it belongs on a bakery showcase.
That's it — you did it. But hold on, I've got a few more tricks that'll take this to another level, from subtle flavor boosts to plating tips that will make your guests think you hired a pastry chef.
Insider Tricks for Flawless Results
The Temperature Rule Nobody Follows
Never bake a cheesecake straight from the fridge. Let the filling come to room temperature before mixing; this ensures the butter and cream cheese emulsify smoothly, preventing lumps. I once tried to skip this step, and the result was a grainy mess that looked more like a cheese dip than a dessert. Trust me, that’s a nightmare you don’t want to relive.
Why Your Nose Knows Best
Rely on scent, not just color, to gauge doneness. When the edges of the cheesecake turn a light golden brown and you catch a faint caramel note, you’re ready to pull it out. If you wait for the center to look completely set, you’ll end up with a dry, cracked top. Let your nose be the judge.
The 5‑Minute Rest That Changes Everything
After the cheesecake has cooled on the rack, give it a 5‑minute pause before adding the crumble topping. This brief rest lets the surface dry just enough so the crumble adheres without sliding off. It’s a tiny step that makes a massive difference in presentation.
Cold Water Splash for Reheating
When you’re ready to serve leftovers, place a small dish of water in the microwave with a slice of cheesecake and heat for 30 seconds. The steam revives the crumbly crust and restores the creamy interior, making it taste freshly baked.
Plate Like a Pro
For a restaurant‑style finish, drizzle a thin ribbon of caramel sauce across the plate, add a dollop of whipped cream, and sprinkle a pinch of toasted pecans. The contrast of textures and the glossy sauce elevate the humble dessert into a show‑stopper.
Creative Twists and Variations
This recipe is a playground. Here are some of my favorite ways to switch things up:
Maple‑Bacon Bliss
Swap half of the brown sugar in the crust for pure maple syrup and fold in crisp‑cooked bacon bits. The sweet‑savory combo adds depth and a smoky undertone that pairs beautifully with the apples.
Pear & Ginger Dream
Replace the tart apples with ripe Bartlett pears and increase the ginger to 1½ tsp. Pears bring a softer sweetness, while extra ginger adds a zing that cuts through the richness.
Chocolate Swirl
Stir ¼ cup melted dark chocolate into the cheesecake filling before pouring it over the apples. The chocolate ribbons create a decadent contrast that will wow any chocolate lover.
Nutty Crunch
Mix chopped toasted walnuts or pecans into the crumble topping for added crunch and a buttery nut flavor. This simple addition adds a new layer of texture without altering the core recipe.
Vegan Vibes
Swap the cream cheese for a vegan cream cheese alternative, use coconut yogurt instead of Greek yogurt, and replace the eggs with a flax‑egg mixture (1 tbsp ground flax + 3 tbsp water per egg). The result is a plant‑based version that still delivers on flavor.
Storing and Bringing It Back to Life
Fridge Storage
Cover the cheesecake loosely with foil or a cake dome and store it in the refrigerator for up to 5 days. The crust will stay crisp, and the filling remains creamy. For best texture, let it sit at room temperature for 15 minutes before serving.
Freezer Friendly
Slice the cheesecake, wrap each piece tightly in plastic wrap, then place them in a freezer‑safe bag. They’ll keep for up to 2 months. When you’re ready to enjoy, transfer a slice to the fridge overnight to thaw gently.
Best Reheating Method
Preheat your oven to 300°F (150°C). Place a slice on a parchment‑lined baking sheet, add a tiny splash of water to the edge of the plate, and cover loosely with foil. Heat for 8‑10 minutes until warmed through. The steam from the water revives the crumble, making it taste freshly baked.