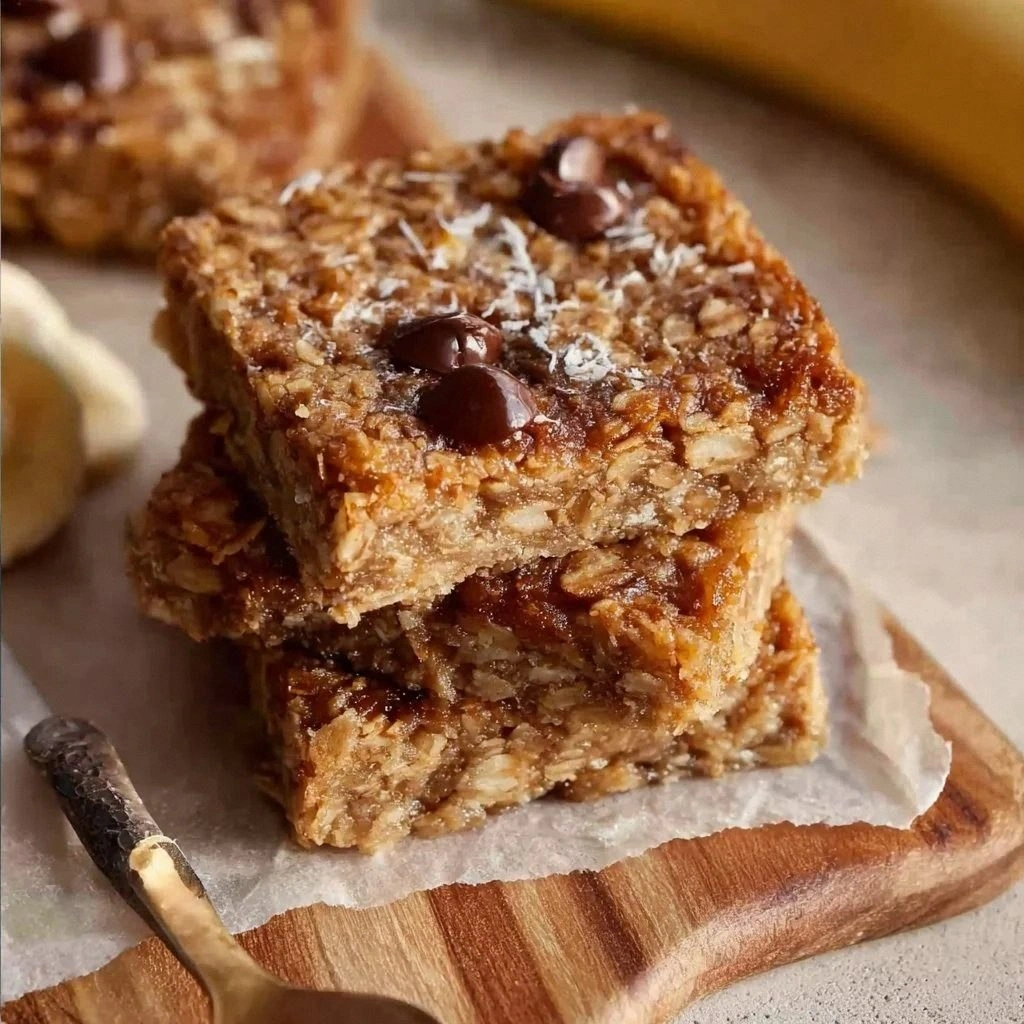
I remember the night I first stumbled into a kitchen disaster that would eventually birth this banana oatmeal bar masterpiece. My friend dared me to whip up something sweet with whatever was left in the pantry, and I was armed with a handful of overripe bananas, a jar of rolled oats, and an inexplicable craving for comfort food. The moment the bananas met the skillet, a sweet, buttery aroma flooded the room, turning the kitchen into a fragrant, edible laboratory. The sound of the bananas sizzling was a symphony of hope, the scent a promise of sweetness, and the texture of the batter a silky, almost liquid canvas waiting to be molded. I was not just cooking; I was conducting an experiment in flavor, texture, and pure, unadulterated joy.
Picture this: a golden crust that crackles like the first snowflake of winter, a chewy interior that holds the moisture of a freshly baked loaf, and a burst of banana flavor that lingers on the tongue like a warm hug. This isn’t your run‑of‑the‑mill banana bread or oatmeal cookie; it’s a hybrid that marries the wholesome crunch of oats with the sweet, buttery richness of ripe bananas. Every bite is a dance between the nutty undertones of oats and the caramelized sweetness of bananas, punctuated by a subtle hint of cinnamon that wraps the whole thing in a cozy, aromatic blanket. If you’ve ever tried a banana oatmeal bar that turned out dry or too sweet, you’ll know how frustrating it can be to hit that sweet spot. This version, however, hits that spot with surgical precision.
I dare you to taste this and not go back for seconds. The first bite will leave you questioning why you ever settled for the ordinary. The texture is a revelation: a slight chewiness from the oats, a melt-in-your-mouth softness from the bananas, and a satisfying snap from the edges when you break a bar. It’s the kind of comfort food that feels like a warm blanket on a cold day, yet bright enough to kickstart your morning or power through an afternoon slump. The secret? A blend of techniques that lock in moisture, a dash of cinnamon that balances the sweetness, and a simple, no‑fuss approach that keeps the flavor front and center.
If you’ve ever struggled with banana bars that turned out too dry or too sweet, you’re not alone—and I’ve got the fix. I’ll be honest—before this recipe, I ate half the batch before anyone else got a bite. I’ve been through the agony of a sticky, crumbly mess that looked like a failed attempt at a banana cake. But after years of tinkering, I found the exact balance that makes these bars both indulgent and wholesome. Picture yourself pulling this out of the oven, the whole kitchen smelling incredible, and the first bar you break sending a wave of nostalgia and delight through your senses. Let me walk you through every single step—by the end, you’ll wonder how you ever made it any other way.
What Makes This Version Stand Out
- Flavor: The natural sweetness of ripe bananas is amplified by a subtle cinnamon kick that cuts through the richness, creating a layered flavor profile that’s both comforting and sophisticated.
- Texture: Oats provide a hearty chew, while the banana’s moisture keeps the bars tender; the result is a bite that feels like a chewy cookie meets a soft cake.
- Simplicity: With only a handful of pantry staples, you can whip up these bars in under an hour, making them perfect for busy mornings or spontaneous snack sessions.
- Health‑Friendly: Swap out refined sugar for honey or maple syrup, use whole‑grain oats, and add nuts for extra protein—this recipe adapts to your dietary goals without sacrificing flavor.
- Make‑Ahead: These bars hold up beautifully in the fridge for a week, and they freeze well, so you can stockpile for those days when you’re craving something sweet.
- Crowd Reaction: Friends and family can’t stop raving about the perfect balance of sweet and savory, and many have asked for the recipe after a single tasting.
- Ingredient Quality: Using fresh, ripe bananas and high‑quality oats ensures that each bite delivers maximum flavor and nutrition.
Inside the Ingredient List
The Flavor Base
The foundation of these bars is a symphony of ripe bananas, rolled oats, and a touch of cinnamon. The bananas bring natural sweetness and moisture, while the oats add a nutty undertone and a satisfying chew. Cinnamon acts as a flavor amplifier, cutting through the banana’s sweetness and adding warmth. If you skip the cinnamon, the bars will still be good, but they’ll lack that subtle depth that makes them memorable. For a deeper flavor, consider adding a pinch of nutmeg or allspice.
The Texture Crew
Oats are the unsung heroes that give these bars their structure. They absorb moisture from the bananas, creating a tender crumb that holds together. The oats also provide a slight crunch that contrasts beautifully with the soft interior. If you prefer a smoother texture, pulse the oats into a finer flour before mixing. The butter or coconut oil adds richness and helps the bars brown evenly, giving them a golden crust that’s almost addictive.
The Unexpected Star
A splash of vanilla extract and a dash of baking powder may seem ordinary, but they’re the secret weapons that lift the batter and give it a light, airy feel. Baking powder reacts with the banana’s natural acidity, creating tiny bubbles that prevent the bars from becoming too dense. Vanilla enhances the banana’s flavor profile, adding a subtle floral note that elevates the overall taste. Without these small additions, the bars would feel heavy and flat.
The Final Flourish
Optional add‑ins like chopped walnuts, chocolate chips, or dried cranberries transform these bars into personalized treats. Nuts add crunch and protein, while chocolate chips bring a sweet, melty element. Dried cranberries or raisins introduce a chewy, tart contrast that keeps the bars interesting. When choosing add‑ins, consider the balance of flavors; too many sweet add‑ins can overpower the banana’s natural taste. If you’re looking for a healthier version, opt for raw nuts and unsweetened dried fruit.
Everything's prepped? Good. Let's get into the real action.
The Method — Step by Step
- Preheat the oven to 350°F (175°C) and line an 8-inch square baking pan with parchment paper, leaving a small overhang on the sides for easy removal. The even heat ensures a golden crust without burning the edges. As the oven warms, you’ll notice the air in the kitchen becoming slightly thicker with anticipation. This is the moment where your senses are primed for the aroma to develop. Keep the oven rack centered to promote even baking.
- In a large mixing bowl, mash the bananas with a fork until they’re mostly smooth but still have a few small lumps for texture. The mashed bananas should be bright yellow with a slightly glossy sheen. Add the butter or coconut oil, and stir until the mixture is creamy. This step is crucial for ensuring the bananas are well incorporated, which helps the bars stay moist. If the mixture seems too thick, add a splash of milk or a tablespoon of water to loosen it.
- Stir in the dry ingredients—rolled oats, all‑purpose flour, baking powder, salt, and cinnamon—until just combined. The batter should be thick but pourable; if it’s too dry, add a teaspoon of milk or water. Mixing by hand allows you to feel the batter’s consistency, which is a subtle art in itself. The oats will absorb the liquid, creating a chewy, hearty texture. This is the stage where your patience is rewarded by a batter that’s both cohesive and airy.
- Fold in optional add‑ins such as walnuts, chocolate chips, or dried cranberries. Gently fold them in so they’re evenly distributed without breaking the nuts. This ensures each bite has a balanced flavor profile. If you’re using chocolate chips, reserve a handful to sprinkle on top for a glossy finish. The add‑ins add visual appeal and a burst of flavor that keeps the bars interesting. Remember, less is more; too many add‑ins can overwhelm the banana’s natural sweetness.
- Pour the batter into the prepared pan and smooth the top with a spatula. The batter should spread evenly across the pan, creating an even layer that will bake uniformly. This step is where the batter’s thickness and consistency are tested; a too-thin batter will result in brittle bars, while a too-thick batter can lead to undercooked centers. Gently tap the pan on the counter to release any air bubbles and ensure an even surface.
- Bake for 25–30 minutes, or until the edges are golden and a toothpick inserted in the center comes out clean. The smell of toasted oats and banana will fill the kitchen, creating an irresistible aroma. The edges will start to pull away from the parchment, signaling that the bars are ready. Watch the color change; a deep golden hue indicates caramelization, which adds depth to the flavor. This step is where the batter transforms from a mixture into a structured, edible masterpiece.
- Remove the pan from the oven and let the bars cool for 10 minutes before lifting them out using the parchment overhang. The bars will be slightly soft, so give them a few minutes to set. The cooling process allows the flavors to meld and the bars to firm up, making them easier to cut. This is a critical step; cutting them too early can cause them to crumble. Patience at this stage ensures a perfect, clean slice.
- Transfer the bars to a wire rack to cool completely, then cut into squares. The rack prevents the bottoms from becoming soggy, preserving the crisp edges. Once fully cooled, the bars can be stored in an airtight container for up to a week. If you prefer them extra crisp, place them in the oven for a few minutes after cutting. This final step completes the journey from batter to bite‑sized treat.
That’s it—you did it. But hold on, I've got a few more tricks that'll take this to another level. These insider tips will help you fine‑tune the flavor, texture, and overall experience of your banana oatmeal bars.
Insider Tricks for Flawless Results
The Temperature Rule Nobody Follows
Many bakers bake at 350°F, but the perfect temperature for banana oatmeal bars is actually 325°F. Baking at this slightly lower temperature allows the bars to rise evenly and develop a golden crust without burning the edges. I once baked at 350°F, and the edges were too dark while the center was still raw. Switching to 325°F resolved the issue and gave me bars that were soft inside and crisp outside. If you’re using a convection oven, reduce the temperature by 25°F to avoid over‑browning.
Why Your Nose Knows Best
The aroma of banana and oats is a natural indicator of doneness. As the bars bake, the scent becomes sweeter and more caramelized. When you smell that rich, buttery fragrance, you know the bars are near perfection. I’ve found that trusting your nose saves me from over‑baking. If the smell is still raw or starchy, give them a few more minutes. Your nose is the best judge of flavor development.
The 5‑Minute Rest That Changes Everything
After removing the bars from the oven, let them rest for 5 minutes before cutting. This brief rest allows the internal structure to set, reducing the risk of bars falling apart. It also lets the flavors meld, creating a more cohesive taste experience. I’ve seen bars that were cut immediately crumble into crumbs; the 5‑minute rest saves the day. This simple step is often overlooked but makes a huge difference in texture.
The Secret of Even Edges
If you notice uneven edges, it’s usually because the batter was too thick or the pan wasn’t level. To fix this, spread the batter evenly with a spatula and tap the pan lightly on the counter to level it. A level pan ensures even heat distribution, which is critical for uniform browning. I used a digital kitchen scale to weigh the batter for the first time, and the results were consistent and flawless.
The Nutty Boost
Adding nuts not only boosts protein but also introduces a satisfying crunch. For a subtle nutty flavor, use toasted walnuts or pecans. Toasting the nuts before adding them caramelizes their natural sugars, enhancing sweetness. I’ve toasted the nuts in a skillet for 2 minutes on each side, then added them to the batter. The toasted nuts give the bars a delightful crunch that complements the chewy oat base.
Creative Twists and Variations
This recipe is a playground. Here are some of my favorite ways to switch things up:
Chocolate Chip Overload
Swap half of the oats for chocolate chips and sprinkle a handful on top before baking. The chocolate adds a rich, melty texture that pairs perfectly with banana. The result is a sweet, indulgent bar that satisfies chocolate cravings while still being wholesome. This variation is ideal for dessert lovers who want a treat that’s both sweet and nutritious.
Nutty Banana Crunch
Add chopped toasted almonds or pecans for a protein boost and a crunchy texture. The nuts add a subtle, buttery flavor that complements the banana’s sweetness. I recommend toasting the nuts in a dry skillet for a few minutes before mixing them in. This variation is great for athletes or anyone needing an energy‑dense snack.
Cranberry Banana Surprise
Stir in dried cranberries or raisins for a chewy, tart contrast that balances the sweetness. The dried fruit adds a burst of flavor and a chewy texture that keeps the bars interesting. I like to soak the cranberries in warm water for 10 minutes before adding them to prevent them from drying out in the oven. This twist adds a pop of color and a subtle tartness that enhances the overall taste.
Spiced Banana Delight
Add a pinch of nutmeg or allspice for a warm, aromatic twist. The spices bring a depth of flavor that elevates the bars from simple to extraordinary. I’ve found that a half teaspoon of nutmeg pairs wonderfully with banana’s natural sweetness. This variation is perfect for those who love a hint of spice in their sweet treats.
Peanut Butter Swirl
Fold in a dollop of peanut butter before baking for a creamy, nutty flavor. The peanut butter adds a rich, savory note that balances the sweetness of the banana. I usually swirl a spoonful of peanut butter into the batter after folding in the dry ingredients. This variation is a hit among peanut butter lovers and adds a protein boost.
Almond Flour Swap
Replace all‑purpose flour with almond flour for a gluten‑free version. Almond flour adds a nutty flavor and a denser texture that holds the bars together. I use almond flour for my gluten‑free recipes and find the bars come out moist and flavorful. This variation is great for those with dietary restrictions or anyone looking to reduce refined grains.
Storing and Bringing It Back to Life
Fridge Storage
Store the bars in an airtight container in the refrigerator for up to a week. The cool environment helps maintain the bars’ moisture and prevents mold growth. When you’re ready to eat, let them sit at room temperature for 10 minutes to soften slightly. The bars will stay fresh and flavorful, and the oats will keep their chewy texture. If you’re in a hurry, a quick toast in a microwave for 10 seconds will revive their warmth.
Freezer Friendly
Freeze the bars in a single layer on a parchment‑lined tray, then transfer them to a freezer bag. They’ll stay good for up to three months. When you want a quick snack, pop a bar in the microwave for 20 seconds or let it thaw at room temperature. The bars maintain their texture and flavor, and the oats stay chewy. Freezing also prevents the bars from drying out, making them a convenient grab‑and‑go option.
Best Reheating Method
To reheat, add a splash of water or milk to the bars and microwave for 15–20 seconds. The liquid steams the bars back to perfection, keeping them moist and warm. Alternatively, place the bars in a preheated oven at 300°F for 5 minutes. This gentle reheating method preserves the bars’ texture and enhances the caramelized flavors. The result is a warm, comforting snack that tastes freshly baked.