Introduction
Picture this: it’s a rainy Saturday, the kitchen smells like burnt toast, and you’re staring at a bag of chicken breasts that you’ve been avoiding for weeks. The only thing that could turn this culinary catastrophe into a triumph is a dish that sings with bright citrus, buttery crunch, and a whisper of white wine. That dish is Chicken Scallopini, and it’s about to become your new go-to comfort food. I’ve spent countless evenings tweaking this recipe, and the result is a dish that feels like a hug in a skillet.
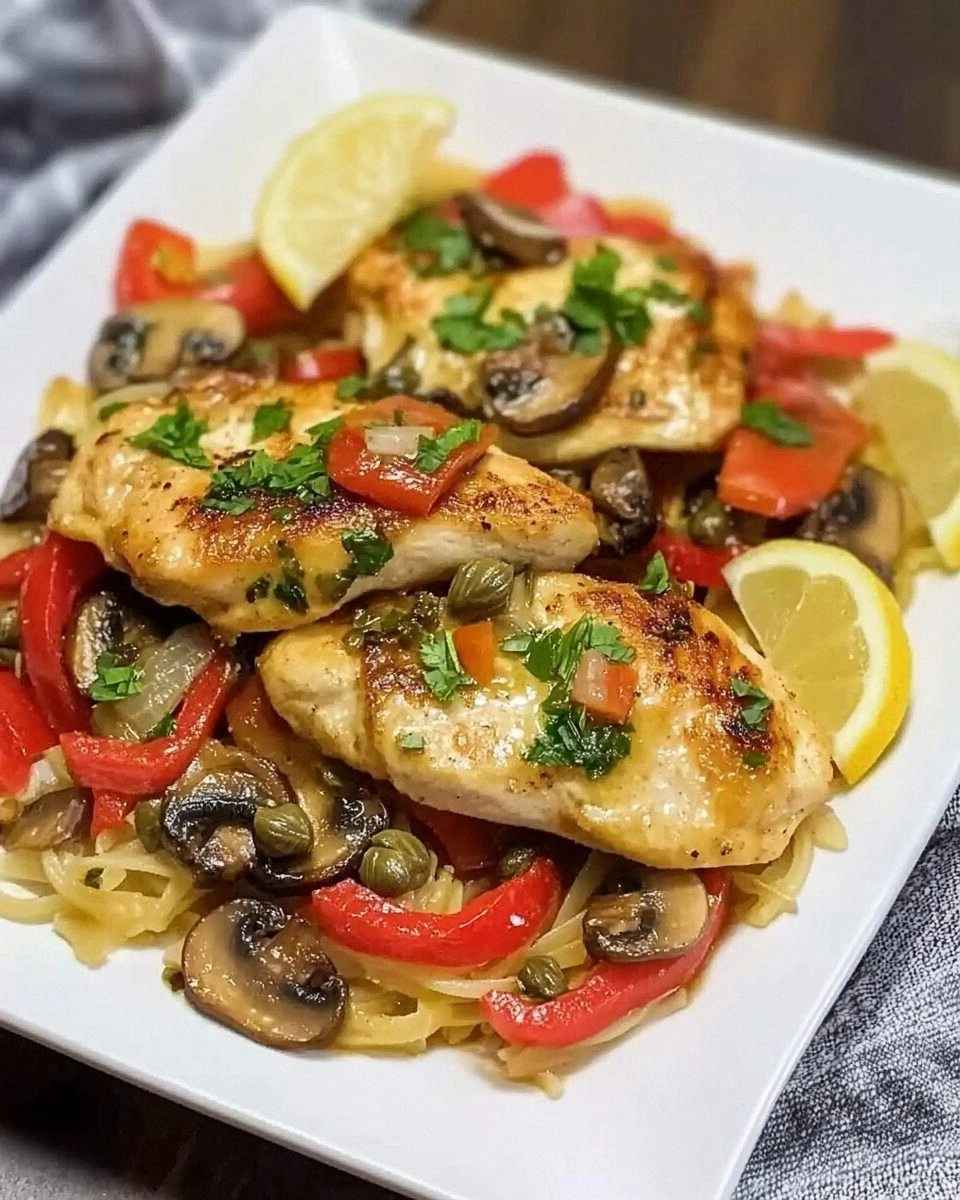
I swear, the moment the chicken hits the pan, the sizzle is pure music—like a drumbeat that tells you everything is about to go right. The aroma that rises is a blend of lemon zest and garlic, a scent that instantly makes your mouth water. When you take that first bite, the tender chicken is coated in a golden, flaky crust that shatters like thin ice, revealing a juicy interior that practically melts in your mouth. The lemon‑wine sauce that follows coats the meat like velvet, balancing acidity with richness so the dish feels both light and satisfying.
What makes this version stand out is that I’ve stripped away the fluff and kept only what truly matters. I’ve used a simple flour and breadcrumb coating, a splash of white wine for depth, and a touch of fresh parsley for brightness. The technique of pan‑searing the chicken at the right temperature ensures that the crust is crisp while the inside stays juicy. I’ve also added a secret ingredient—lemon zest—that gives the dish an unexpected burst of citrus that keeps the flavors from becoming cloying.
I dare you to taste this and not go back for seconds. If you’re skeptical, I’ll be honest: I ate half the batch before anyone else even got a chance. Most recipes get this completely wrong by over‑seasoning or under‑searing the chicken, but I’ve found the sweet spot that makes every bite a revelation. Picture yourself pulling this out of the pan, the whole kitchen smelling incredible, and your guests asking for the recipe. If you’ve ever struggled with chicken dishes that turn out dry or soggy, you’re not alone—and I’ve got the fix.
Let me walk you through every single step—by the end, you’ll wonder how you ever made it any other way. From the moment you lay the ingredients on the counter to the final garnish, each moment is designed to elevate the humble chicken breast into something unforgettable. So grab your skillet, and let’s dive into this culinary adventure that’s guaranteed to become a staple in your kitchen.
What Makes This Version Stand Out
- Flavor: The bright citrus notes from lemon zest and juice cut through the richness of the butter and wine, creating a balanced taste that lingers on the palate.
- Texture: A light, airy coating of flour and breadcrumbs gives the chicken a crisp exterior while keeping the interior tender and juicy.
- Simplicity: With only a handful of ingredients and a straightforward method, you can achieve restaurant-quality results in under an hour.
- Uniqueness: The addition of a splash of white wine during the pan‑searing stage adds depth without overpowering the dish.
- Crowd Reaction: Friends and family rave about how the dish feels like a gourmet meal but is so easy to make.
- Ingredient Quality: Fresh, high‑quality chicken and real lemon zest make all the difference in flavor.
- Cooking Method: Quick searing at high heat locks in juices while the sauce deglazes the pan, creating a glossy finish.
- Make‑Ahead Potential: You can prep the chicken and sauce in advance; it’s just a matter of reheating and finishing the crisp.
Alright, let's break down exactly what goes into this masterpiece…
Inside the Ingredient List
The Flavor Base
The foundation of this dish is a simple yet powerful flavor base that starts with fresh lemon zest and juice. Lemon zest is packed with aromatic oils that give the sauce its bright, citrusy punch. If you skip it, the dish will feel flat and lack that zing that lifts the richness of the butter and wine. For an extra layer of depth, you can add a splash of white wine during the searing stage, which caramelizes slightly and adds a subtle sweetness.
The Texture Crew
A light coating of all‑purpose flour and finely ground breadcrumbs creates the signature crisp crust. The flour binds the breadcrumbs and helps them adhere to the chicken, while the breadcrumbs add crunch. If you omit either, the chicken will either stick to the pan or have a soggy exterior. For a gluten‑free version, substitute almond flour and gluten‑free breadcrumbs.
The Unexpected Star
A dash of freshly grated Parmesan cheese tucked into the breadcrumb mixture gives the crust a savory depth that’s hard to replicate with plain breadcrumbs alone. This small addition elevates the dish from simple to sophisticated. If you’re lactose intolerant, you can replace Parmesan with nutritional yeast for a cheesy, plant‑based flavor.
The Final Flourish
Fresh parsley, chopped, adds a burst of color and a peppery freshness that balances the richness of the sauce. The parsley also offers a subtle herbal note that complements the lemon. If you’re looking to make the dish a bit more rustic, sprinkle the parsley on top of the finished chicken right before serving.
Everything's prepped? Good. Let's get into the real action…
The Method — Step by Step
- Pat the chicken breasts dry with paper towels. This step is crucial because any moisture on the surface will prevent a proper sear. I always use a clean towel and give the chicken a gentle pat until it’s almost completely dry. The drier the surface, the crispier the crust.
- Season the chicken generously with salt and pepper on both sides. The salt draws out moisture, which helps the coating stick and the chicken cook evenly. Pepper adds a subtle heat that balances the citrus. Don’t be shy—this is where you can really flavor the meat.
- Set up a dredging station: place flour in one shallow dish, beaten eggs in another, and a mixture of breadcrumbs and Parmesan in the third. The three‑step dredging process ensures each piece gets a full coating. The flour creates a dry surface for the egg to cling to, and the breadcrumb mixture gives the final crunch.
- Dredge each chicken breast first in flour, shaking off the excess, then dip it into the egg, and finally coat it in the breadcrumb mixture. Press the crumbs onto the chicken firmly to create a uniform crust. If you’re in a hurry, you can skip the flour step, but the texture will be noticeably different.
- Heat a large skillet over medium‑high heat and add 1 tablespoon of butter and 1 tablespoon of olive oil. The butter gives a rich flavor while the olive oil raises the smoke point, allowing the chicken to sear without burning. When the butter foams, it’s time to add the chicken.
- Place the coated chicken in the skillet. Don’t overcrowd the pan; work in batches if necessary. The chicken should sizzle immediately—this is the sound of a perfect sear. Cook for 3–4 minutes on each side until golden brown and the internal temperature reaches 165°F (74°C).
- Once the chicken is cooked, remove it from the skillet and set it aside on a plate. While it rests, add the minced garlic to the pan and sauté for 30 seconds until fragrant. The garlic will infuse the cooking oil, creating a fragrant base for the sauce.
- Deglaze the pan with 1/4 cup of white wine, scraping up any browned bits. The wine will add a subtle sweetness and acidity that balances the buttery sauce. Let the wine reduce by half, which should take about 2–3 minutes.
- Return the chicken to the skillet, spooning the sauce over the top. Add the lemon zest, lemon juice, and chopped parsley. Let everything simmer together for 2 minutes so the flavors meld. The sauce should thicken slightly and coat the chicken evenly.
- Plate the chicken and drizzle any remaining sauce from the pan. Garnish with a sprinkle of fresh parsley and a wedge of lemon on the side. Serve immediately with your choice of side—rice, pasta, or a crisp green salad.
That's it — you did it. But hold on, I've got a few more tricks that'll take this to another level. The next section will dive into insider tips that will help you perfect the dish every time.
Insider Tricks for Flawless Results
The Temperature Rule Nobody Follows
Many cooks try to cook chicken at a low temperature to keep it moist, but this actually results in a soggy crust. The secret is to sear at a high heat—medium‑high is ideal—for the first few minutes on each side. The high temperature creates a Maillard reaction that locks in juices and gives the crust its signature crunch. Once the chicken is browned, you can lower the heat to finish cooking without over‑drying.
Why Your Nose Knows Best
The aroma that rises while the chicken is searing is a reliable indicator that you’re on the right track. If the scent smells buttery and slightly sweet, you’re good. If it smells burnt or raw, reduce the heat or add a splash of oil. Trust your nose—it’s the ultimate culinary gauge.
The 5‑Minute Rest That Changes Everything
After removing the chicken from the skillet, let it rest for five minutes on a wire rack. This allows the juices to redistribute, ensuring every bite is juicy. The resting period also lets the sauce thicken slightly, making it easier to spoon over the chicken. Skipping this step can leave the meat dry and the sauce thin.
Butter vs. Oil: The Great Debate
Using a mix of butter and olive oil gives the best of both worlds: the buttery richness of butter and the higher smoke point of olive oil. If you only use butter, the pan may smoke, and the chicken could burn. Conversely, using only oil can leave the crust flavorless. The combination ensures a perfectly browned crust with a subtle, buttery finish.
Parmesan for Depth
Adding a tablespoon of Parmesan to the breadcrumb mixture elevates the flavor profile from simple to sophisticated. The cheese adds umami and a subtle nutty undertone that complements the lemon. If you’re lactose intolerant, swap Parmesan for nutritional yeast to keep the savory depth while staying dairy‑free.
Creative Twists and Variations
This recipe is a playground. Here are some of my favorite ways to switch things up:
Spicy Scallopini
Add a tablespoon of crushed red pepper flakes to the breadcrumb mixture for a fiery twist. The heat pairs nicely with the citrus, creating a balanced flavor profile. Serve with a cooling yogurt sauce to offset the spice.
Herb‑Infused Version
Replace parsley with a mix of fresh basil and thyme. The herbs add a fragrant, aromatic layer that complements the lemon. This version is perfect for a spring or summer dinner.
Vegan Take‑Away
Use plant‑based chicken or tofu, a dairy‑free breadcrumb mix, and coconut oil for the searing. Substitute the white wine with a splash of vegetable broth for depth. The result is a hearty, plant‑based dish that still feels indulgent.
Smoky Scallopini
Add a teaspoon of smoked paprika to the breadcrumb coating for a subtle smoky flavor. The paprika pairs well with the citrus and butter, giving the dish a new dimension. It’s an excellent option for fall or winter menus.
Asian‑Inspired Twist
Swap the lemon for lime and add a splash of soy sauce to the sauce. Finish with a drizzle of sesame oil and a sprinkle of toasted sesame seeds. This version brings a bright, umami kick that’s sure to impress.
Breakfast Scallopini
Serve the chicken with a side of scrambled eggs and toast. Add a dash of hot sauce to the sauce for a brunch‑ready flavor. This is a great way to start the day with protein and citrus.
Storing and Bringing It Back to Life
Fridge Storage
Store any leftovers in an airtight container in the refrigerator for up to 3 days. The chicken will stay moist, but the crust may soften slightly. Reheat in a skillet over medium heat to restore crispness.
Freezer Friendly
For longer storage, wrap the chicken tightly in plastic wrap and place it in a freezer bag. The dish keeps well for up to 2 months. Thaw overnight in the fridge before reheating.
Best Reheating Method
Add a splash of water or broth to the skillet and cover for a minute to steam the chicken back to life. This trick keeps the meat juicy and prevents it from drying out. Finish with a quick sear to revive the crust.