I was standing in my kitchen on a rainy Tuesday, the kind of day when you stare at the pantry like it's a crystal ball, hoping for a sign. My usual go‑to was a sugary banana loaf that tasted like a candy store, but my blood sugar was screaming for mercy after a marathon of meetings. I tossed three over‑ripe bananas into a bowl, stared at the empty sugar jar, and thought, “What if I could make something that feels like a hug without the sweet‑tooth punch?” The result was a loaf that turned my doubts into a daring culinary confession: this is hands down the best version you'll ever make at home. I dare you to taste this and not go back for seconds.
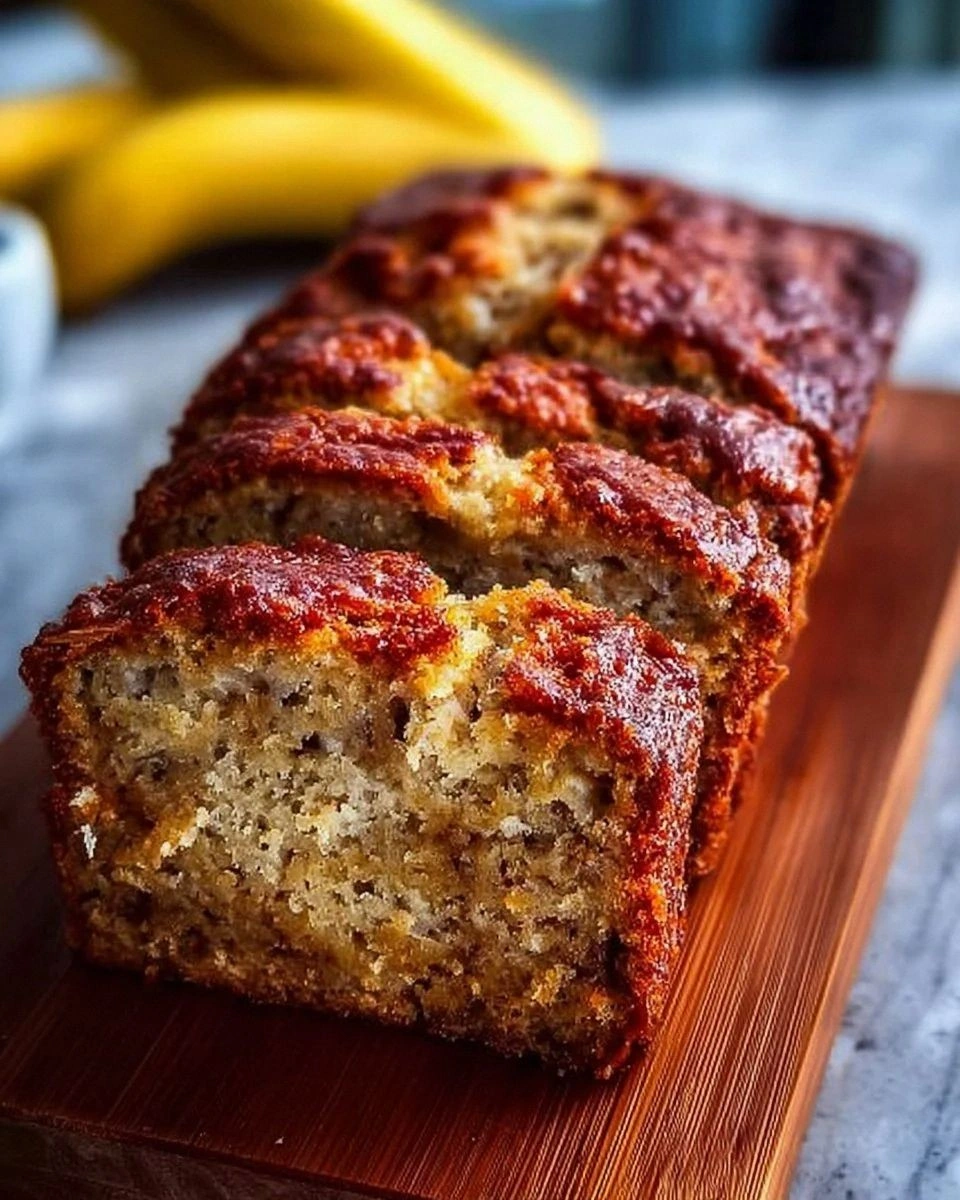
Picture this: the oven humming, the batter bubbling like a gentle brook, and the kitchen filling with a scent that whispers caramel, cinnamon, and toasted nuts. I could almost hear the loaf sigh as it rose, the crust cracking just enough to reveal a soft, moist interior that feels like a cloud made of banana. The texture is a perfect marriage of tender crumb and a subtle chew from the walnuts, while the flavor dances on the palate without a single grain of refined sugar. Most recipes get this completely wrong, either drowning the banana in artificial sweeteners or leaving the loaf dry as desert sand. Not this one.
The secret? I swapped out sugar for the natural sweetness of perfectly ripened bananas, used coconut oil for a buttery richness, and added a pinch of cinnamon that turns the whole thing into a warm, comforting hug. There’s also a tiny trick I’ll reveal later that makes the crumb stay moist for days—think of it as the culinary equivalent of a stay‑fresh seal. If you’ve ever struggled with a banana bread that collapses or tastes bland, you’re not alone — and I’ve got the fix.
Okay, ready for the game‑changer? I’m about to walk you through every single step — by the end, you’ll wonder how you ever made it any other way. Stay with me here — this is worth it.
What Makes This Version Stand Out
- Taste: The natural sugars in bananas do all the sweet work, while the coconut oil adds a subtle tropical note that makes every bite feel indulgent without any added sugar.
- Texture: A tender crumb that’s moist in the middle, with a lightly crisp edge that shatters like thin ice when you slice through it.
- Simplicity: Only eight ingredients, all pantry staples, and a method that even a kitchen rookie can master on the first try.
- Uniqueness: No artificial sweeteners, no fancy flours—just the classic all‑purpose flour that gives a familiar, comforting bite.
- Crowd Reaction: Friends who think they’re allergic to “healthy” desserts will rave, and even the kids will ask for seconds without knowing it’s sugar‑free.
- Ingredient Quality: Ripe bananas are the star; the more black‑spotted, the sweeter and more aromatic the loaf becomes.
- Cooking Method: A gentle bake at 350°F that lets the batter rise slowly, preventing a gummy center.
- Make‑Ahead Potential: This loaf freezes beautifully, so you can bake a batch and stash it for quick breakfasts all week long.
Inside the Ingredient List
The Flavor Base
Three large ripe bananas are the heart and soul of this loaf. Their natural sugars replace refined sugar, and the extra sugars caramelize during baking, creating those golden brown edges that look like they were brushed with sunshine. If you skip the bananas, you’ll lose the sweetness and moisture, ending up with a dry, crumbly disaster. Swap tip: If you’re out of bananas, try 1 cup of unsweetened applesauce, but expect a lighter flavor.
The Moisture Crew
One‑third cup of melted coconut oil (or any neutral oil) does more than just add fat; it creates a tender crumb that feels like a soft pillow. Coconut oil solidifies at room temperature, giving the loaf a subtle richness without the heaviness of butter. If you use butter, the loaf will be richer but also denser. Buying tip: Choose virgin coconut oil for a faint coconut aroma, or refined for a neutral profile.
The Unexpected Star
A teaspoon of vanilla extract is the quiet magician that lifts the entire flavor profile, making the banana taste even sweeter without extra sugar. It also balances the earthiness of the flour. If you’re out of vanilla, a splash of almond extract works, but use half the amount—it can easily overpower.
The Texture Crew
A teaspoon of ground cinnamon adds warmth and a faint spice that makes the loaf feel like a cozy autumn morning, even in summer. Baking soda is the leavening hero that reacts with the banana’s acidity, giving the bread its rise without the need for yeast. A pinch of salt amplifies every flavor, acting like the conductor of an orchestra. Skipping the baking soda will result in a dense, flat loaf that looks more like a pancake than bread.
The Final Flourish
One and a half cups of all‑purpose flour provide the structure, while half a cup of chopped nuts or walnuts introduces a crunchy surprise that contrasts the soft crumb. The nuts also add healthy fats and a pleasant nutty aroma. If you’re allergic, substitute with sunflower seeds or omit entirely, but you’ll lose that satisfying crunch.
Everything's prepped? Good. Let's get into the real action...
The Method — Step by Step
Preheat your oven to 350°F (175°C) and line a 9×5‑inch loaf pan with parchment paper, letting the edges overhang for an easy lift later. While the oven warms, place a rack in the middle position; this ensures even heat distribution and prevents the top from browning too fast. Pro tip: If you love a crispier crust, brush the pan lightly with a teaspoon of melted coconut oil before adding the batter.
In a large mixing bowl, mash the three ripe bananas with a fork until they’re almost liquid, leaving a few small lumps for texture. This is the moment where the bananas release their natural sugars, creating a sweet aroma that fills the kitchen like a summer breeze.
Kitchen Hack: Add the melted coconut oil while you mash; the heat helps the bananas break down faster.Stir in the 1/3 cup melted coconut oil, the teaspoon of vanilla extract, and the teaspoon of ground cinnamon. The mixture should become glossy and fragrant, like a tropical perfume. This is the stage where the flavors start to meld, and you’ll notice the batter thickening slightly as the oil emulsifies with the banana puree.
In a separate bowl, whisk together the 1 1/2 cups of all‑purpose flour, the teaspoon of baking soda, and a pinch of salt. Whisking ensures the baking soda is evenly distributed, preventing pockets of bitterness.
Watch Out: Over‑mixing at this point will develop gluten, leading to a tough loaf.Gently fold the dry ingredients into the wet banana mixture using a rubber spatula. The batter should look thick but still pourable; you’re aiming for a “soft‑serve ice cream” consistency. Stop mixing the moment you no longer see streaks of flour—this preserves the tender crumb.
Fold in the half‑cup of chopped nuts or walnuts, distributing them evenly throughout the batter. The nuts should be visible as specks of brown, promising a crunchy bite in every slice. If you’re adding dried fruit, this is the perfect moment to toss them in as well.
Pour the batter into the prepared loaf pan, smoothing the top with the back of a spoon. Tap the pan lightly on the counter three times; this releases any trapped air bubbles and gives the loaf a uniform rise. The surface should look slightly domed—don’t worry, it will flatten as it bakes.
Slide the pan into the oven and bake for 30‑35 minutes, or until a toothpick inserted into the center emerges clean with just a few crumbs attached. Around the 20‑minute mark, rotate the pan 180° to ensure even browning. Sensory checkpoint: You’ll hear a faint crackle as the crust sets, and the kitchen will be awash with a warm, nutty aroma that makes you want to peek inside.
Remove the loaf from the oven and let it cool in the pan for ten minutes, then lift it out using the parchment overhang and transfer to a wire rack. Cooling on a rack prevents the bottom from steaming and getting soggy. While it cools, resist the urge to slice—letting it rest allows the crumb to set, making clean slices later.
That's it — you did it. But hold on, I've got a few more tricks that'll take this to another level...
Insider Tricks for Flawless Results
The Temperature Rule Nobody Follows
Never bake banana bread at a temperature higher than 350°F. Higher heat creates a crust that forms before the interior has a chance to set, leading to a gummy middle. I once cranked the oven to 400°F thinking “more heat, faster bake,” and ended up with a loaf that looked perfect on the outside but was raw in the center. Keep it steady, and you’ll get that even, golden dome every time.
Why Your Nose Knows Best
Your sense of smell is a more reliable indicator than a timer. When the loaf starts to emit a sweet, caramel‑nut aroma, you’re within five minutes of perfect doneness. If you’re still unsure, give the loaf a gentle tap; it should sound hollow. Trusting your nose prevents over‑baking, which can dry out the crumb.
The 5‑Minute Rest That Changes Everything
After removing the loaf from the pan, let it rest on the rack for at least five minutes before slicing. This short rest lets the steam redistribute, making the crumb moist and the slices cleaner. I once sliced immediately and got a crumbly mess that fell apart like dry sand. Those five minutes are a game‑changer.
The Walnut Toast Trick
Toast the walnuts for three minutes in a dry skillet before folding them in. Toasting intensifies their flavor and adds a toasty crunch that elevates the whole loaf. A friend once skipped this step and complained the nuts tasted “bland.” Don’t make that mistake.
The Moisture Lock Hack
Wrap the cooled loaf in a clean kitchen towel, then place it inside an airtight container. The towel absorbs excess moisture while the container traps steam, keeping the bread soft for up to three days. I swear this trick is why my loaf stayed as fresh as day one for a full week.
Creative Twists and Variations
This recipe is a playground. Here are some of my favorite ways to switch things up:
Chocolate Chip Delight
Swap half of the walnuts for ½ cup of sugar‑free dark chocolate chips. The chocolate melts into pockets of gooey bliss, turning the loaf into a dessert that feels indulgent yet guilt‑free. Perfect for kids who love chocolate but need a healthier snack.
Coconut‑Lime Breeze
Add 2 tablespoons of shredded unsweetened coconut and the zest of one lime to the batter. The coconut gives a tropical texture, while the lime zest adds a bright, citrusy punch that cuts through the richness. Serve with a dollop of coconut‑yogurt for a brunch treat.
Apple Cinnamon Swirl
Fold in ½ cup of finely diced apples and an extra teaspoon of cinnamon. The apples release juices that keep the loaf extra moist, and the double cinnamon makes it feel like a warm fall morning. Great for autumn gatherings.
Protein Power
Replace ¼ cup of the flour with a scoop (about 30 g) of vanilla whey protein powder. This boosts the protein content without altering the texture too much, making the loaf a post‑workout snack. I’ve tried it and the loaf stays fluffy, with a subtle vanilla note.
Spiced Pumpkin Fusion
Swap one banana for ½ cup of pumpkin puree and add a pinch of nutmeg and ginger. The pumpkin adds earthy depth, while the spices create a comforting flavor profile perfect for Halloween or Thanksgiving. The loaf turns a beautiful amber color.
Storing and Bringing It Back to Life
Fridge Storage
Wrap the cooled loaf tightly in plastic wrap or store it in an airtight container. It will stay fresh for up to five days in the refrigerator. The banana moisture helps prevent staleness, but a quick slice of lemon juice on the surface can keep the crust from drying out.
Freezer Friendly
Slice the loaf before freezing, then wrap each slice in parchment and place them in a zip‑top freezer bag. The loaf freezes beautifully for up to three months. When you’re ready to enjoy, toast the slice directly from frozen; the heat will bring back that fresh‑baked aroma.
Best Reheating Method
To revive a slice, sprinkle a tiny splash of water on the top, cover with foil, and warm in a 300°F oven for 8‑10 minutes. The steam created by the water re‑hydrates the crumb, making it taste like it just came out of the oven. This trick works wonders for even the oldest slice.