Picture this: I’m in the middle of a chaotic kitchen, a bag of flour flying, a pot of sauce boiling over, and my best friend challenges me to whip up something that feels like a sweet, buttery hug in a bite. I glance at the fridge, see the peanut butter, powdered sugar, and chocolate chips, and think, “Why not?” I’ve always loved peanut butter, but the idea of turning it into a no‑bake Easter egg that’s both indulgent and surprisingly simple made my taste buds dance. I’ve tried countless peanut butter treats—bars, cookies, even a classic peanut butter cup—but none of them captured that silky, chocolate‑coated bliss that melts on the tongue like a summer breeze. This version takes that comfort and turns it into a show‑stopping dessert that’s perfect for Easter or any time you want a quick, crowd‑pleasing treat.
From the first sizzling of butter on the stove to the final drizzle of chocolate, every step feels like a ritual. The air is thick with the nutty aroma of toasted peanuts, sweetened by powdered sugar, and the chocolate chips melt into a glossy, dark river that coats the peanut butter like velvet. When the mixture cools, the texture shifts from a liquid swirl to a firm, chewy bite that snaps with a satisfying crack—like a tiny piece of candy that’s both crunchy and creamy. The colors pop: golden peanut butter, glossy chocolate, and a rainbow of sprinkles that add a playful pop of crunch. Every element—taste, texture, aroma—comes together in a harmony that feels like a sweet hug from the inside.
What sets this recipe apart is its simplicity and the way each ingredient sings. No elaborate steps, no need for an oven, and no complicated techniques. It’s a recipe that turns ordinary pantry staples into a dessert that feels like a gourmet creation. The peanut butter isn’t just a flavor; it’s the base that gives the whole thing a rich, nutty backbone. Powdered sugar sweetens it just enough without overwhelming the natural peanut flavor. Chocolate chips melt into a glossy coating that gives the final product that irresistible shine. And the sprinkles? They’re the final flourish that adds a pop of color and a crunch that makes every bite memorable. I dare you to taste this and not go back for seconds.
I’ll be honest—after making the first batch, I ate half of it before anyone else even got a taste. The texture was so perfect that I kept a spoon in my pocket for the next bite. Most recipes get this completely wrong. Here’s what actually works: the right balance of butter and shortening, the precise timing for the chocolate to set just right, and the simple technique of rolling the mixture into a tight, smooth shape. Picture yourself pulling this out of the fridge, the whole kitchen smelling incredible, and seeing the bright, glossy surface that invites you to dive in. Let me walk you through every single step—by the end, you’ll wonder how you ever made it any other way.
What Makes This Version Stand Out
- Flavor: The creamy peanut butter base gives a deep, nutty richness that pairs perfectly with the sweet, slightly bitter chocolate coating. The vanilla extract lifts the flavors, adding a subtle aromatic note that makes each bite feel balanced.
- Texture: The mixture becomes a chewy, slightly crunchy center with a glossy chocolate shell that snaps delightfully when bitten. The contrast between the smooth interior and the crisp exterior feels like a bite of sunshine.
- Simplicity: No oven, no baking, just a pan and a few ingredients. Even beginners can follow this recipe with confidence.
- Uniqueness: The use of shortening or coconut oil keeps the mixture silky and prevents it from becoming too greasy, while the colorful sprinkles add a playful visual twist that feels like Easter.
- Make‑Ahead: Once set, these treats can be stored for up to a week, making them perfect for last‑minute parties or to bring to a potluck.
- Ingredient Quality: Using high‑quality peanut butter and chocolate chips transforms a simple treat into a gourmet experience.
- Quick Prep: From start to finish, you’re looking at less than an hour, which is perfect for a busy weekend or an unexpected guest.
- Crowd Reaction: These are guaranteed crowd‑pleasers—kids love the sprinkles, adults appreciate the rich peanut flavor, and everyone loves the quick, no‑bake process.
Alright, let’s break down exactly what goes into this masterpiece…
Inside the Ingredient List
The Flavor Base
Creamy peanut butter is the heart of this recipe. It provides a deep, nutty flavor that stands up to the sweetness of powdered sugar and the richness of chocolate. If you prefer a slightly sweeter version, try using honey‑sweetened peanut butter or a blend of peanut butter and almond butter. Skipping peanut butter will turn this into a plain chocolate treat, losing the signature nutty kick that makes it so memorable.
When selecting peanut butter, look for a brand with a high peanut content and minimal added sugars or oils. The cleaner the peanut flavor, the more pronounced it will be in the final product. If you’re using natural peanut butter, give it a good stir before measuring to ensure the oils are evenly distributed.
The Sweetener
Powdered sugar is the sweetener of choice because it dissolves quickly, preventing graininess in the final texture. It also helps bind the mixture together, giving the treat a firm, cohesive bite. If you’re watching sugar, consider using a sugar substitute that can be ground into a fine powder, such as powdered erythritol or stevia. Just keep in mind that substitutes may alter the flavor slightly.
If you prefer a darker, caramelized sweetness, you can replace some of the powdered sugar with brown sugar. However, brown sugar will add moisture and may affect the setting time, so use it sparingly.
The Butter and Oil
Butter adds richness and helps the mixture bind together. It also contributes to the glossy sheen of the final product. The 1/2 cup of butter should be softened to room temperature to ensure it melts smoothly when heated. Shortening or coconut oil is added to keep the mixture from becoming too greasy and to help maintain a smooth texture during cooling.
Shortening is a neutral‑flavored fat that keeps the mixture silky. Coconut oil adds a subtle tropical note that pairs well with chocolate. If you’re vegan or prefer a dairy‑free option, coconut oil is an excellent substitute. Just be aware that coconut oil solidifies at cooler temperatures, which can affect the final texture slightly.
The Chocolate
Semi‑sweet chocolate chips are the star that gives the treat its glossy, irresistible coating. The chocolate’s natural bitterness balances the sweetness of the powdered sugar and the richness of the peanut butter. If you prefer a darker chocolate flavor, swap the semi‑sweet chips for dark chocolate chips or even a mix of dark and milk chocolate for a layered flavor profile.
Melt the chocolate slowly over a double boiler or in a microwave, stirring frequently to avoid scorching. If the chocolate thickens too much, add a teaspoon of coconut oil to thin it out, giving it a silky finish that coats the peanut butter evenly.
The Final Flourish
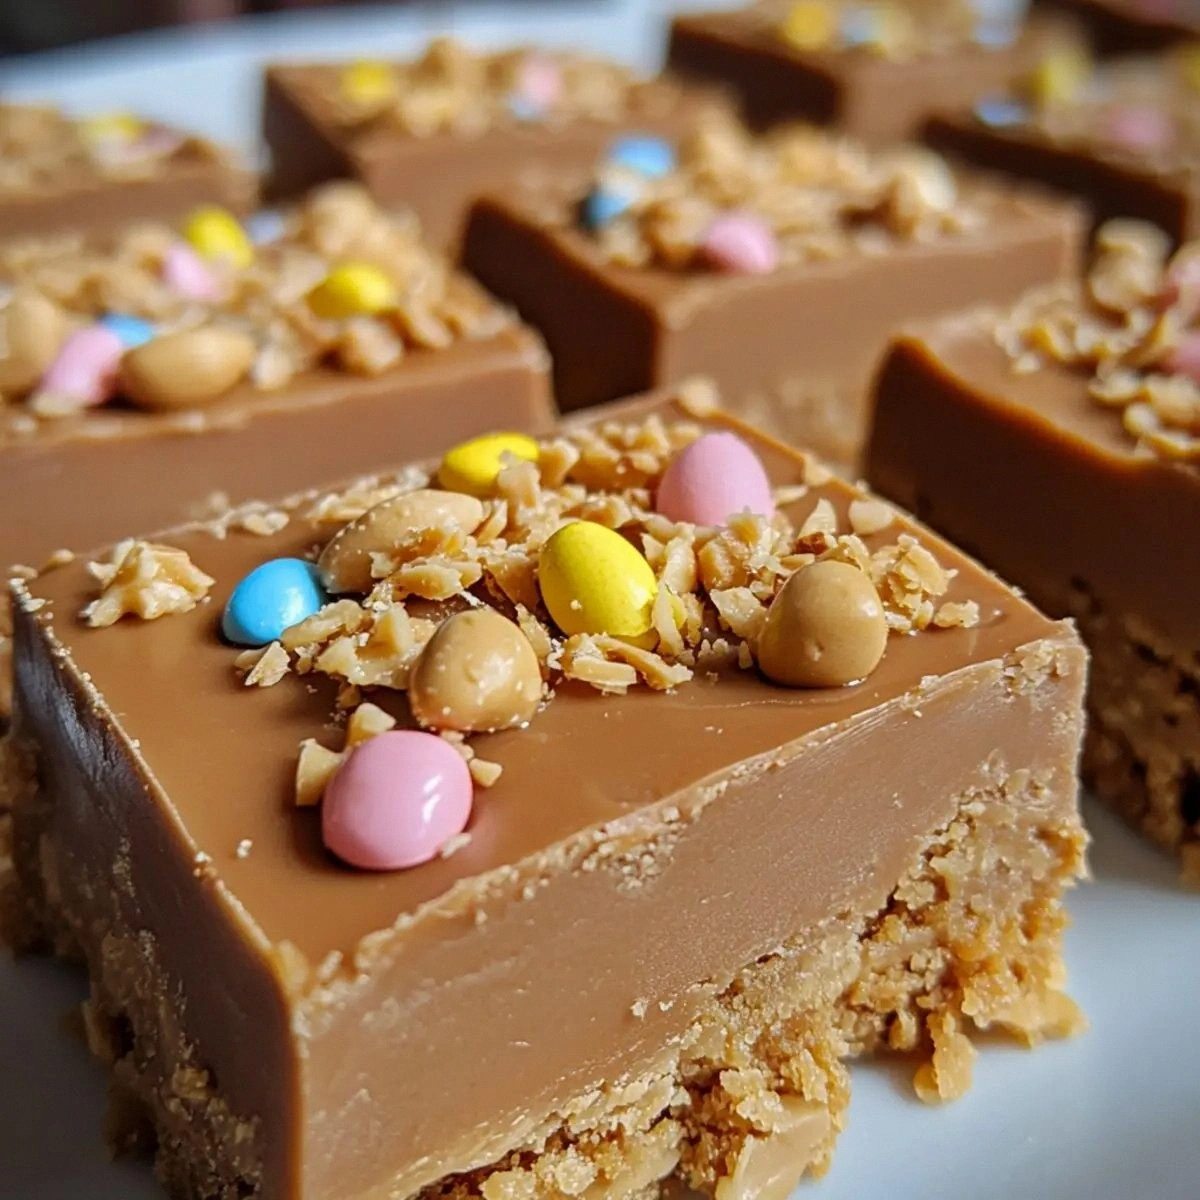
Colored sprinkles and chopped peanuts are the finishing touches that add crunch, color, and an extra layer of flavor. Sprinkles give a playful visual appeal that’s perfect for Easter, while the peanuts add a satisfying crunch and a deeper nutty taste. If you’re allergic to peanuts or prefer a different texture, consider using crushed pretzels, toasted coconut flakes, or even a sprinkle of sea salt for a savory twist.
The key to a great final flourish is to coat the cooled mixture evenly. Roll the mixture in a bowl of sprinkles and chopped peanuts, ensuring every bite has a hint of crunch. This step not only enhances flavor but also transforms the treat into a delightful, Instagram‑worthy dessert.
Everything’s prepped? Good. Let’s get into the real action…
The Method — Step by Step
- Step 1: Melt Butter and Shortening — In a medium saucepan, combine the softened butter and shortening (or coconut oil) over low heat. Stir continuously until the mixture is completely melted and smooth, about 3 minutes. The goal is a silky, golden liquid that’s ready to mix with the peanut butter. Watch the mixture; it should not brown. If it starts to steam, reduce the heat slightly.
- Step 2: Add Peanut Butter — Remove the pan from the heat and immediately stir in the creamy peanut butter. Mix until the peanut butter is fully incorporated, forming a homogeneous paste. The mixture should look glossy and slightly thick. If it feels too thick, add a teaspoon of milk to thin it out.
- Step 3: Sweeten the Mix — Sprinkle in the powdered sugar, a tablespoon at a time, stirring constantly. The sugar should dissolve completely, leaving no gritty texture. This step is crucial for achieving the right firmness. If the mixture feels too sticky, add a little more powdered sugar until it reaches a ball‑forming consistency.
- Step 4: Infuse with Vanilla — Add the teaspoon of vanilla extract and stir until it’s evenly distributed. Vanilla adds a subtle warmth that enhances the peanut and chocolate flavors. The mixture should now be smooth and glossy, ready for the chocolate.
- Step 5: Melt the Chocolate — While the peanut butter mixture sits, melt the semi‑sweet chocolate chips in a double boiler or microwave. If using a microwave, heat in 30‑second intervals, stirring each time, until smooth. This ensures a glossy coating that will set firmly.
- Step 6: Combine and Cool — Pour the melted chocolate into the peanut butter mixture, stirring gently until the chocolate is fully incorporated. The mixture should look like a thick, glossy batter. Transfer it to a shallow dish and let it cool to room temperature. This cooling phase is essential; if it cools too quickly, the chocolate may seize.
- Step 7: Shape the Eggs — Once the mixture has cooled, use a tablespoon to scoop out portions and roll them between your palms into smooth balls. Place each ball on a parchment‑lined tray. The balls should be about 1.5 inches in diameter. If you prefer a more egg‑like shape, gently press each ball into a small mold or use a cookie cutter for a uniform shape.
- Step 8: Coat with Sprinkles and Peanuts — In a shallow bowl, combine the colored sprinkles and chopped peanuts. Roll each ball in the mixture until fully coated. The coating should cling firmly. This step not only adds crunch but also gives the treats an eye‑catching appearance.
- Step 9: Chill and Set — Place the coated balls in the refrigerator for at least 30 minutes, or until the chocolate has set and the treats are firm. If you’re short on time, pop them in a freezer for 10 minutes to speed up the setting process.
- Step 10: Serve and Enjoy — Remove the treats from the fridge, let them sit at room temperature for 5 minutes to soften slightly, and then serve. Each bite delivers a burst of creamy peanut butter, a glossy chocolate coating, and a satisfying crunch. I dare you to taste this and not go back for seconds.
That’s it — you did it. But hold on, I’ve got a few more tricks that’ll take this to another level…
Insider Tricks for Flawless Results
The Temperature Rule Nobody Follows
Temperature control is the secret to a glossy, firm finish. Keep the butter and chocolate at a gentle 120°F (49°C). If the mixture gets too hot, the chocolate will seize, and the texture will become grainy. A kitchen thermometer is a small investment that pays off in smoothness.
Why Your Nose Knows Best
Before you roll the mixture into balls, give it a sniff. The aroma should be sweet and nutty. If you detect a burnt or oily scent, the mixture has overheated. Smell it as a quick quality check to avoid ruining the final texture.
The 5-Minute Rest That Changes Everything
After the mixture has cooled to room temperature, let it rest for 5 minutes before shaping. This short pause allows the fats to settle, making the mixture easier to handle and preventing it from sticking to your hands.
Use a Silicone Mat for Easy Removal
Instead of parchment paper, try a silicone baking mat. It’s non‑stick and reusable, making clean‑up a breeze. The smooth surface also helps the treats release without breaking.
Keep a Small Bowl of Water Handy
If the mixture starts to dry out during the shaping process, lightly spray it with water. A few droplets will rehydrate it, keeping it pliable.
Creative Twists and Variations
This recipe is a playground. Here are some of my favorite ways to switch things up:
Chocolate‑Covered Peanut Butter Cups
Instead of rolling the mixture into balls, pour it into a mini muffin tin lined with paper cups. Once set, dip the tops in melted chocolate and roll in crushed nuts for a crunchy twist. These mini cups are perfect for parties.
Salted Caramel Peanut Bites
Add a tablespoon of salted caramel sauce to the peanut butter mixture before adding powdered sugar. The caramel will create a sweet‑savory balance, and the final coating can be a mix of sea salt and crushed pretzels for extra crunch.
Vegan Coconut Peanut Treats
Replace the butter with coconut oil and use a vegan chocolate chip blend. The coconut adds a tropical note that pairs wonderfully with the peanut flavor. Serve with a drizzle of maple syrup for an extra sweet touch.
Nutty Trail Mix Bars
Flatten the mixture into a pan, top with a mixture of dried fruit, nuts, and seeds, and chill until firm. Slice into bars for a portable snack that’s both sweet and nutritious.
Mint‑Infused Peanut Butter Squares
Add a teaspoon of peppermint extract to the mixture. Once cooled, roll in crushed peppermint candies and chocolate chips for a minty, chocolatey treat that’s especially refreshing during summer.
Chocolate‑Dipped Peanut Butter Swirls
Create a swirl effect by piping the peanut butter mixture into a piping bag with a star tip. Pipe onto parchment, swirl with melted chocolate, then chill. The swirling pattern adds a decorative touch and a textural contrast.
Storing and Bringing It Back to Life
Fridge Storage
Store the treats in an airtight container at room temperature or in the fridge. They’ll keep fresh for up to a week. If you notice a slight crust forming, simply place them at room temperature for a few minutes to soften.
Freezer Friendly
These treats freeze well. Pack them in a single layer on a parchment sheet, then transfer to a freezer bag. They’ll last up to 3 months. When you’re ready to enjoy, let them thaw at room temperature for 10–15 minutes.
Best Reheating Method
To bring them back to life, place the treats in a microwave on medium power for 10–15 seconds, or heat in a preheated oven at 300°F (149°C) for 5 minutes. Add a tiny splash of water before reheating to create steam, which helps the chocolate soften without melting.