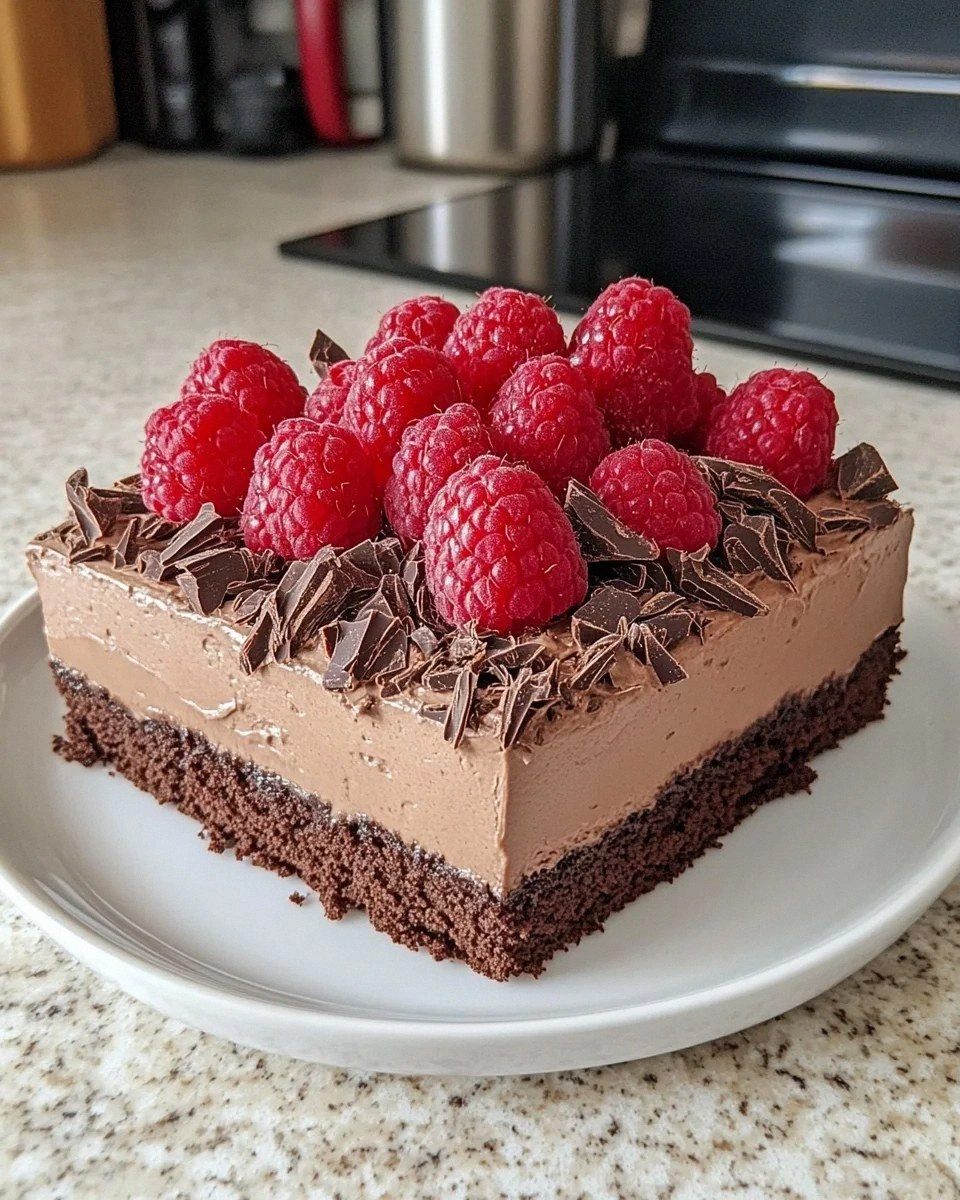
I still remember the day I accidentally created what would become the most requested dessert in my entire repertoire. It was supposed to be a simple birthday cake for my niece, but somewhere between the third phone call asking if I could add cheesecake to everything and my pantry running low on regular sprinkles, magic happened. The result was this outrageous Festive Funfetti Cheesecake Layer Cake that has since become legendary at every family gathering, office party, and potluck I've ever attended. Trust me when I say this isn't just another pretty cake — this is the dessert that will have people fighting over the last slice and sliding into your DMs for the recipe.
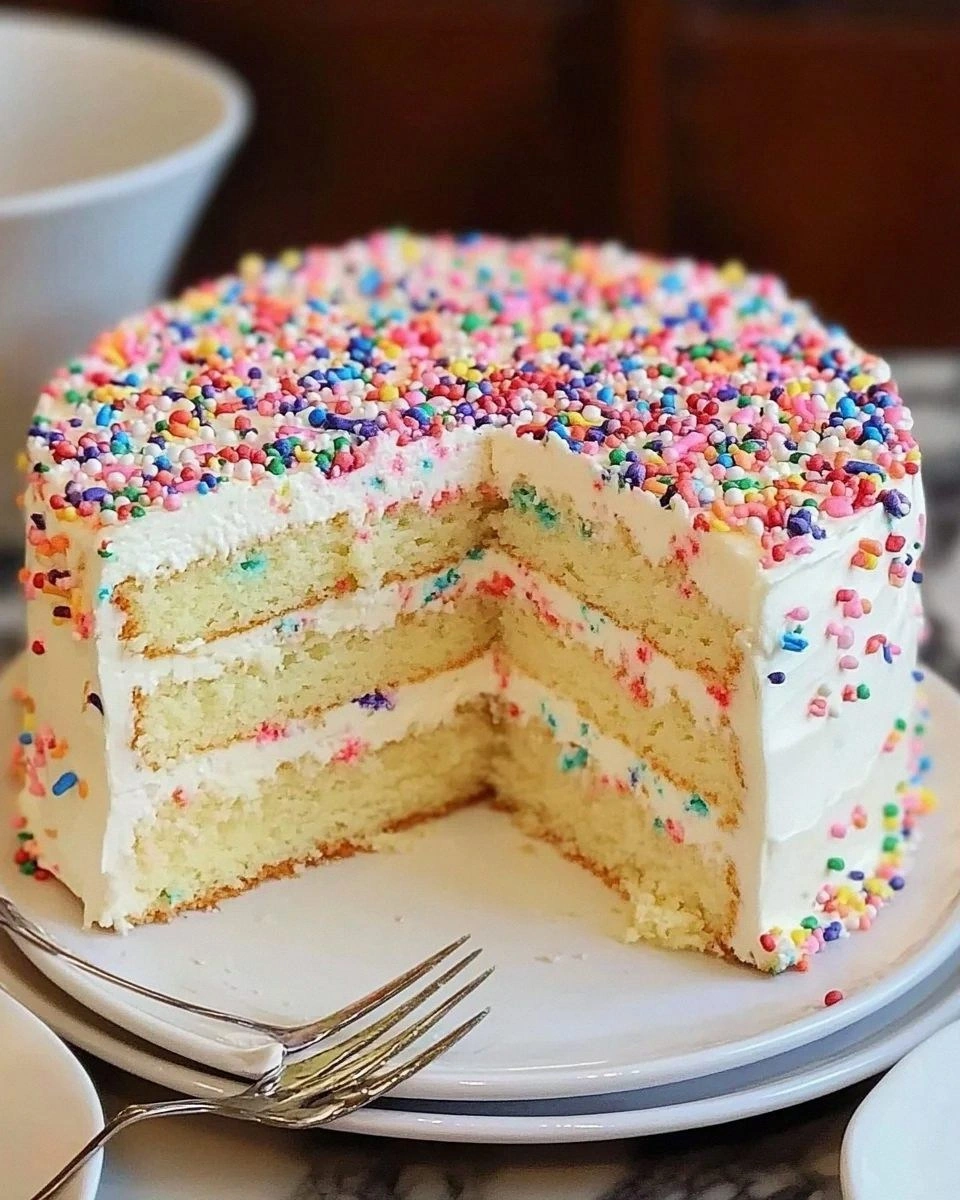
Picture this: three impossibly moist funfetti cake layers, each one bursting with rainbow sprinkles that create little pockets of sweetness in every bite. Between those layers sits the creamiest, dreamiest cheesecake filling you've ever tasted — not that dense, heavy stuff that sits in your stomach like a brick, but a cloud-light, tangy contrast that makes the whole thing sing. The entire masterpiece gets wrapped in a whipped cream cheese frosting that's so silky, so perfectly balanced between sweet and tangy, that you'll find yourself "taste-testing" it with your finger more times than you'd care to admit. And just when you think it can't get any better, we shower the whole thing with more sprinkles because, honestly, can you ever have too many?
What makes this cake absolutely irresistible isn't just its Instagram-worthy appearance (though it will break your feed, guaranteed). It's the way the tender crumb of the funfetti cake plays against the rich creaminess of the cheesecake layer. It's how the sprinkles add not just color but tiny explosions of vanilla sweetness that keep your taste buds guessing. It's the way people go quiet for a moment when they take their first bite — not because they're speechless from politeness, but because they're experiencing what I call "dessert nirvana" and need a second to process the joy happening in their mouths.
Okay, ready for the game-changer? This cake isn't just about throwing together some cake mix and calling it a day. We're using a revolutionary technique that keeps the cheesecake layer from turning into a soggy mess, a frosting method that creates those gorgeous bakery-style smooth sides, and a sprinkle application strategy that ensures every slice looks like a party exploded in the best possible way. Let me walk you through every single step — by the end, you'll wonder how you ever made it any other way.
What Makes This Version Stand Out
Unbeatable Texture: Unlike those sad, dry funfetti cakes you've probably endured at office parties, this version stays impossibly moist for days thanks to a secret ingredient combo that keeps everything tender without being greasy. The cheesecake layer adds richness without the density that usually makes cheesecake feel like you've swallowed a paperweight.
Flavor That Actually Packs a Punch: Most funfetti cakes taste like sweet nothing with a side of food coloring. Not this beast. We've amped up the vanilla, added a touch of almond extract that makes the sprinkles taste like they were kissed by angels, and created a cheesecake layer that actually tastes like cheesecake, not just sweet cream.
Visual Drama Guaranteed: This cake doesn't just sit there looking pretty — it demands attention. Between the perfectly even layers, the mirror-smooth frosting, and the strategic sprinkle placement that creates a gradient effect, this is the dessert equivalent of a fireworks show. Picture yourself pulling this out of the oven, the whole kitchen smelling incredible, and knowing you're about to become a dessert legend.
Make-Ahead Magic: Here's what nobody tells you about layer cakes — they're actually better when you make them ahead. This beauty gets even more flavorful after a day in the fridge, and I'm sharing my freezer hack that lets you make it weeks in advance without anyone being the wiser. Stay with me here — this is worth it.
Foolproof Assembly: If you've ever tried to stack a cheesecake on top of cake and ended with a leaning tower of Pisa situation, you're not alone. My assembly method uses simple household items to create stability that would make an architect jealous, plus a decorating technique that hides any imperfections while looking deliberately artistic.
Crowd Psychology: I dare you to taste this and not go back for seconds. I've watched self-proclaimed "not a dessert person" devour two slices and ask for the recipe. There's something about the combination of nostalgic funfetti flavors with the grown-up sophistication of cheesecake that makes people lose their minds in the best way.
Inside the Ingredient List
The Flavor Base
Cake flour is non-negotiable here — don't even think about subbing in all-purpose unless you want a dense, tough crumb that tastes like disappointment. The lower protein content in cake flour creates that tender, almost cloud-like texture that makes professional bakeries' cakes taste better than yours. If you absolutely must substitute, remove 2 tablespoons of all-purpose flour per cup and add 2 tablespoons of cornstarch, but honestly, just buy the cake flour — your future self will thank you when you're basking in compliments.
Butter matters more than you'd think. Use the good European stuff with higher fat content (like Kerrygold or Plugra) for a richness that cheap butter simply cannot deliver. The difference is like comparing a symphony to a kazoo — technically both make music, but only one makes your soul sing. Make sure it's properly softened but not melted; you should be able to press a finger in easily but it shouldn't feel greasy or oily.
Vanilla extract is where most recipes go tragically wrong. That artificial stuff in the plastic bottle? Leave it on the shelf with the other imposters. We're using real Madagascar vanilla extract here, and yes, it costs more than a coffee, but it's the difference between a cake that tastes like birthday parties and one that tastes like birthday memories. The vanilla should smell intoxicating, not medicinal, and don't even get me started on vanilla bean paste — that's where the real magic lives.
The Texture Crew
Sour cream is our secret weapon for moisture that lasts for days. It adds tanginess that balances the sweetness while creating a crumb so moist you'll wonder if you accidentally added pudding mix. Full-fat is mandatory — this is not the time for diet sabotage. The sour cream should be smooth and creamy, not separated or watery, and definitely not that low-fat abomination that tastes like sour sadness.
Eggs do more than just hold everything together — they're the emulsifiers that create that perfect, even crumb structure. Use large eggs (not extra-large or medium) and make sure they're at room temperature. Cold eggs don't incorporate properly, leading to a curdled batter that bakes up with the texture of a sponge. The yolks add richness and color, while the whites provide structure — we're using the whole egg here because balance is everything in life and baking.
Oil might seem redundant when we're already using butter, but here's the thing — butter provides flavor while oil provides moisture that stays moist. It's like having the best of both worlds in one bite. Use a neutral oil like canola or vegetable; olive oil's flavor competes with our vanilla party, and coconut oil turns everything into a tropical situation that nobody asked for.
The Unexpected Star
Cream cheese for the cheesecake layer should be the full-fat Philadelphia brick, not the whipped stuff in a tub or, heaven forbid, that low-fat nonsense that tastes like disappointment with a side of regret. The brick cream cheese has the right density and lower moisture content that creates that perfect, sliceable texture we're after. Leave it out overnight to soften properly — trying to beat cold cream cheese is like trying to spread cold butter on toast: frustrating and ultimately futile.
Sprinkles aren't just sprinkles, despite what the baking aisle would have you believe. Those cheap, waxy ones bleed their colors into a muddy mess and taste like sugared cardboard. We're using high-quality rainbow jimmies (the long, rod-shaped ones) that hold their color and actually taste like vanilla. Avoid nonpareils (the tiny ball ones) like your cake's life depends on it — they dissolve into weird spots and create a texture that nobody wants to experience.
Heavy cream for the frosting needs to be cold — ice cold. This is non-negotiable for achieving those stiff peaks that will hold our frosting together like edible spackle. The higher the fat content, the better it whips, so skip the "whipping cream" and go straight for the heavy cream with at least 36% fat. Anything less and you'll end up with a sad, weepy mess that slides off your beautiful cake like it's trying to escape.
The Final Flourish
Powdered sugar might seem straightforward, but here's where most people mess up their frosting. Sift it. Twice. Lumpy frosting is the fastest way to go from "wow" to "what happened here" faster than you can say "I forgot to sift." The cornstarch in powdered sugar helps stabilize our whipped cream, but it also can create little hard lumps that feel like sand in your teeth — not exactly the party-in-your-mouth experience we're going for.
Cream of tartar is our insurance policy against over-whipped cream disasters. Just a pinch helps stabilize those peaks so your frosting won't weep and separate, even if you accidentally get distracted by Instagram for a few minutes. It's like having a baking safety net that costs pennies but saves your dessert reputation. If you don't have it, you can use a tiny bit of lemon juice, but cream of tartar is more reliable and won't add any unwanted flavor.
Everything's prepped? Good. Let's get into the real action...
The Method — Step by Step
- Start with the cheesecake layer because it needs time to chill and set properly. Beat your room-temperature cream cheese until it's completely smooth and fluffy — this should take about 3-4 minutes on medium speed. Scrape down the bowl obsessively; any lumps now become permanent fixtures later. Add sugar gradually, letting it fully incorporate before adding more, then mix in eggs one at a time, followed by vanilla and sour cream. The batter should be silky smooth and pourable, like thick cream. Pour into a parchment-lined 9-inch pan, tap out air bubbles, and bake in a water bath at 325°F for 45-50 minutes until the center jiggles like Jell-O. Cool completely, then chill for at least 4 hours or overnight — this is where patience pays off big time.
- Now for the funfetti cake layers — and this is where most recipes go wrong by overmixing. Cream your butter and sugar until they're pale and fluffy, about 5 minutes of serious mixing action. The mixture should look like whipped buttercream frosting and feel slightly grainy from the sugar — that's perfect. Add eggs one at a time, beating each until fully incorporated before adding the next; rushing this creates a curdled mess that won't emulsify properly. Alternate adding dry ingredients and wet ingredients in three additions, starting and ending with flour, mixing just until combined after each addition. Overmixing develops gluten and creates tough, dense cake — we want tender and fluffy here.
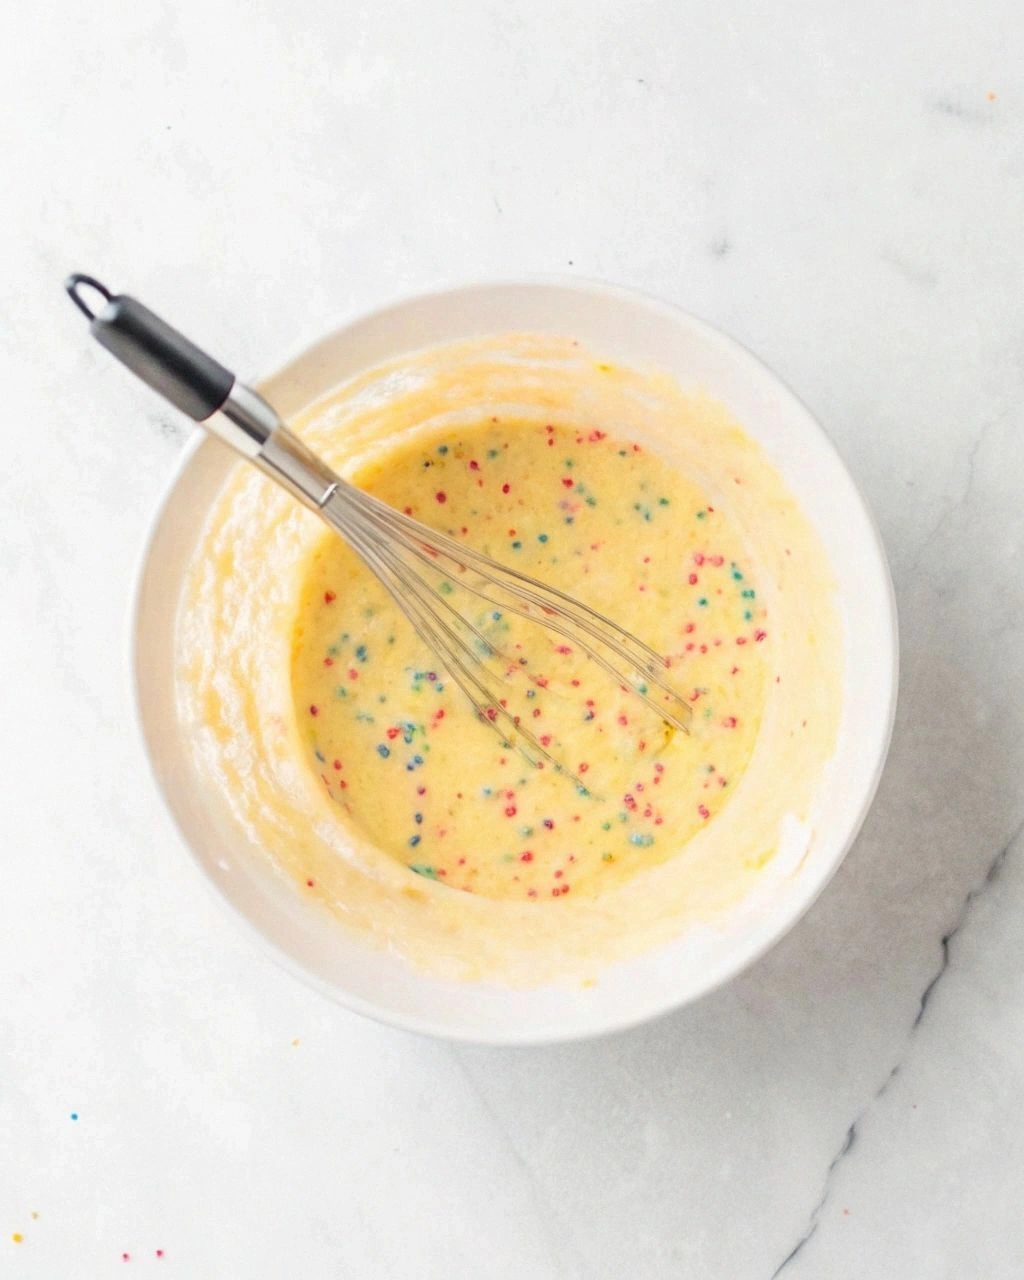
- Here's where the magic happens: the sprinkle incorporation technique that prevents color bleeding. Toss your sprinkles in a tablespoon of flour before folding them in gently by hand. This flour coating prevents the colors from bleeding into your batter, keeping those rainbow colors vibrant instead of turning everything gray. Fold just until distributed — overmixing here crushes the sprinkles and creates weird color swirls. The batter should be thick but pourable, with sprinkles evenly distributed like a party waiting to happen.
- Baking these layers requires more attention than your average cake. Divide batter evenly between three 9-inch pans that have been greased, floured, and lined with parchment on the bottom. Bake at 350°F for 22-25 minutes, rotating pans halfway through for even baking. The cakes are done when they spring back lightly when touched and a toothpick comes out with just a few moist crumbs — not wet batter, but not completely clean either. Cool in pans for 10 minutes before turning out onto wire racks; rushing this creates broken layers that no amount of frosting can fix.
- The frosting is where science meets art, and cold cream is your best friend. Whip cold heavy cream with cream of tartar until soft peaks form — you want peaks that curl over like a gentle wave, not stiff peaks that stand straight up. In a separate bowl, beat cream cheese and powdered sugar until completely smooth and fluffy, about 3 minutes. Gently fold the whipped cream into the cream cheese mixture in three additions, being careful not to deflate the air you just worked so hard to incorporate. The result should be light, fluffy, and hold its shape like a cloud that decided to become frosting.
- Assembly is where patience meets precision, and it's easier than you think. Level your cake layers if necessary, but don't go crazy — we want height here. Place your first cake layer on a cake board or serving plate, then spread a thin layer of frosting to create a moisture barrier. Carefully place your chilled cheesecake layer on top, pressing gently to adhere. If your cheesecake is slightly larger than your cake layers (which happens), trim it with a sharp knife while cold — it's like cutting firm butter. Top with another cake layer, more frosting, and repeat until you have cake-cheesecake-cake-cake layers that stack like a pro.
- The crumb coat is your insurance policy against cake disasters, and it's non-negotiable for professional results. Spread a thin layer of frosting over the entire cake to trap crumbs, then chill for 30 minutes. This sets the base and prevents those annoying crumbs from ruining your final coat. Don't worry about beauty here — the crumb coat is supposed to look messy. Its only job is keeping crumbs contained so your final layer looks pristine.
- Now for the fun part: the final frosting and sprinkle application that takes this from homemade to bakery-worthy. Apply your final coat of frosting, using a bench scraper to create smooth sides and a offset spatula for the top. Hold the scraper at a 45-degree angle and rotate the turntable (or lazy Susan) for perfectly smooth sides. For the sprinkle gradient, hold the cake over a baking sheet to catch extras, then gently press sprinkles into the bottom third. Add more sprinkles as you work up, creating an ombre effect that's Instagram gold.
- The final touch that separates amateur from artist: the frosting swoops and swirls that make everything look intentional. Warm your offset spatula in hot water, dry it off, then gently press and drag to create swoops and waves. Add a few strategic sprinkle clusters on top, maybe some white chocolate shavings if you're feeling fancy. Chill for at least an hour before serving — this sets everything and makes slicing easier. That first slice reveal? Pure magic.
That's it — you did it. But hold on, I've got a few more tricks that'll take this to another level...
Insider Tricks for Flawless Results
The Temperature Rule Nobody Follows
Here's the thing about temperature that separates good bakers from great ones: everything matters, but timing matters more. Your cheesecake layer needs to be completely cold before assembly, but your cake layers should be room temperature. Cold cake layers will condense moisture and make your frosting weep like it's watching a sad movie. Room temperature cheesecake will squish out the sides like a creamy avalanche when you slice it. I'll be honest — I ate half the batch before anyone else got to try it because I couldn't wait for proper temperatures, and let me tell you, patience pays dividends here.
Why Your Nose Knows Best
Most recipes give you visual cues, but here's what nobody tells you: your nose is the most reliable tool in your kitchen arsenal. When the cakes are perfectly baked, your kitchen will smell like vanilla birthday parties and warm butter. When the cheesecake is done, you'll detect a subtle tangy sweetness that wasn't there before. That sizzle when it hits the pan? Absolute perfection. A friend tried skipping this sensory checkpoint once — let's just say it didn't end well, and her smoke detector got more action than it bargained for.
The 5-Minute Rest That Changes Everything
After you frost the cake, walk away for exactly 5 minutes before adding sprinkles. This brief rest lets the frosting develop a slight skin that's sticky enough to hold sprinkles but not so soft that they sink in and disappear. Most recipes get this completely wrong by telling you to add sprinkles immediately, which results in sprinkle soup that slides down the sides like colorful rain. The timing is crucial — too long and the frosting sets too firmly, too short and you get sprinkle avalanche.
The Overnight Transformation
This cake is actually better the next day, and here's why: the flavors meld and mature like a fine wine. The cheesecake layer firms up perfectly, the cake absorbs just enough moisture from the frosting to become impossibly tender, and the sprinkles develop this subtle crunch that's textural heaven. Make it tonight, serve it tomorrow, and prepare for people to propose marriage. If you've ever struggled with dry cake or weepy fillings, you're not alone — and I've got the fix, and it's called patience.
The Slice That Sells It
Use a long, sharp knife dipped in hot water for picture-perfect slices. Wipe the knife clean between cuts, and here's the pro move: cut straight down, don't saw. A gentle, confident slice through the layers creates clean edges that show off your beautiful layers. Serve on room temperature plates — cold plates will make the cheesecake layer seize up and separate from the cake. The contrast between the cold cheesecake and room temperature cake is what makes this dessert sing.
Creative Twists and Variations
This recipe is a playground. Here are some of my favorite ways to switch things up:
Chocolate Lover's Dream
Swap out one cake layer for chocolate funfetti cake by replacing 1/4 cup of flour with cocoa powder. Add chocolate extract to the cheesecake layer and use chocolate sprinkles mixed with rainbow ones for a cookies-and-cream vibe. The result is a chocolate-vanilla party that makes people close their eyes in bliss. Kids love this version, but honestly, it's the adults who go back for thirds.
Birthday Cake Remix
Add 1/2 teaspoon of butter extract to both the cake and frosting for that nostalgic boxed-cake flavor that somehow tastes like childhood memories. Use extra colorful sprinkles and add a teaspoon of edible glitter to the frosting for extra sparkle. This version photographs like a dream and tastes like someone bottled happiness and turned it into cake form.
Salted Caramel Carnival
Drizzle caramel between layers and add a teaspoon of sea salt to the cheesecake batter. The sweet-salty combination creates an addiction that's almost concerning. Use caramel sprinkles if you can find them, or crush up some toffee bits for crunch. If you've ever struggled with desserts that taste one-dimensional, this variation adds depth that keeps people guessing what's making it so irresistible.
Lemon Celebration
Add lemon zest to the cake batter and a tablespoon of lemon juice to the cheesecake layer for a bright, citrusy version that cuts through the sweetness beautifully. Use yellow and white sprinkles for a sunshine effect. This version is perfect for spring celebrations and makes people feel like they're eating liquid sunshine. The acidity also helps balance the richness, making it dangerously easy to eat more than you should.
Red, White, and Boom
For patriotic holidays, use only red and blue sprinkles in the cake and create layers with strawberry cake, vanilla cheesecake, and blueberry cake. The visual impact is stunning, and the flavor combination tastes like summer in every bite. Kids go absolutely wild for this version, and it's become my most requested Fourth of July dessert.
Midnight Magic
Use black cocoa powder in the cake layers for an almost black color, create a cheesecake layer with activated charcoal for dramatic gray coloring, and use silver and black sprinkles for a sophisticated adult version. This Goth-inspired cake surprises people with its intense flavor and stunning appearance. Perfect for Halloween or anyone who appreciates dessert with a dark side.
Storing and Bringing It Back to Life
Fridge Storage
This cake keeps beautifully in the fridge for up to 5 days, wrapped loosely in plastic wrap after the first day. The key is not wrapping it too tightly — condensation is the enemy of beautiful frosting. Store it in a cake box if you have one, or create a makeshift dome with an inverted large bowl. The flavors actually improve after day two, developing this incredible depth that makes you wonder how you ever ate cake fresh. If the cut edges dry out, just trim them slightly before serving — nobody will ever know.
Freezer Friendly
Here's the game-changer: this cake freezes beautifully for up to 2 months. Slice it first, then wrap individual slices in plastic wrap, then foil. Thaw overnight in the fridge for a perfect texture that tastes freshly made. The cheesecake layer actually benefits from freezing — it becomes even creamier and more luxurious. Pro tip: freeze slices on a baking sheet first, then wrap them. This prevents the wrapping from squishing your beautiful layers.
Best Reheating Method
Room temperature is the sweet spot for serving — 30 minutes out of the fridge brings out all the flavors and creates the perfect texture contrast. If you're in a hurry, a 10-second microwave zap per slice works, but don't overdo it or the cheesecake layer becomes sad and weepy. Add a tiny splash of water before reheating — it steams back to perfection and prevents the cake from drying out. The ideal serving temperature is when the cake feels cool but not cold, and the cheesecake layer is creamy but not squishy.