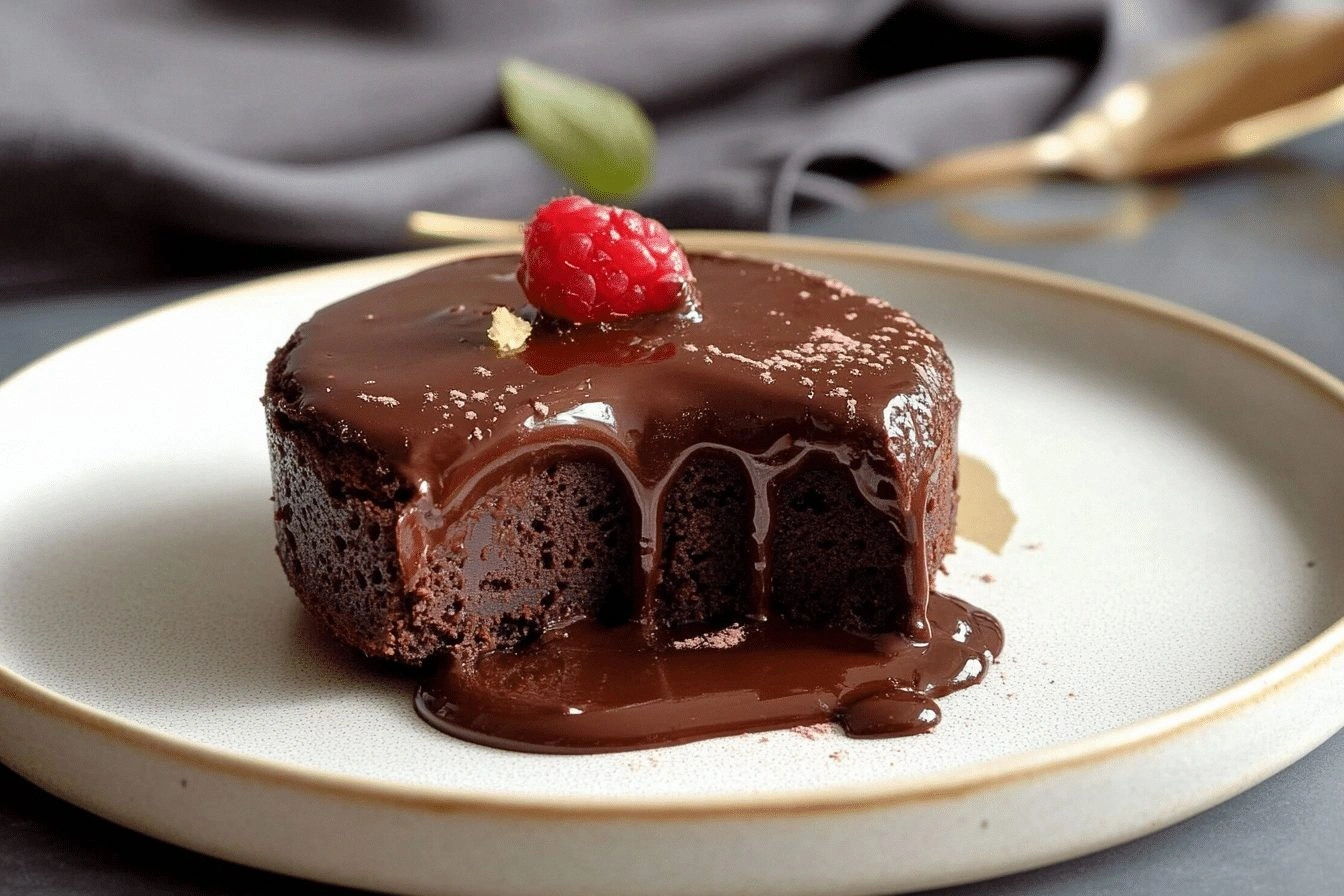
Picture this: I was halfway through a midnight snack, scrolling through Instagram, when I stumbled upon a photo of a molten chocolate center that looked like liquid gold. The temptation was immediate, and I decided to test the recipe that would later become my go-to for dessert emergencies. I set the timer, whisked, and the kitchen filled with the rich aroma of chocolate melting into butter. The first bite was a revelation—dark chocolate depth wrapped in a tender, buttery crumb that melted in my mouth. I was already planning the next batch before the first one even cooled.
That night, my oven had a habit of overheating, and I nearly set the kitchen on fire while attempting a classic chocolate cake. The previous batch had come out dry, with a crumb that felt like sand. I wanted something that would turn a kitchen mishap into a triumph, a dessert that would wow friends and family without a second guess. I discovered that using a precise blend of dark chocolate, butter, and a touch of vanilla can create a gooey center while maintaining structural integrity. The result? A moist, decadent cake that still holds its shape when sliced.
This version is different because it balances intensity with tenderness, ensuring every bite is a silky experience. I added a pinch of sea salt to intensify the chocolate flavor without tipping into salty. The key technique is a low‑temperature double boiler melt that preserves the chocolate’s silky texture. I also folded in the eggs gently, avoiding overmixing to keep the batter airy. The final touch? A quick chill before baking to set the structure for that perfect gooey center.
Picture yourself pulling this out of the oven, the whole kitchen smelling incredible, and the center oozing like a molten river. I dare you to taste this and not go back for seconds; the gooeyness will have you craving another bite. Most recipes get this completely wrong, but here's what actually works: a precise ratio of chocolate to butter and a careful bake time. If you've ever struggled with a chocolate cake that turns out dense or overbaked, you're not alone—and I've got the fix. Let me walk you through every single step—by the end, you'll wonder how you ever made it any other way.
What Makes This Version Stand Out
- Flavor: The use of 70% dark chocolate provides a bittersweet depth that cuts through the sweetness of sugar, creating a complex tasting experience. The subtle hint of vanilla amplifies the chocolate’s aroma, making each bite feel like a well‑crafted symphony. The pinch of sea salt elevates the overall profile, preventing the dessert from feeling cloyingly sweet.
- Texture: The batter’s delicate balance of fat, sugar, and eggs results in a tender crumb that crumbles effortlessly. The gooey center is achieved by a precise bake time, allowing the interior to remain liquid while the edges set. This contrast between molten and crisp creates a memorable mouthfeel that keeps diners coming back.
- Simplicity: With only seven core ingredients, the recipe feels approachable yet sophisticated. No exotic additives or complex steps are required, making it suitable for both novice bakers and seasoned chefs. The streamlined process reduces the risk of mishaps while still delivering a show‑stopping dessert.
- Ingredient Quality: Choosing high‑quality dark chocolate and fresh butter ensures the flavor is unmistakable. The dark chocolate’s 70% cocoa content offers a robust taste that stands up to the richness of butter and sugar. Using real vanilla extract, rather than imitation, adds depth and authenticity.
- Crowd Reaction: This dessert is guaranteed to be a hit at gatherings, because the gooey center is a visual and gustatory treat. Friends will comment on how it feels like a chocolate lava cake in a personal size. The elegant presentation and rich flavor make it a conversation starter.
- Cooking Method: The low‑temperature double‑boiler melt preserves the chocolate’s silky texture, preventing separation or bitterness. Folding the eggs gently preserves air pockets, which contribute to the cake’s lightness. The quick chill before baking sets the structure, ensuring a perfect rise.
- Make‑Ahead Potential: Once baked, the cakes can be stored in the refrigerator for up to four days, and they reheat beautifully. The batter can also be prepared in advance and frozen, saving time during busy holidays. This flexibility makes it ideal for last‑minute dessert plans.
Inside the Ingredient List
The Flavor Base
Dark chocolate is the heart of this dessert, providing bittersweet depth and complexity that defines the flavor profile. It should be chopped finely to ensure even melting and prevent clumps. If you prefer a sweeter cake, you can reduce the chocolate to 60% cocoa, but the richness will diminish. A small amount of sea salt is added to heighten the chocolate’s natural notes without becoming overpowering. Vanilla extract acts as a subtle aromatic enhancer, filling the kitchen with a warm, comforting scent.
The Texture Crew
Unsalted butter is the primary fat source, lending a buttery softness that keeps the crumb tender. Melt the butter just until it turns a light amber color to develop a nutty aroma. Granulated sugar is the sweetener that balances chocolate bitterness and contributes to moisture retention. The eggs provide structure; the whites stabilize the batter, while the yolks add richness. Folding the eggs gently after they’re beaten ensures the batter remains airy.
The Unexpected Star
All-purpose flour is the binding agent that holds the batter together without overpowering the melt. Use a light hand when measuring; too much flour can make the cake dense. Sifting the flour before adding it to the wet mixture helps eliminate lumps and ensures a smoother batter. If you’re craving a gluten‑free option, a blend of oat and rice flours can be used, but the texture will shift slightly.
The Final Flourish
The pinch of salt is more than seasoning; it sharpens every flavor note, creating a harmonious balance. A small splash of espresso or a dash of chili can be added here for a unique twist, but keep the base ingredients unchanged. The final step is chilling the batter for 15 minutes, which helps the chocolate set and the batter to thicken before baking. This brief rest is crucial for achieving that perfect gooey center. When you’re ready to bake, the batter should feel slightly firmer but still pourable.
The Method — Step by Step
- Preheat the oven to 180°C (350°F) and line a 20cm (8-inch) round cake pan with parchment paper. Grease the paper lightly with butter or oil to ensure easy release. Set the pan on a baking sheet for stability. This step is crucial to avoid sticking and uneven baking. Let the oven preheat fully before placing the pan inside.
- Fill a medium saucepan with about 2 inches of water and bring to a simmer. Place a heat‑proof bowl on top, ensuring it doesn’t touch the water. Add the dark chocolate and unsalted butter to the bowl, stirring until fully melted and glossy. Keep the mixture at a gentle simmer; if it boils, lower the heat immediately. The aroma of chocolate should become rich and inviting.
- In a separate bowl, whisk the granulated sugar until it’s lightly aerated. This helps the sugar dissolve evenly when combined with the melted chocolate. Once the chocolate mixture is smooth, pour it into the sugar bowl and stir until the mixture is uniform. Add the vanilla extract and a pinch of sea salt, mixing until fully incorporated. The mixture should look silky and slightly glossy.
- Beat the eggs in a small bowl until the whites are slightly frothy but not fully beaten. Gently fold the eggs into the chocolate mixture, ensuring no lumps form. The batter should feel smooth and slightly thick. Be careful not to overmix, as this can deflate the batter’s airy quality. The mixture should have a glossy sheen.
- Sift the all‑purpose flour over the batter to avoid lumps. Gently fold the flour in using a spatula, just until the flour is incorporated. The batter should still be pourable but slightly thickened. This step is where the structure begins to form. Avoid overworking to keep the crumb tender.
- Pour the batter into the prepared pan, smoothing the top with a spatula. Tap the pan lightly on the counter to release any air bubbles. Place the pan in the preheated oven and bake for 30 minutes, or until the edges set but the center remains slightly soft. The batter should rise slightly and develop a dark, caramelized crust. The smell of chocolate baking should fill the kitchen.
- Watch Out: The most critical moment is when the cake is about 25 minutes into baking. If you open the oven door too early, the cake may collapse. Keep the door closed and use the oven light to monitor progress. A good indicator is when the edges pull away from the pan. The center should still feel slightly jiggly when you give it a gentle shake.
- Remove the cake from the oven and let it cool in the pan for 10 minutes. Then, run a knife around the edges and invert onto a wire rack to cool completely. The cake should still feel slightly warm, but the center should hold its shape. Cooling on the rack prevents the bottom from becoming soggy. The cake will firm up as it cools, revealing its gooey center.
- Serve immediately with a dusting of powdered sugar or a scoop of vanilla ice cream. The contrast of hot, molten chocolate with cold, creamy ice cream is a classic pairing. If you prefer a more decadent experience, drizzle a little dark chocolate sauce over the top. The cake can also be sliced and served with fresh berries for a bright, acidic counterpoint.
- Store any leftovers in an airtight container in the refrigerator for up to four days. Bring to room temperature before serving for optimal flavor and texture. For a longer shelf life, freeze the cake slices for up to two months. Thaw in the refrigerator overnight and warm in a microwave for a few seconds before serving. The cake’s texture remains delightful after reheating.
Insider Tricks for Flawless Results
The Temperature Rule Nobody Follows
Many bakers set the oven to the highest setting they can find, assuming more heat equals a better bake. This can quickly overcook the edges while leaving the center undercooked. Instead, bake at a moderate 180°C (350°F) and use an oven thermometer to confirm accuracy. The slow, steady heat allows the chocolate to melt evenly and the batter to rise without collapsing. This method ensures a consistent gooey center every time.
Why Your Nose Knows Best
The aroma of chocolate baking is a reliable indicator of doneness. When the scent becomes rich and slightly nutty, the cake is ready to come out of the oven. Avoid the temptation to check the center with a toothpick; the scent is a more accurate cue. This sensory checkpoint saves you from overbaking and preserves the cake’s moisture.
The 5‑Minute Rest That Changes Everything
After removing the cake from the oven, let it rest in the pan for 5 minutes before turning it out. This brief pause allows the heat to distribute evenly, preventing a sudden temperature shock that can crack the surface. The rest also lets the batter set, making it easier to invert without sticking. A quick 5‑minute rest is a small step that yields big flavor gains.
How to Prevent Cracking on the Surface
Cracks often appear when the cake expands too quickly or the oven temperature is too high. Keep the oven door closed during the first 20 minutes of baking to maintain a stable environment. If cracks do appear, gently brush the surface with a thin layer of melted chocolate to seal them. This not only fixes the appearance but also adds a glossy finish.
The Secret to a Perfectly Risen Edge
The edges should rise slightly higher than the center for a classic look. To achieve this, ensure the batter is evenly spread in the pan and the pan is level. Avoid overmixing, as this can cause the batter to over‑expand. The result is a golden rim that contrasts beautifully with the soft interior.
How to Keep the Center Gooey
The key to a molten center is timing. Remove the cake just before the center is fully set; it should still feel slightly jiggly when gently shaken. If you prefer a firmer center, bake an extra 2 minutes, but be careful not to overbake. The gooeyness is the star of this dessert, so trust your instincts and the oven’s temperature.
Creative Twists and Variations
This recipe is a playground. Here are some of my favorite ways to switch things up:
Salted Caramel Swirl
Drizzle a homemade salted caramel sauce over the batter before baking. The caramel adds a sweet‑salty contrast that pairs beautifully with the dark chocolate. Keep the swirl minimal to preserve the gooey center. Serve with a scoop of salted caramel ice cream for an extra indulgent touch.
Espresso Infusion
Add 1 tablespoon of brewed espresso to the chocolate mixture for a rich, coffee‑kissed flavor. The espresso deepens the chocolate’s bitterness and adds a subtle aroma. This variation is perfect for coffee lovers seeking a decadent dessert. Pair with a light whipped cream for balance.
Chili Powder Kick
Stir in 1/4 teaspoon of smoked chili powder for a hint of heat that complements the chocolate’s richness. The mild spiciness adds complexity without overwhelming the flavor. This twist is ideal for adventurous palates craving a bold dessert. A dusting of cocoa powder completes the look.
Coconut Cream Topping
Top the finished cake with a swirl of chilled coconut cream for a tropical vibe. The coconut adds a creamy texture that balances the chocolate’s intensity. Lightly toast coconut flakes to sprinkle on top for added crunch. This version works wonderfully for beachside gatherings.
Berry Compote Drizzle
Serve the cake with a warm berry compote made from fresh raspberries and a splash of balsamic vinegar. The tartness cuts through the sweetness and complements the chocolate. Drizzle the compote over the center for a burst of color and flavor. This pairing is especially delightful in spring.
Lemon Zest Dust
Finish the cake with a light dusting of lemon zest to add brightness and a citrus lift. The zest’s bright oils contrast with the deep chocolate flavor. This variation is refreshing for summer evenings. Pair with a chilled glass of sparkling wine for a celebratory touch.
Storing and Bringing It Back to Life
Fridge Storage
Place the cooled cake in an airtight container and refrigerate for up to four days. The moist crumb will stay tender, and the chocolate center remains silky. When ready to serve, allow the cake to sit at room temperature for 15 minutes to restore its original texture. Avoid over‑refrigerating, as this can dry out the crumb.
Freezer Friendly
Slice the cake into individual portions and wrap each slice tightly in plastic wrap. Place the wrapped slices in a freezer bag and freeze for up to two months. To thaw, leave the slices in the refrigerator overnight. The chocolate will retain its smoothness, and the cake will feel almost fresh.
Best Reheating Method
Reheat frozen or refrigerated slices in a microwave on low power for 15‑20 seconds, or until warm. A tiny splash of water on a paper towel can help steam the cake, keeping it moist. Serve immediately with a drizzle of chocolate sauce or a scoop of ice cream. The reheated cake should feel as decadent as freshly baked.