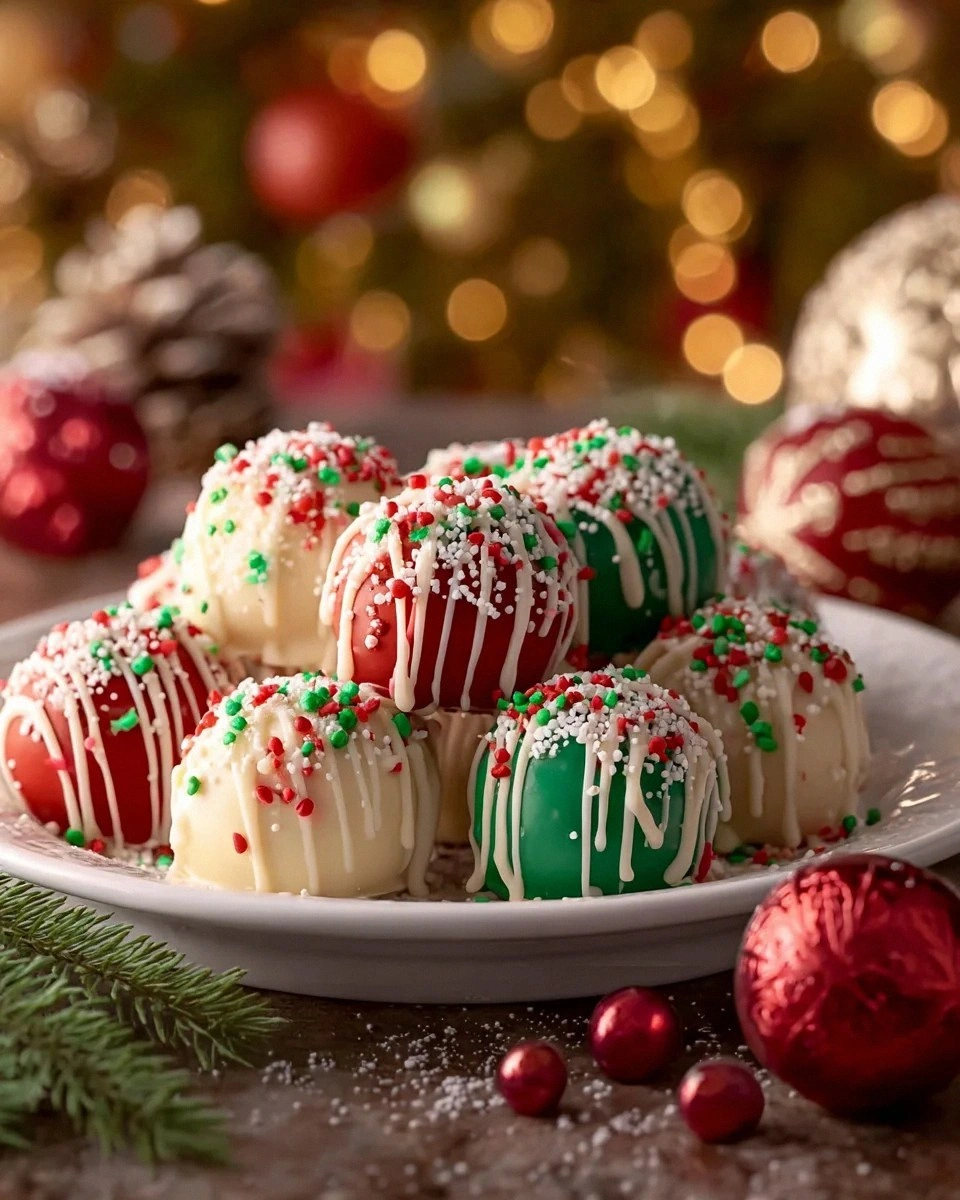
Picture this: it’s the night before the big holiday dinner, the house smells like pine and cinnamon, and you’ve just realized the dessert table is looking a little… bland. I was standing there, spoon in hand, daring anyone to complain about the lack of sparkle, when my roommate shouted, “You’ve got to make those cheesecake bites, but no oven!” I laughed, grabbed a bowl, and thought, “Challenge accepted.” The result? A batch of No‑Bake Christmas Cheesecake Bites that turned the entire kitchen into a festive wonderland, and honestly, I ate half the batch before anyone else got a chance. I dare you to taste this and not go back for seconds.
The moment the first bite hits your tongue, you’re hit with a cascade of flavors that feels like a winter fireworks show. The creamy, tangy cheesecake center is hugged by a buttery graham cracker crust, all cloaked in a glossy white‑chocolate shell that shatters like delicate snowflakes. Then, the surprise pop of red and green candy melt drizzles over the top, with a sprinkle of festive confetti that makes each piece look like a tiny Christmas ornament. You can almost hear the crackle as the chocolate breaks, see the sparkle of the sprinkles, and feel the cool, velvety texture melt against your palate. It’s a full‑sensory celebration, and it’s all happening without a single oven‑baked minute.
Most recipes I’ve tried for holiday cheesecake bites either demand a freezer‑long set‑up that leaves you staring at a cold slab of “no‑taste” or they rely on a soggy crust that collapses under the weight of the topping. This version stands out because it balances simplicity with elegance, using only a handful of pantry staples while delivering a texture that’s crisp on the outside and luxuriously smooth inside. The secret? A quick‑melt white‑chocolate coating that locks in moisture, and a strategic layering of crushed graham crackers that creates a perfect bite‑size crunch. Trust me, this is hands down the best version you’ll ever make at home.
Now, I’m about to walk you through every single step — by the end, you’ll wonder how you ever made any other cheesecake bite any other way. Okay, ready for the game‑changer? Let’s dive into the magic.
What Makes This Version Stand Out
- Flavor Explosion: The combination of tangy cream cheese, sweet white chocolate, and a hint of vanilla creates a taste profile that feels like a holiday hug in every bite. The red and green chocolate drizzles add a festive pop that’s both visual and flavorful.
- Texture Harmony: A buttery graham cracker base gives a satisfying crunch, while the creamy interior melts like snow on a warm tongue. The outer white‑chocolate shell cracks cleanly, delivering that perfect snap.
- Simplicity: No oven, no complicated equipment, just a microwave, a mixing bowl, and a few simple tools. You can whip these up while the turkey roasts, saving you precious kitchen real estate.
- Make‑Ahead Friendly: Because there’s no baking, you can assemble the bites a day ahead, let them set in the fridge, and they’ll stay fresh and firm, ready to dazzle your guests.
- Visual Wow Factor: The bright red and green drizzles turn each bite into a miniature Christmas ornament, making the platter look like a holiday masterpiece without any extra effort.
- Ingredient Quality: Using real cream cheese and premium white chocolate ensures a rich, authentic flavor that cheap substitutes simply can’t match.
- Crowd Reaction: I’ve seen grown‑ups and kids alike pause, stare, and then dive in with reckless abandon. It’s the kind of treat that sparks conversation and repeat requests.
- Versatility: Swap the candy melts for any color you like, or replace the graham crackers with chocolate cookie crumbs for a double‑chocolate twist. The canvas is yours.
Inside the Ingredient List
The Flavor Base
Cream Cheese: The star of the show! Use softened cream cheese for a smooth and creamy texture. Let it sit out for about 30 minutes before mixing; this prevents lumps and makes incorporation effortless. If you skip this step, you’ll end up with a grainy bite that feels like you’re chewing on curd.
Powdered Sugar: This sweet touch balances the tanginess of the cream cheese. It dissolves easily, giving the bites a lovely sweetness without grittiness. You can substitute with a blend of granulated sugar and cornstarch if you’re out of powdered sugar, but the texture won’t be quite as silk.
Vanilla Extract: A splash of vanilla enhances the flavor. It’s like a warm hug in every bite, bringing out the best in the cheesecake mixture. Opt for pure vanilla for depth; imitation can taste flat.
The Texture Crew
Crushed Graham Crackers or Cookie Crumbs: These provide that essential crunch. You can use traditional graham crackers for a classic taste, or swap in chocolate cookies for a richer profile. If you over‑process them, the crust becomes too fine and loses its bite, so pulse just enough to get coarse crumbs.
Whipped Topping (Cool Whip): This light fluffiness adds volume and creaminess to the mixture, making it irresistibly smooth. It also stabilizes the filling, preventing it from becoming too dense. For a dairy‑free version, try a coconut‑based whipped topping.
The Unexpected Star
White Chocolate Chips: These add a rich sweetness and create a luscious chocolate coating. Melting them is simple and makes a wonderful base. Use high‑quality chips; low‑fat varieties can become grainy when melted.
Red and Green Melting Chocolate or Candy Melts: These make your bites festive! They can also be swapped with any color for different occasions. The key is to melt them gently, using short bursts in the microwave to avoid scorching.
The Final Flourish
Holiday Sprinkles: Want to add a pop of festivity? Sprinkles are the perfect finishing touch, elevating your treats to a cheerful favorite. Choose non‑edible glitter for extra sparkle, but keep edible sprinkles for flavor.
Everything's prepped? Good. Let’s get into the real action…
The Method — Step by Step
Start by softening the cream cheese. Place the block in a large mixing bowl and let it sit at room temperature for 30 minutes. While you wait, line a baking sheet with parchment paper; this will be your cooling rack later. Once softened, beat the cream cheese with an electric mixer on medium speed until it’s silky and free of lumps. The mixture should look glossy, not grainy.
Add the powdered sugar and vanilla extract to the softened cream cheese. Sprinkle the sugar slowly while the mixer runs to avoid a cloud of sweet dust. Continue beating until the mixture is light and fluffy, about 2‑3 minutes. At this point, the batter should be thick enough to hold its shape when scooped. This is the moment of truth — if it feels too runny, add a tablespoon more powdered sugar.
Gently fold in the whipped topping (Cool Whip) until just combined. The goal is to keep the mixture airy, so stop mixing as soon as you see a uniform swirl. Next, stir in the crushed graham crackers or cookie crumbs, distributing them evenly. The crumbs should coat the interior, creating a subtle crunch that will contrast with the smooth outer shell.
Now, it’s time for the white‑chocolate coating. Place the white chocolate chips in a microwave‑safe bowl, add a teaspoon of coconut oil (see Kitchen Hack above), and melt in 20‑second bursts, stirring in between. The chocolate should become glossy and fluid, not overheated. Once melted, let it cool for about a minute so it’s still liquid but not scorching.
Using a small cookie scoop (about one tablespoon), portion out the cheesecake mixture onto the prepared parchment. Press each mound gently to form a compact disc, about 1‑inch thick. This is where the magic happens; the more compact the disc, the less likely it will crack when you dip it later. Place the formed discs in the freezer for 10‑15 minutes to firm up — this step is crucial for a clean dip.
Prepare your dipping station. Fill a shallow dish with the melted white chocolate. If you want a thicker coating, you can double‑dip: first dip, let set, then dip again. While the chocolate is still warm, dip each chilled cheesecake disc, rotating to coat all sides. Let excess drip off, then place the coated bites back onto the parchment.
While the white‑chocolate shell is still soft, drizzle the red and green candy melts over each bite. Use a small spoon or a squeeze bottle for precision. The drizzles should create a festive zig‑zag pattern, reminiscent of holiday lights. Sprinkle holiday sprinkles on top while the chocolate is still tacky, ensuring they stick.
Allow the finished bites to set completely. Transfer the tray to the refrigerator for at least 30 minutes, or to the freezer for a quicker set. Once firm, gently lift the bites with a spatula and arrange them on a serving platter. That’s it — you did it. But hold on, I’ve got a few more tricks that’ll take this to another level…
Insider Tricks for Flawless Results
The Temperature Rule Nobody Follows
Never dip a warm cheesecake disc into cold chocolate; the temperature shock will cause the coating to crack. Keep the discs chilled until the very last second, and make sure the chocolate is just warm enough to flow. I once tried to speed things up by leaving the discs at room temperature — the result was a shattered shell that looked more like broken glass than a festive treat.
Why Your Nose Knows Best
The moment you smell the faint buttery aroma from the melted white chocolate, you know it’s ready. If you can’t detect that nutty scent, the chocolate is still too cool and will set too hard, making the drizzle uneven. Trust your nose; it’s a more reliable thermometer than a kitchen gadget for this delicate step.
The 5‑Minute Rest That Changes Everything
After you finish drizzling and sprinkling, let the bites rest uncovered for five minutes before refrigerating. This short pause lets the surface moisture evaporate, preventing a soggy finish. A friend once skipped this rest and ended up with a gummy bottom that never firmed up.
Double‑Dip for Double Delight
If you crave an extra thick shell, dip the bites a second time after the first coat has set for about two minutes. The second layer adds a satisfying snap and a richer chocolate flavor. Just be careful not to over‑dip, or the bite will become too hard to bite through.
Seasonal Swirl Technique
When drizzling the red and green melts, use a quick back‑and‑forth motion to create a swirl rather than straight lines. This not only looks more festive but also distributes the color evenly, ensuring each bite gets a burst of holiday hue. It’s a tiny visual trick that makes a massive impact on the platter’s overall aesthetic.
Creative Twists and Variations
This recipe is a playground. Here are some of my favorite ways to switch things up:
Chocolate‑Lover’s Dream
Swap the white‑chocolate coating for dark chocolate and use crushed chocolate cookies instead of graham crackers. Add a pinch of espresso powder to the filling for a mocha kick. Perfect for the cocoa‑obsessed crowd.
Berry Bright
Replace the red candy melt with raspberry coulis and the green melt with a mint‑flavored white chocolate. Fold in a handful of freeze‑dried raspberries into the cheesecake mixture for a pop of tartness. Ideal for a springtime twist.
Nutty Noel
Stir finely chopped toasted pecans or walnuts into the crust mixture, and drizzle with caramel instead of candy melts. Top with a drizzle of sea‑salted chocolate for a sweet‑and‑savory combo that feels indulgent.
Vegan Victory
Use a plant‑based cream cheese alternative, coconut‑sweetened whipped topping, and dairy‑free white chocolate. Swap the graham crackers for oat‑based cookies. The result is a dairy‑free delight that still satisfies the holiday cravings.
Spiced Surprise
Add a pinch of ground cinnamon and a dash of ground ginger to the cheesecake filling. Use gingerbread cookie crumbs for the crust, and drizzle with a spiced dark chocolate (infused with a hint of clove). This gives the bites a warm, holiday‑spice profile.
Storing and Bringing It Back to Life
Fridge Storage
Place the bites in an airtight container lined with parchment paper to prevent sticking. They’ll stay fresh for up to five days. If you notice any condensation, pat the tops gently with a paper towel before resealing.
Freezer Friendly
For longer keeping, arrange the bites on a baking sheet, freeze until solid (about 1 hour), then transfer to a zip‑top freezer bag. They’ll keep for up to two months. When you’re ready to serve, let them thaw in the fridge for 30 minutes, then give them a quick room‑temperature sit‑up for that perfect bite‑temperature.
Best Reheating Method
Although these are best served cold, if you prefer a slightly softer texture, place the bites on a microwave‑safe plate, add a tiny splash (about a teaspoon) of water to the plate, and microwave on low for 10‑15 seconds. The steam will revive the creamy center without melting the chocolate shell.