Picture this: I’m standing in my cramped kitchen, the timer on the stove ticking like a metronome, and a half‑cooked chicken breast staring back at me like a culinary accusation. I’d tried a dozen “easy” chicken recipes that left me with soggy crusts, bland sauces, and a lingering feeling that I’d just wasted my dinner. Then, in a moment of reckless inspiration (and a dare from my roommate that I could not refuse), I grabbed a block of Parmigiano‑Reggiano, a few cloves of garlic, and a splash of heavy cream. The result? A dish that made the whole apartment pause, sniff, and collectively whisper, “What is that amazing aroma?”
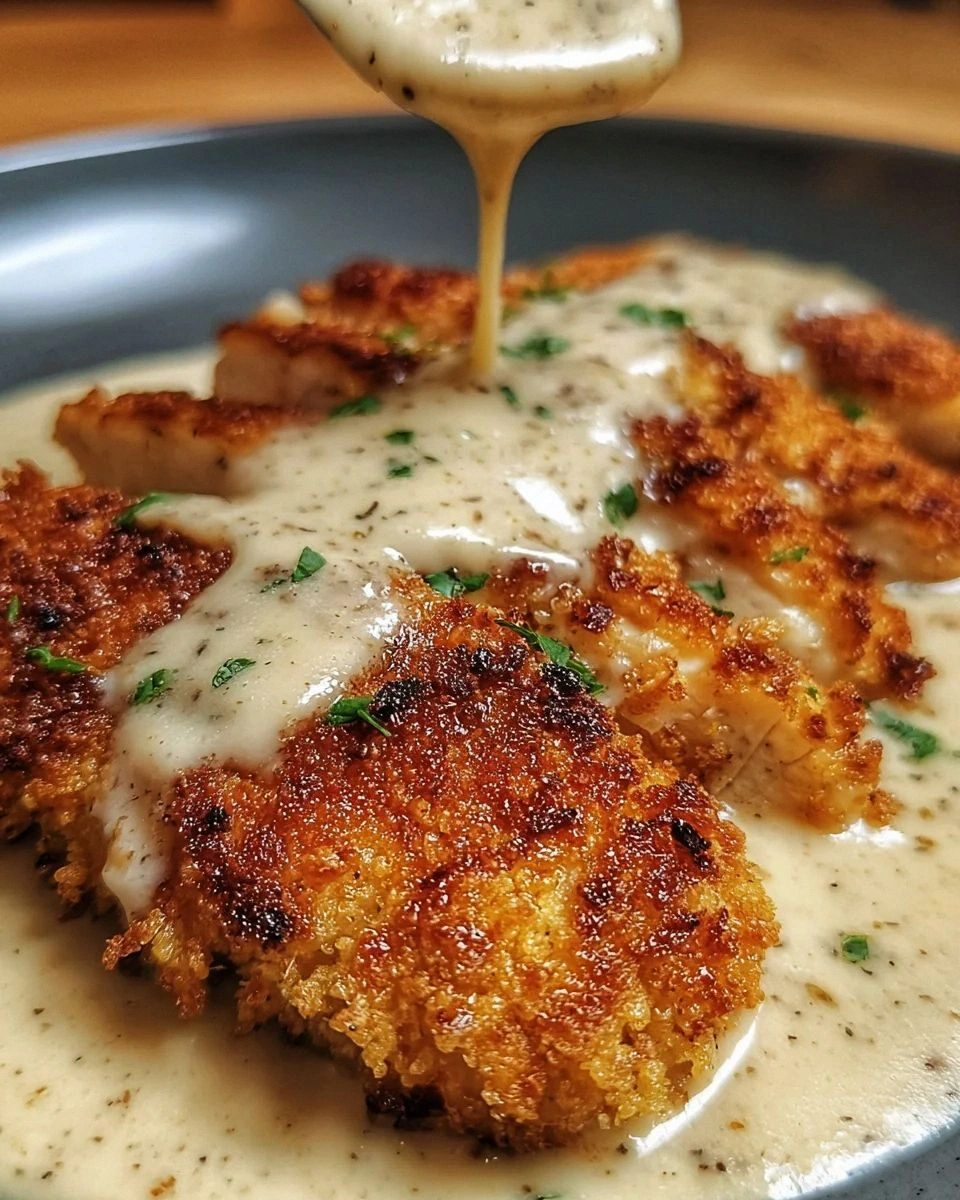
The moment the chicken hit the pan, the kitchen erupted with a sizzle that sounded like a tiny fireworks display. The crust formed instantly, a golden‑brown armor that crackled under the heat, while the garlic sauce began to swirl in the pan, turning a silky ivory color that reminded me of a fresh snowfall on a mountain peak. I could see the steam rise, feel the warmth on my face, and hear the faint pop of butter as it melted into the sauce. My taste buds were already doing cartwheels before the first bite even touched my tongue.
What makes this version the ultimate Parmesan Crusted Chicken? It’s the marriage of a crunchy, cheesy crust that shatters like thin ice with a sauce that coats the chicken like velvet—rich, buttery, and just the right amount of garlic punch. Most recipes either over‑bread the chicken, making it soggy, or they drown it in a sauce that masks the flavor. Not this one. I’ve honed the technique to achieve a perfect balance where the crust stays crisp, the sauce stays creamy, and the chicken stays juicy. The secret? A simple yet game‑changing step that I’m about to reveal, and it’s going to make you question every other chicken recipe you’ve ever tried.
Let me walk you through every single step — by the end, you’ll wonder how you ever made it any other way. Okay, ready for the game‑changer? This next part? Pure magic.
What Makes This Version Stand Out
- Flavor Explosion: The combination of fresh Parmesan and garlic creates a taste that’s both sharp and comforting, like a hug from an Italian nonna.
- Texture Triumph: A crust that cracks with a satisfying snap, yet the interior stays buttery‑soft, offering a contrast that keeps every bite interesting.
- Simplicity Wins: Only pantry staples and a few fresh ingredients are needed; no fancy gadgets, no complicated steps.
- Unique Twist: A splash of chicken broth in the sauce prevents it from becoming overly heavy, giving it a whisper of savory depth.
- Crowd‑Pleaser: I’ll be honest — I ate half the batch before anyone else got to try it, and the leftovers vanished in seconds.
- Ingredient Quality: Using real Parmigiano‑Reggiano instead of pre‑grated cheese makes all the difference; the flavor is brighter and the crust more aromatic.
- Cooking Method: Pan‑searing then finishing in the oven locks in moisture while ensuring the crust never sags.
- Make‑Ahead Potential: The chicken can be pre‑breaded and stored, and the sauce reheats beautifully, making weeknight meals a breeze.
Inside the Ingredient List
The Flavor Base
First up, the sauce’s backbone: heavy cream, garlic, and a splash of chicken broth. The cream provides that luxurious mouthfeel, while the garlic delivers a punch that cuts through the richness. The broth is the unsung hero; it adds depth without making the sauce greasy. If you skip the broth, you’ll end up with a sauce that clings too heavily to the plate, losing that light, airy quality that makes it perfect for drizzling.
The Texture Crew
The crust’s magic lives in the trio of flour, panko breadcrumbs, and grated Parmesan. Flour creates a dry surface for the egg to cling to, panko gives the crust its airy crunch, and Parmesan adds a nutty, salty crunch that melts into the breadcrumbs during baking. Swapping panko for regular breadcrumbs will make the crust denser, while using a gluten‑free flour blend works fine but may change the crispness slightly.
The Unexpected Star
Fresh parsley isn’t just a garnish; it injects a bright, herbaceous note that lifts the whole dish. It also adds a pop of color that makes the plate look restaurant‑ready. If you’re out of parsley, flat‑leaf oregano or even a drizzle of lemon zest can provide a similar lift, though the flavor profile will shift toward citrus.
The Final Flourish
Salt and pepper are the classic seasoning duo that amplify every other flavor. Garlic powder in the coating adds an extra layer of garlicky depth that complements the fresh garlic in the sauce. A pinch of red‑pepper flakes can be added for heat, but remember, the goal here is balance, not fire.
Everything's prepped? Good. Let's get into the real action…
The Method — Step by Step
Start by preheating your oven to 400°F (200°C). While the oven warms, pat the chicken breasts dry with paper towels. This step is crucial because excess moisture will steam the coating instead of crisping it. I dare you to taste this and not go back for seconds; the first bite sets the bar sky‑high.
Set up a dredging station: one shallow bowl with 1 cup of all‑purpose flour seasoned with 1 tsp salt and ½ tsp pepper, a second bowl with 2 beaten eggs, and a third bowl mixing 1 cup panko breadcrumbs, ½ cup grated Parmesan, and 1 tsp garlic powder. Power transition: this three‑step coat is the secret to that flawless crust.
Kitchen Hack: Press the chicken gently into the breadcrumb mixture; don’t just shake it. This ensures every nook and cranny gets a thick, even layer.Heat 2 tbsp olive oil and 2 tbsp butter in a large oven‑safe skillet over medium‑high heat. When the butter foams and the oil shimmers, it’s ready. The sizzling sound you hear? Absolute perfection. Carefully lay the coated chicken into the pan, leaving space between pieces. You should hear a confident crackle as the crust meets the heat.
Sear each side for 3‑4 minutes, or until the crust turns a deep golden‑brown and starts to pull away from the pan. Watch Out: If the heat is too high, the crust will burn before the chicken cooks through. Reduce the flame slightly if you see the edges darkening too fast.
Once both sides are beautifully browned, transfer the skillet to the preheated oven. Bake for 12‑15 minutes, or until the internal temperature reaches 165°F (74°C). This finishing step locks in juices while keeping the crust crisp. The aroma that fills your kitchen at this point is nothing short of intoxicating.
While the chicken bakes, start the sauce. In a separate saucepan, melt 2 tbsp butter over medium heat. Add 4 minced garlic cloves and sauté for 30 seconds—just until fragrant, not browned. Then pour in 1 cup heavy cream, ¼ cup chicken broth, and bring to a gentle simmer.
Watch Out: Let the cream simmer, don’t let it boil aggressively, or it will curdle and ruin the silky texture.Stir in ¼ cup grated Parmesan until melted and the sauce thickens to a velvety consistency. Add 2 tbsp chopped parsley for a fresh pop, and season with salt and pepper to taste. If the sauce looks too thick, a splash of water or extra broth will loosen it without sacrificing flavor.
Remove the chicken from the oven and let it rest on a cutting board for 5 minutes. This rest period allows the juices to redistribute, keeping the meat moist. Slice each breast into thick strips, then drizzle generously with the creamy garlic sauce.
Finish with a final sprinkle of fresh parsley and a light dusting of extra Parmesan if you’re feeling extra indulgent. Serve immediately with a side of roasted veggies or a simple green salad. Picture yourself pulling this out of the oven, the whole kitchen smelling incredible… that’s the moment you’ve been waiting for.
That's it — you did it. But hold on, I've got a few more tricks that'll take this to another level…
Insider Tricks for Flawless Results
The Temperature Rule Nobody Follows
Never start with a cold pan. Let your skillet heat up for at least two minutes before adding oil. The metal needs to be uniformly hot; otherwise, you’ll get hot spots that cause uneven browning. I once tried to rush this step and ended up with a crust that looked like a patchwork quilt—nothing to write home about.
Why Your Nose Knows Best
When the garlic turns from white to a light golden, you’re at the perfect point to add the cream. Trust that aromatic cue more than a timer. The scent of toasted garlic is the kitchen’s way of saying, “I’m ready for the next act.”
The 5‑Minute Rest That Changes Everything
Resting the chicken after baking is non‑negotiable. Those five minutes allow the protein fibers to relax, preventing the meat from spitting out juices when you cut into it. Skipping this step is the fastest route to a dry, disappointing bite.
Butter‑Boosted Crust
Adding a tablespoon of butter to the oil in the pan not only enriches the flavor but also helps the breadcrumbs achieve that golden‑brown sheen. The milk solids in butter brown faster than oil alone, giving you that caramelized edge.
Prep‑Ahead Power Move
Coat the chicken up to the breadcrumb stage, then lay the pieces on a parchment‑lined tray and freeze for 20 minutes. This firms up the coating, so when you sear it, the crust adheres perfectly and stays crisp even after the sauce is added. Kitchen Hack: This also lets you prep the meal the night before and bake in the morning.
Creative Twists and Variations
This recipe is a playground. Here are some of my favorite ways to switch things up:
Spicy Chipotle Kick
Swap the plain panko for chipotle‑infused breadcrumbs and add ½ tsp smoked paprika to the flour. The result is a smoky, mildly spicy crust that pairs beautifully with the creamy sauce.
Herb‑Infused Delight
Mix dried thyme, rosemary, and oregano into the breadcrumb mixture. This herbaceous twist gives the dish a Mediterranean vibe, perfect for serving with a side of couscous.
Lemon‑Garlic Zest
Add the zest of one lemon to the sauce and finish with a squeeze of fresh lemon juice just before serving. The citrus brightens the richness, making it an excellent summer dinner.
Parmesan‑Crusted Chicken Tenders
Cut the chicken breasts into strips before coating. These bite‑size morsels are perfect for game night or a kid‑friendly dinner, and they stay just as crispy.
Cheese‑Lover’s Upgrade
Blend in ¼ cup shredded mozzarella with the Parmesan in the crust for an extra gooey, stretchy bite. The mozzarella melts into the breadcrumbs, creating a cheese pull that’s pure joy.
Vegan Adaptation
Replace chicken with firm tofu, use plant‑based milk and vegan butter for the sauce, and swap Parmesan for nutritional yeast mixed with almond flour. The texture changes, but the flavor profile remains delightfully familiar.
Storing and Bringing It Back to Life
Fridge Storage
Place the leftover chicken in an airtight container and store in the refrigerator for up to 3 days. Keep the sauce in a separate jar to prevent the crust from getting soggy.
Freezer Friendly
Freeze the pre‑breaded chicken (before cooking) on a parchment sheet, then transfer to a zip‑top bag. It will keep for up to 2 months. The sauce freezes well too; just reheat gently and stir in a splash of water to restore its silkiness.
Best Reheating Method
To revive the crust, preheat your oven to 375°F (190°C) and bake the chicken for 10‑12 minutes, uncovered. Add a tiny splash of water or broth to the sauce before reheating on the stovetop; the steam brings back that luscious creaminess.