If you think pumpkin pie is the pinnacle of fall desserts, think again. A few years back, I was scrambling to whip up a quick treat for a Halloween party, and the kitchen was a chaotic blend of melted chocolate, crushed cookies, and a frantic dash of milk. The result? A sloppy, pudding‑like mess that looked like it had been buried in a pumpkin patch. Yet, as I tasted that first spoonful, my taste buds erupted in a symphony of sweet, earthy, and slightly mischievous flavors. I was instantly hooked.
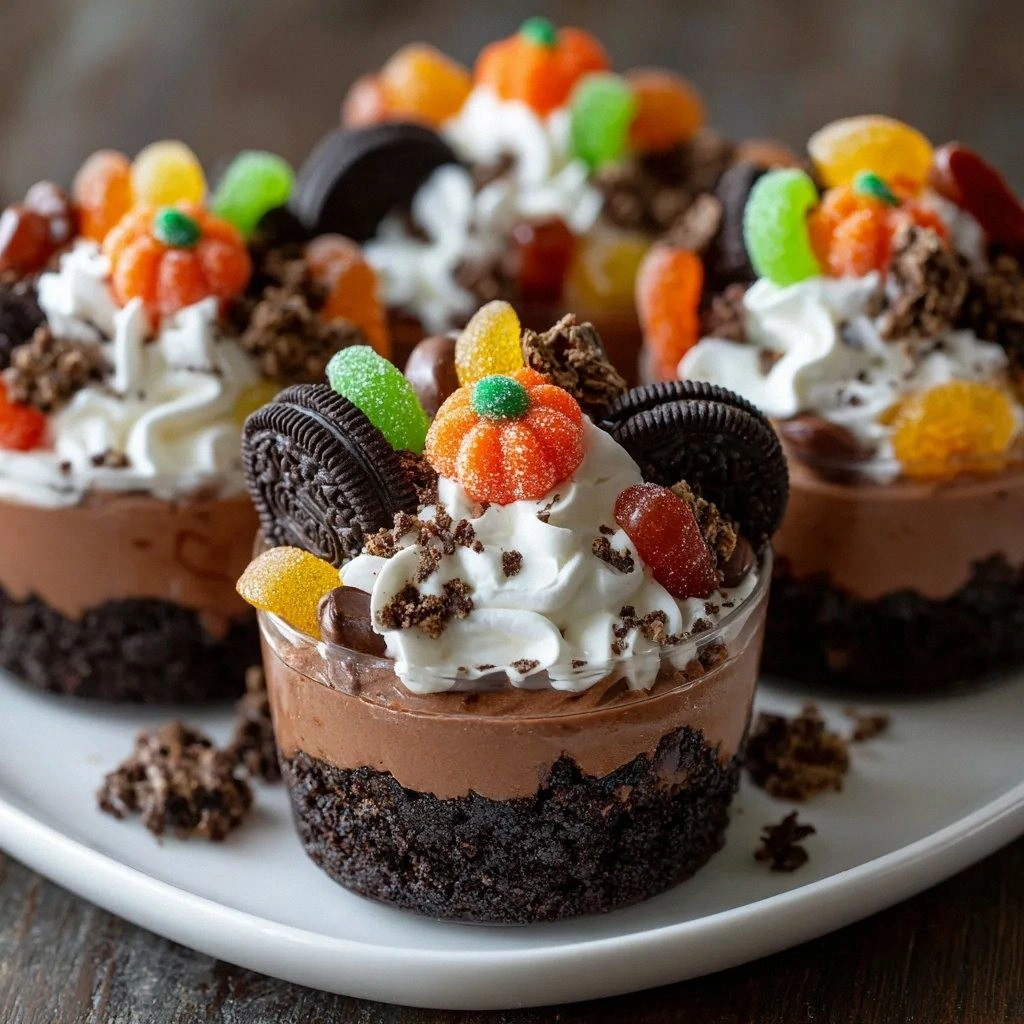
The aroma that filled the room was like a warm, chocolaty hug with a hint of autumn. The sound of the mixer whirring, the gentle hiss of milk heating, and the faint crackle of cookie crumbs all contributed to a sensory experience that was almost cinematic. The texture—soft, creamy, and speckled with crunchy bits—was like walking through a forest floor after a rainstorm, each bite a new discovery. The visual appeal was undeniable: a dark, glossy pudding base, a layer of cookie “dirt,” and bright, pumpkin‑flavored candies peeking out like hidden treasures. The first bite was an instant reminder that dessert could be playful and sophisticated at once.
What sets this version apart from the countless pumpkin‑themed treats you’ll find online is the meticulous balance of flavors and textures. The pudding base is rich enough to satisfy chocolate lovers while the cookie layer adds a satisfying crunch that mimics real dirt. The pumpkin candies bring a pop of color and a subtle, fruity sweetness that cuts through the chocolatey heaviness. And the green gummy worms? They’re not just a gimmick; they add a whimsical, almost nostalgic touch that turns each cup into a miniature scene from a childhood pumpkin patch. I dare you to taste this and not go back for seconds.
Most recipes get this completely wrong. They either over‑sweeten the pudding, under‑crunch the cookie layer, or forget the playful garnish that makes the dish memorable. The secret? A precise ratio of pudding to milk, a generous crush of chocolate sandwich cookies, and a strategic placement of the candies and worms. The result is a dessert that is both comforting and adventurous, a dessert that feels like a secret garden hidden in your kitchen. It’s the kind of dish that will have your guests asking for the recipe after the party is over.
Picture yourself pulling this out of the fridge, the whole kitchen smelling incredible, and seeing the little “patches” of pumpkin and green worms on every cup. The moment you set the cups on the table, the room lights up with curiosity and delight. I’ll be honest—before I discovered this version, I’d made the standard pumpkin dessert that never quite satisfied my craving for something extra. That was until I experimented with a different pudding base and a creative garnish. And now, I’ve perfected it. Let me walk you through every single step—by the end, you’ll wonder how you ever made it any other way.
What Makes This Version Stand Out
- Flavor: The chocolate pudding mix provides a deep, velvety base that contrasts beautifully with the bright, fruity pumpkin candies. The combination feels like a dessert that’s both classic and daring.
- Texture: The crushed chocolate sandwich cookies create a crunchy “dirt” layer that gives the cups a satisfying bite. Each spoonful is a delightful mix of creamy pudding and crunchy cookie.
- Visual Appeal: The vibrant orange of the pumpkin candies against the dark pudding and green gummy worms makes each cup a work of art. It’s a dessert that’s as fun to look at as it is to eat.
- Ease of Preparation: Every step is straightforward, with minimal cleanup. No advanced techniques required, making it a great choice for busy evenings.
- Make‑Ahead Potential: The cups can be assembled up to two days in advance, letting you focus on the party details. The pudding stays fresh, and the cookie “dirt” remains crunchy.
- Party Appeal: Guests of all ages love the playful design. It’s a conversation starter and a crowd‑pleaser that will keep the party lively.
- Ingredient Quality: Using a high‑quality chocolate pudding mix and fresh cookies elevates the dish. The better the base, the richer the final product.
- Ingredient Versatility: Swap out the pumpkin candies for other seasonal sweets or add a splash of espresso for an extra kick. The base is adaptable to your taste.
Alright, let's break down exactly what goes into this masterpiece. And remember, the secret ingredient is the “dirt” layer—crushed cookies that mimic the texture of real soil.
Inside the Ingredient List
The Flavor Base
Chocolate pudding mix is the backbone of this dessert. It provides a silky, chocolatey foundation that balances the sweetness of the pumpkin candies. The mix’s powdered sugar content keeps the pudding from becoming too dense. If you skip the pudding mix, you’ll lose that rich, velvety mouthfeel that makes the cups feel indulgent. For the best flavor, choose a mix with a high cocoa content—dark chocolate versions add a slightly bitter depth that pairs well with the sweet gummies. If you’re watching calories, look for a low‑sugar or sugar‑free option, but be prepared to adjust the milk quantity accordingly.
Milk is essential for activating the pudding mix and achieving the right consistency. Whole milk gives a creamier texture, but any milk will work—skim, soy, or oat are all acceptable substitutes. If you use a lower‑fat milk, add a splash of heavy cream to compensate for the reduced richness. Skipping milk will result in a powdery, unappealing pudding that won’t hold its shape. When measuring milk, use a liquid measuring cup to ensure accuracy. A small mistake in the milk-to-pudding ratio can turn a luscious dessert into a watery mess.
Crushed chocolate sandwich cookies are the “dirt” layer that makes the cups visually and texturally exciting. The cookies add a crunchy contrast to the creamy pudding and a subtle chocolate flavor that enhances the overall taste. If you’re gluten‑free, look for a cookie that meets your dietary needs. If you can’t find chocolate sandwich cookies, you can use any chocolate cookie or even chocolate wafer crumbs. The key is to crush them finely enough that they don’t clump but still retain a texture reminiscent of soil. This step is crucial—without it, the cups will feel flat and uninspired.
Whipped cream lightens the pudding, giving it a fluffy, airy quality that feels like a cloud. The whipped cream also serves as a decorative layer that makes the cups look more polished. For a dairy‑free version, use a plant‑based whipped topping. If you prefer a firmer topping, chill the whipped cream before spooning it into the cups. Avoid over‑whipping; you want a light, airy texture that doesn’t collapse when you add the candies. A good rule of thumb is to whip until soft peaks form and then fold gently into the pudding to preserve the airy feel.
The Unexpected Star
Pumpkin‑flavored candies or gummies are what give the cups that unmistakable fall vibe. They add a bright, fruity sweetness that cuts through the chocolate richness. The candies also provide a pop of color—orange against dark pudding—making each cup a visual treat. If you can’t find pumpkin gummies, substitute with orange‑colored jelly beans or candy corn for a similar effect. The candies should be added after the pudding has set to prevent them from dissolving. This step is essential for the authentic pumpkin patch aesthetic.
Green gummy worms are the whimsical touch that turns the dessert into a playful scene. They mimic worms in the dirt, adding a fun, nostalgic element that kids and adults alike will love. If you’re allergic to gelatin, look for a gelatin‑free gummy worm or use a small piece of green licorice. The worms should be placed on top of the pudding or tucked into the cookie layer for a “buried” effect. A good tip is to sprinkle a few extra worms on the top for a dramatic finish.
Everything’s prepped? Good. Let’s get into the real action and start building those cups.
The Method — Step by Step
- Step 1: Prepare the pudding. In a medium saucepan, whisk together the chocolate pudding mix and milk until smooth. Heat over medium heat, stirring constantly, until the mixture thickens and comes to a gentle boil. This should take about 5 minutes. Once it reaches a thick, glossy consistency, remove it from heat and let it cool slightly. The pudding should still be pourable but not runny.
- Step 2: Crush the cookies. Place the chocolate sandwich cookies in a zip‑lock bag and crush them with a rolling pin or a food processor. Aim for crumbs that are slightly larger than fine sand; you want them to be crunchy but not powdery. The size of the crumbs matters because it affects the “dirt” feel. If you prefer a finer texture, pulse the cookies briefly in the processor. Once crushed, set the crumbs aside.
- Step 3: Whip the cream. In a chilled bowl, beat the whipped cream until soft peaks form. If you’re using a dairy‑free alternative, follow the package instructions for whipping. The cream should be light and airy, not thick or heavy. A good test is to lift the beaters; the peaks should hold their shape but fall back slightly. This whipped layer will sit on top of the pudding and add a cloud‑like finish.
- Step 4: Assemble the base. Spoon a generous layer of the chocolate pudding into each serving cup, filling them about two‑thirds full. The pudding should be spread evenly so that every bite has the same chocolatey base. This layer is the foundation; it needs to be thick enough to hold the subsequent layers without sinking. Use a spatula to smooth the surface if desired. The goal is a uniform, glossy base that looks like dark soil.
- Step 5: Add the cookie “dirt.” Sprinkle the crushed cookies evenly over the pudding. The crumbs should cover the surface but not completely bury the pudding. This layer gives the cups a rustic, earthy look. The cookies also add crunch that contrasts the creamy pudding. If you want a more pronounced dirt effect, press the crumbs gently into the pudding so they adhere better.
- Step 6: Layer the pumpkin candies. Gently place the pumpkin‑flavored candies on top of the cookie layer. The candies should be scattered like seeds in soil. The bright orange color will pop against the dark pudding. This step is crucial for the pumpkin patch aesthetic. Be sure to distribute them evenly for a uniform look.
- Step 7: Add the green gummy worms. Tuck a few green gummy worms into the pudding or place them on top of the candies. They’ll look like worms crawling through the dirt. This playful touch is what turns a simple dessert into a fun, interactive experience. The worms should be visible enough to be noticed but not so many that they overwhelm the cup.
- Step 8: Finish with whipped cream. Spoon or pipe a dollop of whipped cream onto the top of each cup. The cream should sit on top of the candies and worms, creating a fluffy, cloud‑like finish. If you want a more dramatic effect, use a piping bag with a star tip. The whipped cream also helps to keep the layers separate, preventing the pudding from soaking into the crumbs.
- Step 9: Chill and serve. Place the cups in the refrigerator for at least 30 minutes to allow the layers to set and the flavors to meld. The pudding will firm up, and the cookie crumbs will maintain their crunch. When ready to serve, remove them from the fridge and let them sit at room temperature for a few minutes. This final touch ensures the whipped cream remains fluffy and the pudding stays smooth.
That’s it— you did it. But hold on, I've got a few more tricks that'll take this to another level. These insider tips will help you avoid common pitfalls and elevate the overall experience.
Insider Tricks for Flawless Results
The Temperature Rule Nobody Follows
Temperature control is everything when making pudding. If the mixture is too hot, it can seize and become grainy. If it’s too cool, it won’t thicken properly. The sweet spot is a gentle boil—just enough to thicken without scorching. Use a thermometer to monitor the heat; aim for 80–85°C. This ensures a silky texture that coats the spoon like velvet.
Why Your Nose Knows Best
Smell the pudding as it cooks. A faint, chocolatey aroma signals that the pudding is developing flavor. If you detect a burnt scent, lower the heat immediately. Your nose is a reliable indicator of doneness, especially when you’re dealing with powdered mixes that can quickly go from perfect to burnt.
The 5-Minute Rest That Changes Everything
After the pudding has thickened, let it rest for 5 minutes off the heat. This allows the starches to fully gelatinize, resulting in a smoother final product. Skipping this step can leave the pudding slightly grainy. The rest period is short, but it’s worth the extra minute for that silky finish.
Use a Double Boiler for Even Heating
A double boiler ensures gentle, even heat distribution. The indirect heat prevents the pudding from scorching on the bottom of the pan. If you don’t have a double boiler, place a heat‑proof bowl over a pot of simmering water. This method works wonders for delicate desserts like pudding.
Keep the Crumbs Fresh
Crushed cookies can become stale quickly. Crush them fresh just before assembling the cups. If you need to prepare the crumbs ahead of time, store them in an airtight container at room temperature. This keeps them crunchy and prevents them from absorbing moisture from the pudding.
Store Cups Properly
After assembling, cover the cups with plastic wrap and refrigerate. This prevents the whipped cream from drying out and keeps the pudding from absorbing odors from other foods. If you’re making them a day ahead, keep them chilled until you’re ready to serve. The cups will stay fresh and the flavors will meld beautifully.
Creative Twists and Variations
This recipe is a playground. Here are some of my favorite ways to switch things up:
Chocolate‑Mocha Madness
Swap the chocolate pudding mix for a mocha‑flavored version. Add a teaspoon of instant espresso powder to the milk before whisking. The result is a coffee‑infused, chocolatey delight that pairs well with pumpkin candies. It’s a great option for coffee lovers who want a dessert with a caffeine kick.
Nutty Crunch Edition
Incorporate chopped toasted almonds or pecans into the cookie layer. The nuts add a buttery crunch that complements the chocolate base. Use a nut‑free cookie if you’re serving guests with allergies. This variation adds a sophisticated texture and nutty aroma.
Berry Burst Surprise
Replace the pumpkin candies with dried cranberries or dried orange peel. The tartness of the berries cuts through the chocolate richness and adds a surprising burst of flavor. This version is perfect for guests who love a balance of sweet and tart.
Vegan Delight
Use a dairy‑free chocolate pudding mix and plant‑based whipped topping. Substitute the chocolate sandwich cookies with gluten‑free, vegan chocolate cookies. The result is a completely plant‑based dessert that still feels indulgent. Vegan guests will thank you for this thoughtful adaptation.
Spiced Pumpkin Twist
Add a pinch of ground cinnamon, nutmeg, and clove to the pudding mix. The spices will give the dessert an aromatic, warming flavor profile that feels like a true pumpkin treat. The spices also enhance the pumpkin candy’s natural sweetness.
Miniature Pumpkin Pockets
Instead of cups, spoon the pudding into mini muffin tins and bake briefly until the edges set. Once cooled, fill the pockets with the cookie crumbs, candies, and worms. This version is great for parties where bite‑size portions are preferred.
Storing and Bringing It Back to Life
Fridge Storage
Store the cups in an airtight container in the refrigerator for up to two days. Keep the whipped cream on top to preserve its fluffiness. If you notice the pudding starting to dry out, add a splash of milk before serving to restore moisture.
Freezer Friendly
For longer storage, freeze the cups in a freezer‑safe container. They’ll keep well for up to two weeks. When you’re ready to serve, thaw them in the refrigerator overnight and then let them sit at room temperature for 15 minutes before topping with fresh whipped cream.
Best Reheating Method
Reheating is not recommended for this dessert, as the pudding can become watery. If you must, gently warm the cups in a microwave on low power for 10–15 seconds, then stir. Adding a tiny splash of water before reheating can help it steam back to perfection.