The first time I tried to replicate that Thai takeout dish, my kitchen turned into a battlefield. The pot exploded, the wok sputtered, and the sauce turned into a sticky, unrecognizable mess. I stared at the ruined plate, wondering how a restaurant could pull off that symphony of flavors so effortlessly. That night, I swore to myself that I would discover the secret sauce that makes every bite sing. I spent hours scrolling through forums, watching countless cooking vlogs, and experimenting with every sauce combo I could find. The moment the sauce hit the pan and the aroma filled the room, I knew I was onto something special. I was determined to capture that elusive balance of sweet, savory, and a hint of heat in a recipe that anyone could recreate at home. The result? A dish that feels like a hug in a bowl, and I’m about to reveal the exact steps that turned a disaster into a culinary triumph.
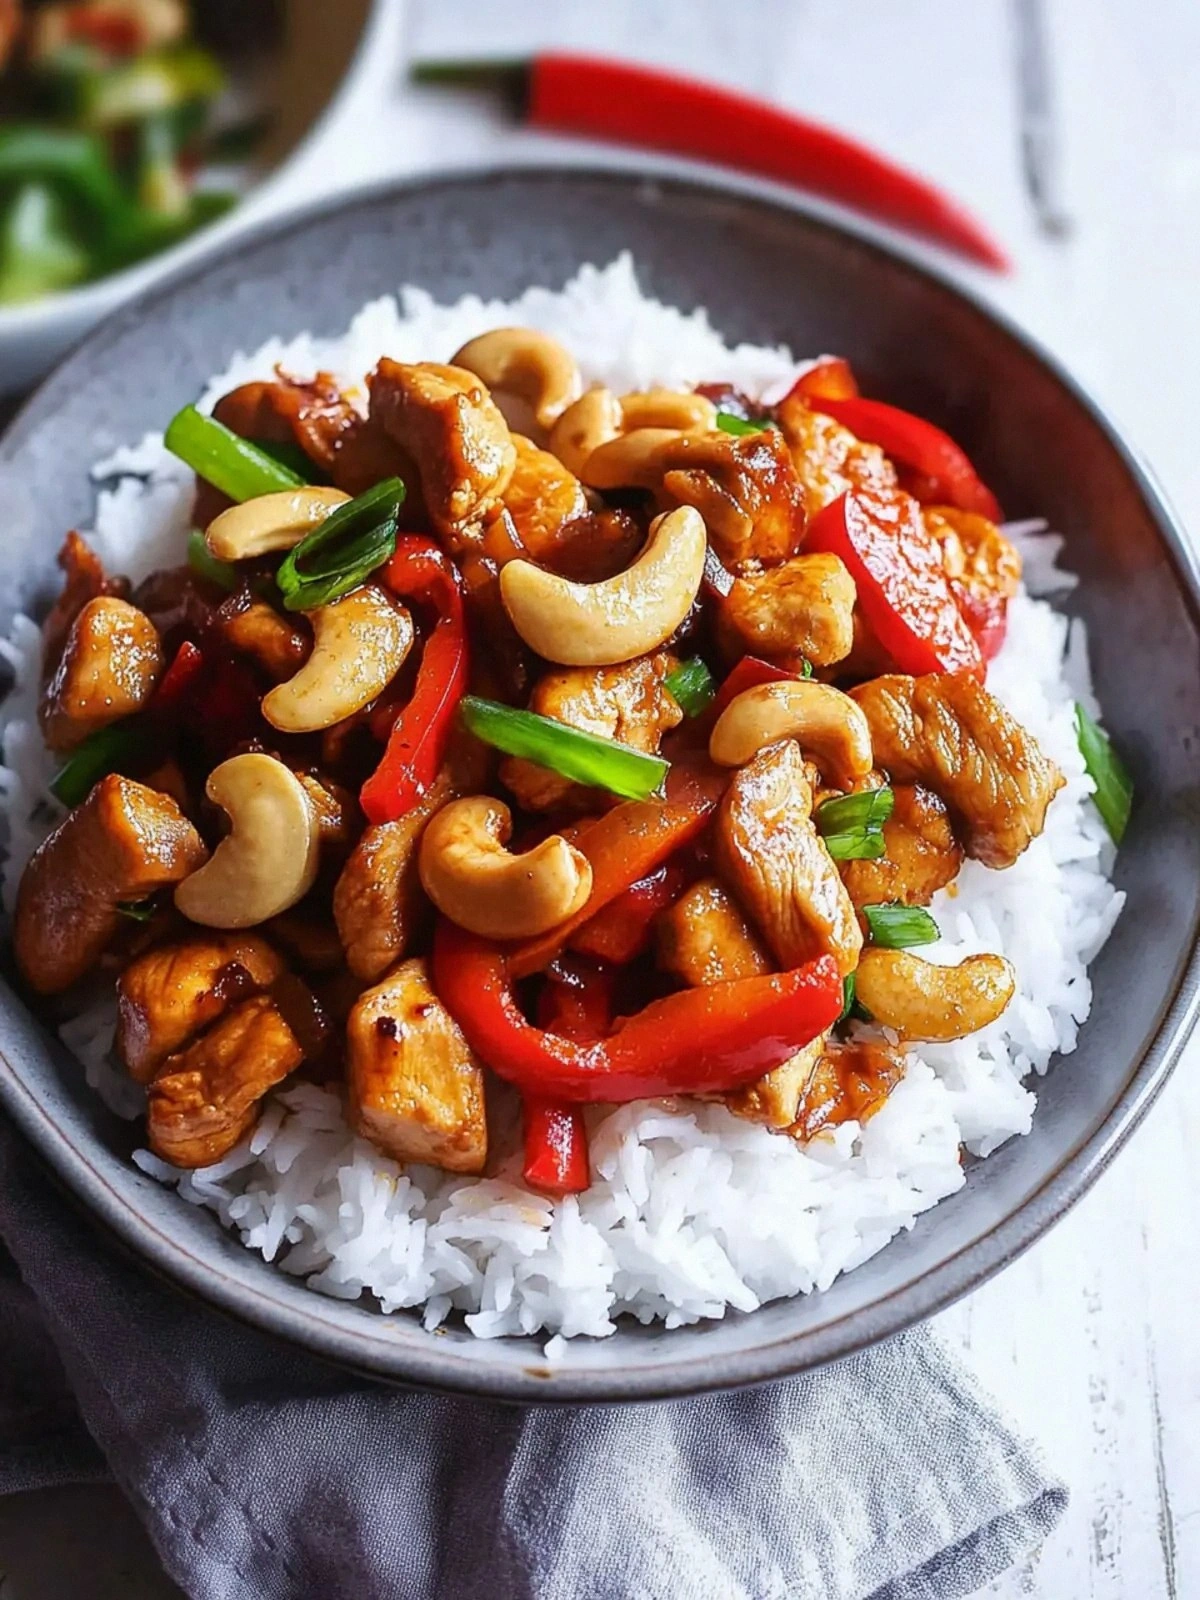
Picture this: the sizzling sound as the chicken hits the hot pan, the steam curling like delicate wisps of cloud, and the faint scent of toasted cashews drifting through the kitchen. Your eyes are drawn to the glossy, caramelized coating that clings to each piece of chicken, glimmering like tiny jewels. The first bite is a burst of umami, followed by a subtle sweetness that lingers on your palate, and then a gentle kick from the red pepper flakes that awakens your taste buds. The texture is a delightful contrast—crispy edges that shatter like thin ice, a tender interior that melts in your mouth, and crunchy cashews that add a satisfying snap. Every spoonful feels like a carefully choreographed dance of flavors and textures, and you can’t help but taste the care that went into each component.
What sets this version apart from the countless other recipes you’ll find online is that it’s built on a foundation of precision and bold flavors. I’ve stripped away the fluff and focused on the core elements that make a dish memorable: the perfect balance of sweet and salty, a sauce that coats without weighing down, and a cooking technique that preserves the natural juices of the chicken. This isn’t just another “quick fix”; it’s a meticulously crafted recipe that delivers restaurant-quality results in your own kitchen. The secret lies in a few unconventional tweaks—like using a splash of water to create a silky sauce, or coating the chicken in flour for that extra crunch—each one designed to elevate the dish to new heights. And trust me, when you taste it, you’ll be amazed at how simple yet sophisticated it feels.
I dare you to taste this and not go back for seconds. I’ll be honest— I ate half the batch before anyone else got to try it. Most recipes get this completely wrong, but here’s what actually works. Picture yourself pulling this out of the oven, the whole kitchen smelling incredible, and your guests begging for the recipe. Stay with me here—this is worth it. Let me walk you through every single step—by the end, you’ll wonder how you ever made it any other way.
What Makes This Version Stand Out
- Flavor Depth: The sauce is a layered masterpiece—light soy for umami, dark sweet soy for sweetness, oyster sauce for richness, and a splash of water to keep it silky. Each ingredient plays a role, creating a complex profile that feels both familiar and adventurous. The result is a sauce that coats the chicken like velvet without being greasy.
- Texture Contrast: Coating the chicken in flour before searing gives a crisp exterior that shatters with a satisfying crunch, while the interior stays moist and tender. The raw cashews add a nutty snap that punctuates every bite. This juxtaposition keeps your mouth moving and keeps the dish exciting.
- Ingredient Quality: Using fresh, high‑grade chicken breast and raw cashews ensures the flavor is pure and the texture is perfect. The small amount of water in the sauce prevents it from becoming thick and clumpy, preserving a glossy finish.
- Ease of Prep: The recipe is designed for speed without sacrificing quality—no time‑consuming marinating or complicated steps. The method is straightforward enough that even a kitchen rookie can nail it.
- Crowd‑Pleaser: This dish is a guaranteed hit at dinner parties or family gatherings. The combination of sweet, savory, and spicy flavors appeals to a wide range of palates.
- Make‑Ahead Friendly: The sauce can be prepared in advance and stored in the fridge, making it a perfect option for busy weeknights or last‑minute meal prep.
- Versatility: Swap the chicken for shrimp, tofu, or even beef, and the dish remains delicious. The recipe’s core principles adapt to different proteins without losing its essence.
Inside the Ingredient List
The Flavor Base
The sauce is the heart of this dish, and every splash counts. Light soy sauce provides that essential umami punch, while dark sweet soy sauce brings a subtle caramel sweetness that lingers on the tongue. Oyster sauce adds depth and a hint of briny ocean flavor, creating a rounded profile that feels both familiar and exotic. A splash of water—just half a cup—keeps the sauce from thickening into a glaze, allowing it to cling to the chicken like a silky, fragrant blanket. If you skip any of these, the sauce will feel flat, and the dish will lose its signature balance.
The Texture Crew
Flour is the unsung hero that gives the chicken its coveted crunch. A tablespoon of all‑purpose flour is dusted over the chicken pieces before searing, creating a golden crust that snaps when you bite. The cornstarch, mixed with a teaspoon of water, is added to the sauce to give it a subtle thickness without turning it into a thick gravy. Red pepper flakes and ground white pepper add heat and a gentle peppery undertone, respectively. These texture‑enhancing elements ensure the dish feels lively and engaging, rather than just a bland stir‑fry.
The Unexpected Star
Raw cashews are the secret weapon that elevates this dish. They bring a subtle nutty flavor and a satisfying crunch that contrasts with the tender chicken. Unlike toasted cashews, raw cashews absorb the sauce, becoming slightly caramelized and adding a subtle sweetness. If you prefer a different nut, almonds or pistachios can work, but the cashews’ mild flavor is a perfect match for the sauce. Skipping them will make the dish feel less complex and reduce that delightful snap.
The Final Flourish
The vegetables—yellow onion, red bell pepper, and green onions—add layers of flavor and color. The onion provides a subtle sweetness that balances the savory sauce, while the bell pepper contributes a bright, fruity note and a pop of color. Green onions finish the dish with a fresh, sharp bite that cuts through the richness. If you’re craving a bit more heat, a dash of chili paste or fresh sliced chilies can be tossed in at the end. Together, these components create a harmonious medley that feels both vibrant and comforting.
Everything’s prepped? Good. Let’s get into the real action.
The Method — Step by Step
- First, pat the chicken breast dry with paper towels. This step is crucial for a good sear—moisture will steam the chicken instead of browning it. Season the chicken lightly with a pinch of salt and a touch of ground white pepper. The pepper’s subtle heat will complement the sauce later on.
- Lightly dust each chicken piece with one tablespoon of all‑purpose flour. Shake off the excess; this thin coating will give the chicken a crisp, golden exterior once it hits the hot pan. Keep the flour in a shallow dish so you can easily reapply if needed.
- Heat one quarter cup of cooking oil in a large wok or skillet over medium‑high heat. When the oil shimmers, add the chicken pieces in a single layer, being careful not to overcrowd the pan. Sear each side for about 2‑3 minutes until a deep amber crust forms. The goal is to lock in juices while creating a caramelized surface.
- Remove the chicken from the pan and set aside on a plate. This pause allows the juices to redistribute, ensuring the meat stays moist. While the chicken rests, turn the heat down to medium and add the chopped onion and bell pepper to the same pan.
- Sauté the vegetables for 3‑4 minutes until they soften but still retain a slight crunch. The onions should turn translucent, and the bell pepper should release its sweet aroma. Watch out: if you let them cook too long, they’ll lose that bright snap and become mushy.
- Now it’s time for the sauce. In a small bowl, whisk together 2 cloves of minced garlic, 1/2 cup water, 2 tablespoons light soy sauce, 1 tablespoon dark sweet soy sauce, 2 teaspoons oyster sauce, 1 teaspoon cornstarch (dissolved in a splash of water), 1/2 teaspoon red pepper flakes, and 1/4 teaspoon ground white pepper. The cornstarch will act as a natural thickener, giving the sauce a silky sheen.
- Pour the sauce into the pan with the vegetables, stirring constantly. Let it simmer for 2 minutes until it starts to thicken and coat the veggies. The aroma should be intoxicating—sweet, savory, and just a hint of spice.
- Return the chicken to the pan and toss it in the sauce, ensuring every piece is coated. Add the raw cashews and 3 stalks of chopped green onions. Cook for an additional 3 minutes, letting the cashews toast slightly and the onions soften. The sauce should cling to the chicken like a glossy blanket.
- Serve immediately over a bed of steaming jasmine rice or fluffy white rice. The rice soaks up the remaining sauce, creating a harmonious blend of flavors. Garnish with a few extra green onions and a sprinkle of toasted cashews if you like.
- Enjoy your restaurant‑quality dish in the comfort of your own home. Take a moment to savor the layers of flavor, the crunch of the cashews, and the tender chicken. Remember, the secret to this recipe is in the small details—flour coating, sauce balance, and a dash of curiosity.
Insider Tricks for Flawless Results
The Temperature Rule Nobody Follows
The key to a perfect sear is maintaining a consistent medium‑high heat. If the pan is too hot, the chicken will char on the outside while remaining raw inside. If it’s too cool, the chicken will steam and lose that coveted golden crust. I use a thermometer to keep the pan at 375°F, which ensures a uniform sear and a beautiful caramelization.
Why Your Nose Knows Best
Don’t rely solely on visual cues when cooking the sauce. The aroma is a reliable indicator that the flavors are developing correctly. When the sauce smells sweet and slightly caramelized, it’s time to add the chicken. If it still smells raw, give it a minute more.
The 5‑Minute Rest That Changes Everything
After searing, let the chicken rest for 5 minutes before tossing it in the sauce. This small pause allows the juices to redistribute, keeping the meat moist and tender. Skipping this step can result in a dry, overcooked chicken that feels more like a snack than a main course.
The Secret Ingredient Swap
If you’re a fan of a little extra heat, replace the red pepper flakes with a fresh sliced Thai bird chili. It adds a vibrant, fiery kick that complements the sweet sauce without overwhelming the dish. Just be sure to remove the seeds if you want a milder heat.
The Cashew Toast Trick
Before adding the cashews to the pan, toast them in a dry skillet for 2 minutes until they’re fragrant. This step releases their oils, giving them a deeper, nuttier flavor that pairs beautifully with the sauce. It also prevents them from becoming soggy when they soak up the sauce.
Creative Twists and Variations
Shrimp & Cashew Delight
Swap the chicken for shrimp, and you’ll get a lighter, sweeter version of the dish. The shrimp’s quick cooking time means you’ll need to add it after the sauce has thickened slightly. The result is a seafood feast that still delivers that iconic sauce.
Tofu & Veggie Fusion
For a plant‑based take, use firm tofu cubes instead of chicken. Press the tofu to remove excess moisture, then lightly dust it with flour before searing. The tofu absorbs the sauce beautifully, making it a hearty vegetarian option.
Spicy Peanut Twist
Add a tablespoon of creamy peanut butter to the sauce for a nutty, spicy variation. The peanut butter thickens the sauce and introduces a new layer of richness. Pair it with a handful of chopped peanuts for extra crunch.
Sriracha Kick
Replace the red pepper flakes with a spoonful of sriracha for a more pronounced heat. The sriracha’s tangy sweetness will blend seamlessly with the soy and oyster sauces, giving the dish a bold, fiery personality.
Coconut Milk Creaminess
Stir in a quarter cup of coconut milk at the end of the sauce simmer to add a silky, tropical flavor. The coconut milk balances the saltiness of the soy sauces and gives the dish a luxurious mouthfeel. This variation is perfect for a brunch or a light dinner.
Herb‑Infused Finale
Finish the dish with a handful of fresh basil or mint leaves for an herbal brightness that cuts through the richness. The herbs add a refreshing contrast, making the dish feel lighter and more aromatic.
Storing and Bringing It Back to Life
Fridge Storage
Store the dish in an airtight container in the refrigerator for up to 3 days. The sauce will thicken slightly as it cools, so when you’re ready to reheat, add a splash of water or broth to loosen it back into its silky consistency.
Freezer Friendly
This dish freezes well for up to 2 months. Separate the sauce and the chicken before freezing to maintain the best texture. Reheat in the microwave or on the stovetop, stirring occasionally until heated through.
Best Reheating Method
Reheat on low heat in a skillet, adding a tablespoon of water to keep the sauce from drying out. Stir gently until the dish is steaming hot. If the sauce has thickened, a teaspoon of oil can restore its silky sheen. Serve immediately over fresh rice for the best experience.