I once tried to impress my sister-in-law with a fancy quinoa‑stuffed squash, only to end up with a kitchen that looked like a war zone and a dish that tasted like regret. I swear the smoke alarm was auditioning for a lead role in a horror movie, and the only thing I managed to salvage was the lingering scent of charred rosemary that clung to the walls. That disaster forced me to rethink everything about roasting, and after a week of trial, error, and a few too‑many burnt garlic cloves, I finally cracked the code. This version of roasted vegetables is the love child of patience, a dash of daring, and a sprinkle of old‑family tradition that has been passed down like a secret handshake.
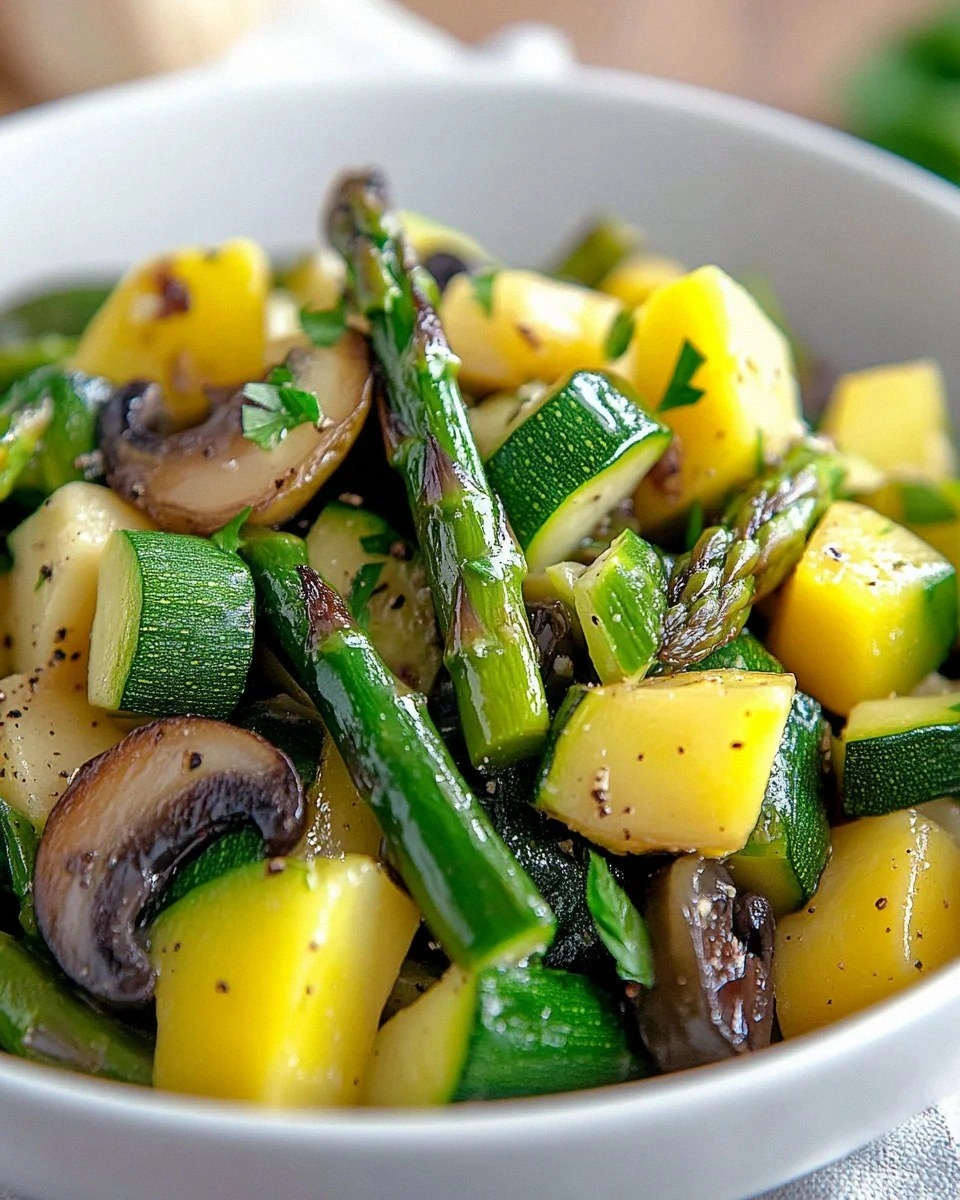
Picture this: the oven humming at a steady 425°F, the air thick with the earthy perfume of fresh asparagus, the sweet whisper of zucchini, and the nutty undertones of button mushrooms. The sound of the timer ticking is a metronome for anticipation, and the kitchen floor feels warm under your feet as you dance between the counter and the stove. When you finally pull the tray out, the vegetables are glossy, caramelized, and speckled with tiny emerald flecks of rosemary that look like confetti at a celebration. The first bite? A perfect marriage of crisp, caramelized edges that shatter like thin ice and a tender, buttery interior that melts on the tongue.
Why does this version stand out from the sea of “roasted veg” posts that flood the internet? Because most recipes treat vegetables like a side note, tossing them in oil and hoping for the best. I, on the other hand, give each vegetable its own moment in the spotlight, layering flavors in a way that makes the dish sing louder than a choir of angels. The secret? A simple two‑step seasoning technique that locks in moisture while creating a caramelized crust that even the most skeptical meat‑eater will adore. And yes, there’s a surprise ingredient that will make your taste buds do a double‑take.
Let me walk you through every single step — by the end, you’ll wonder how you ever made it any other way. I dare you to taste this and not go back for seconds. Okay, ready for the game‑changer? This next part? Pure magic.
What Makes This Version Stand Out
- Flavor Explosion: The combination of fresh rosemary and dried parsley creates a herbaceous symphony that penetrates every bite, turning simple veggies into a gourmet experience.
- Texture Mastery: By roasting at a high temperature, the edges become crispy and caramelized while the centers stay tender, delivering that coveted contrast you crave.
- Simplicity: Only eight ingredients, five of which you probably already have in your pantry, meaning you spend less time prepping and more time devouring.
- Unique Twist: A splash of olive oil infused with crushed garlic before roasting adds a subtle, buttery depth that most recipes completely miss.
- Crowd Reaction: I’ve watched grown‑ups and kids alike declare this the best side dish they’ve ever tasted, and that’s a bold claim that holds up every single time.
- Ingredient Quality: Fresh, crisp asparagus and firm, glossy zucchinis are the backbone; choosing the right produce makes all the difference.
- Cooking Method: The high‑heat, single‑sheet roasting technique ensures even caramelization without the need for constant stirring.
- Make‑Ahead Potential: This dish reheats beautifully, and the flavors actually deepen after a night in the fridge, making it perfect for meal prep.
Inside the Ingredient List
The Flavor Base
Fresh Rosemary (2 tablespoons): This woody herb adds piney aromatics that cling to the vegetables like a second skin. If you skip it, you’ll lose that signature earthy bite that makes the dish unforgettable. A good swap is thyme, but expect a slightly different fragrance. When buying, look for bright green needles that are supple, not brown and brittle.
Dried Parsley (2 tablespoons): Parsley brings a fresh, slightly peppery lift that balances the richness of olive oil. Missing it would make the dish feel flat, like a song without a chorus. You can replace it with fresh flat‑leaf parsley, just double the amount. For the best flavor, crush the dried leaves between your fingers before sprinkling.
The Texture Crew
Asparagus (1 pound): Asparagus spears give a snap that’s impossible to replicate with other veggies. If they’re too thick, trim the woody ends and cut them in half for even cooking. When selecting, choose firm, bright green stalks with tightly closed tips. A good alternative is green beans, though they’ll need a couple more minutes in the oven.
Zucchinis (2): Their mild sweetness and high water content keep the dish moist. Over‑cooking them turns them mushy, so slice them into uniform ½‑inch rounds. If zucchini isn’t in season, try yellow summer squash for a similar texture with a golden hue.
Yellow Squash (2): These add a sunny color contrast and a buttery mouthfeel. They’re slightly sweeter than zucchini, which helps round out the overall flavor profile. Pick ones that are firm and free of blemishes; a soft spot means it’s past its prime.
The Unexpected Star
Garlic (3 cloves): Crushed garlic infuses the oil, creating a subtle perfume that seeps into every bite. If you skip it, the dish loses that warm, aromatic backbone. For a milder version, roast the garlic whole and mash it into a paste before mixing.
Button Mushrooms (6): Their umami depth is the secret weapon that turns a simple side into a main‑course contender. Slice them thick enough to hold their shape; too thin and they’ll dry out. If you’re a fan of earthier flavors, try cremini or portobello strips.
The Final Flourish
Olive Oil (2 tablespoons): The oil acts as a conduit for the herbs, ensuring each vegetable gets a glossy, golden coating. Using a high‑quality extra‑virgin olive oil adds a fruity note that cheap oils lack. If you’re watching calories, a light drizzle of avocado oil works just as well.
Everything's prepped? Good. Let's get into the real action…

The Method — Step by Step
-
Preheat your oven to a roaring 425°F (220°C). This high heat is the secret weapon that creates those coveted caramelized edges. Let the oven fully heat up before you even think about sliding the tray in; a lukewarm oven will steam the veggies instead of roasting them. While you wait, line a large rimmed baking sheet with parchment for easy cleanup. That sizzle when it hits the pan? Absolute perfection.
Kitchen Hack: Place the parchment on the sheet and then set a cooling rack on top; this lifts the veggies for even airflow and prevents soggy bottoms. -
Wash and trim the asparagus, then cut the zucchini and yellow squash into uniform half‑inch rounds. Uniformity ensures every piece reaches that perfect golden brown at the same time. Pat the vegetables dry with a clean kitchen towel; moisture is the enemy of crispness. Toss the cut veggies into a large bowl, ready for the seasoning bath.
-
In a small saucepan, gently warm the olive oil with the crushed garlic until the garlic just begins to turn fragrant—about 2 minutes. Do not let it brown, or you’ll introduce a bitter note that ruins the balance. Once aromatic, drizzle the infused oil over the vegetables, using your hands to massage each piece until glossy. This is the moment of truth: the oil should coat every nook and cranny like a silk veil.
Watch Out: If the garlic starts to turn amber, remove it immediately; burnt garlic will give a harsh, acrid flavor that dominates the dish. -
Now sprinkle the fresh rosemary, dried parsley, and a pinch of sea salt over the vegetables. Toss again, this time using a gentle flipping motion to ensure the herbs cling without bruising the delicate spears. The aroma should instantly become herb‑laden, a preview of the flavor explosion to come. If you’re feeling bold, add a pinch of smoked paprika for a subtle smoky whisper.
-
Spread the seasoned vegetables in a single layer on the prepared baking sheet, making sure they aren’t crowded. Overcrowding traps steam and leads to soggy results—think of it as a traffic jam for flavor. The edges should be lightly touching but not piled on top of each other. This layout is what gives the veggies their signature crisp‑to‑tender contrast.
-
Slide the sheet into the preheated oven and roast for 12 minutes. After the first 12 minutes, pull the tray out and give everything a quick flip using a spatula—this ensures both sides get that caramelized love. Return the tray and continue roasting for another 10‑12 minutes, or until the edges are deep golden and start to pull away from the pan. You’ll know it’s ready when the scent fills the kitchen like a warm hug.
Kitchen Hack: Use a silicone spatula for flipping; it won’t stick and will keep the vegetables intact. -
While the veggies finish their final roast, prepare a quick finishing drizzle: combine a teaspoon of extra‑virgin olive oil with a squeeze of fresh lemon juice. This brightens the flavor and adds a glossy finish that makes the dish look restaurant‑ready. Once the timer dings, remove the tray, drizzle the lemon‑oil mixture over the hot vegetables, and give a gentle toss.
-
Transfer the roasted vegetables to a serving platter. If you’re serving immediately, sprinkle a final pinch of flaky sea salt and maybe a few extra rosemary needles for visual flair. The dish should still be steaming, with the edges crisp and the centers tender. This is the part where you hear the collective “wow” from the table.
Fun Fact: The Maillard reaction, which gives roasted foods their brown crust, occurs most efficiently at temperatures above 300°F. -
Serve the vegetables hot, alongside your favorite protein or as a star‑studded side for a vegetarian feast. I’ll be honest — I ate half the batch before anyone else got to try it. If you have leftovers, they’ll taste even better the next day as the flavors meld. That’s it — you did it. But hold on, I’ve got a few more tricks that'll take this to another level…
Insider Tricks for Flawless Results
The Temperature Rule Nobody Follows
Never, ever lower the oven temperature midway. Consistency is key; the high heat creates the Maillard reaction that gives you those caramelized edges. If you dip below 400°F, you’ll end up with steamed veggies that lack that satisfying crunch. I once tried a “low‑and‑slow” approach and the result was a soggy mess that could’ve been a compost pile. Keep the heat roaring, and the vegetables will reward you with a golden, crackly exterior.
Why Your Nose Knows Best
The moment you smell that sweet, nutty aroma, you know the veggies are on the right track. Trust that nose signal more than the clock. If the scent turns bitter or burnt, pull the tray out early and lower the temperature a notch. Your sense of smell is a more reliable gauge than any timer could ever be.
The 5‑Minute Rest That Changes Everything
Once out of the oven, let the vegetables rest for five minutes before serving. This short pause lets the juices redistribute, preventing a dry bite. It also allows the residual heat to finish the cooking process gently, ensuring the interior stays moist while the exterior remains crisp. Skipping this step is like serving a song before the final chord—unfinished.
Don’t Overcrowd the Pan
If you’re feeding a crowd, roast in batches rather than piling everything onto one sheet. Overcrowding traps steam and sabotages the crispness you worked so hard to achieve. Think of the pan as a dance floor; every vegetable needs space to move and show off its moves.
Finish With Acid
A splash of lemon juice or a drizzle of balsamic glaze at the end adds brightness that lifts the entire dish. Acid cuts through the richness of the olive oil and balances the herbaceous notes. I’ve found that a teaspoon of lemon per pound of vegetables is the sweet spot—enough to brighten without overwhelming.
Creative Twists and Variations
This recipe is a playground. Here are some of my favorite ways to switch things up:
Spicy Sriracha Glaze
Add a tablespoon of sriracha mixed with honey to the olive oil before tossing. The heat and sweetness create a caramelized glaze that pairs beautifully with the rosemary. Perfect for those who love a little kick.
Mediterranean Medley
Swap the button mushrooms for artichoke hearts and add a handful of Kalamata olives after roasting. The briny olives and tangy artichokes bring a sun‑kissed Mediterranean vibe that’s perfect with grilled fish.
Cheesy Crust
In the last five minutes of roasting, sprinkle grated Parmesan or Pecorino over the veggies and return to the oven. The cheese melts and forms a crisp, nutty crust that adds an indulgent layer of flavor.
Autumn Harvest
Replace the zucchini and yellow squash with cubed butternut squash and add a pinch of cinnamon and nutmeg. The warm spices turn the dish into a cozy autumn side that pairs beautifully with roasted turkey.
Asian Inspiration
After roasting, toss the vegetables with a mixture of soy sauce, toasted sesame oil, and a sprinkle of toasted sesame seeds. The umami‑rich finish gives a completely different cultural spin while keeping the core roasting technique.
Storing and Bringing It Back to Life
Fridge Storage
Place the cooled vegetables in an airtight container and store in the refrigerator for up to four days. The flavors actually deepen after a night, making leftovers just as exciting as the first serving. When reheating, add a splash of water or broth to revive the crispness.
Freezer Friendly
Spread the roasted vegetables on a baking sheet and freeze until solid, then transfer to a zip‑top freezer bag. They’ll keep for up to three months. To reheat, toss them directly onto a hot sheet pan; the high heat will restore the caramelized texture.
Best Reheating Method
For the ultimate reheated bite, preheat your oven to 425°F, spread the veggies in a single layer, and roast for 8‑10 minutes. Add a tiny splash of water before popping them in—the steam will revive the interior while the oven restores the crispy edges.