Picture this: I was standing in a cramped kitchen, the timer on my phone blinking like a tiny red alarm, when my roommate shouted, “We need a dessert that screams Hawaiian paradise!” I laughed, because I’d been craving something sweet and tropical for weeks, but the only thing that came to mind was a soggy slice of banana bread. I grabbed my notebook, scribbled a quick recipe, and the next thing I knew, I was whisking ube puree, butter, and coconut milk together like a mad scientist. The result? A glossy, velvety mochi that melts in your mouth and leaves a hint of tropical vanilla on the tongue. This isn’t just a dessert; it’s a passport to the islands, a bite of sunshine that turns a simple dinner into a celebration.
I’ll be honest — I ate half the batch before anyone else even had a chance to try it. The moment the first piece hit my lips, I felt the ube’s sweet, nutty undertone mingle with buttery richness, all wrapped in a chewy, slightly spongy texture that feels like a hug in edible form. The aroma that filled the kitchen was unmistakably tropical: sweet coconut, warm butter, and a faint hint of vanilla that pulled me in. I could almost hear the waves crashing against the shore and feel the gentle breeze of a Hawaiian afternoon. If you’ve ever struggled to find a dessert that balances sweetness with substance, you’re not alone — and I’ve got the fix.
What sets this version apart is that it’s not just another ube recipe; it’s a reimagining of mochi with a buttery twist that turns ordinary into extraordinary. The first time I tasted it, I realized that the combination of ube puree and coconut milk creates a natural sweetness that eliminates the need for excessive sugar. The buttery crust gives the mochi a golden, slightly crisp edge that contrasts beautifully with the soft interior. And the best part? The recipe is so simple you can whip it up in under an hour, even if you’re a novice cook. I dare you to taste this and not go back for seconds, because once you try it, you’ll never settle for store-bought desserts again.
Let me walk you through every single step — by the end, you’ll wonder how you ever made it any other way. From selecting the freshest ube to mastering the delicate balance of moisture and chew, I’ll share every trick that turns a kitchen mishap into a triumph. This recipe is hands down the best version you’ll ever make at home, and I’m excited to share why it’s a game-changer for anyone who loves sweet, comforting treats with a tropical twist.
What Makes This Version Stand Out
- Taste: The ube puree brings a subtle earthy sweetness that pairs perfectly with the creamy coconut milk, creating a flavor profile that’s both exotic and familiar.
- Texture: The chewy interior combined with a slightly crisp buttery crust offers a satisfying contrast that keeps you coming back for more.
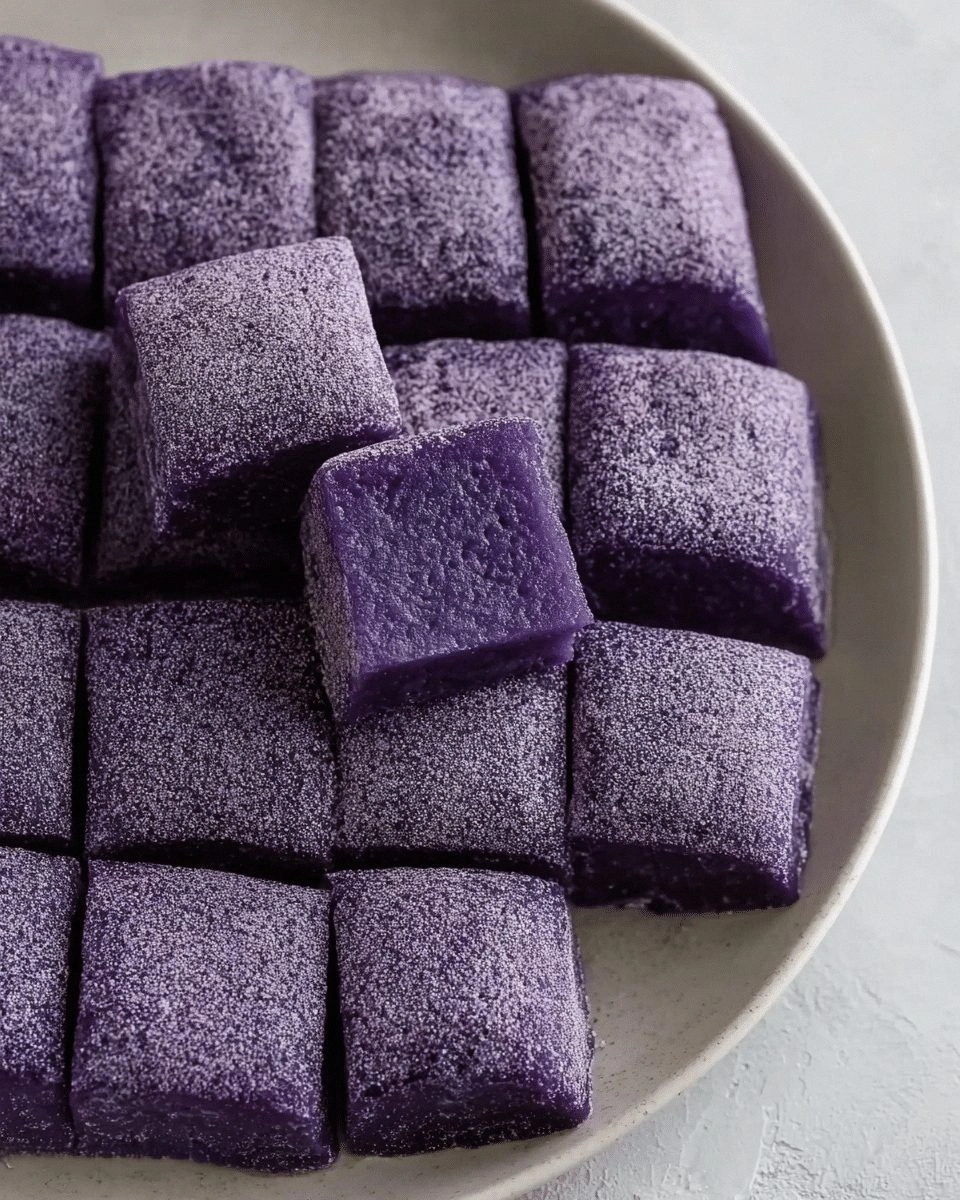
- Ingredient Quality: Using fresh, high‑grade ube ensures a vibrant purple hue and a richer flavor than packaged alternatives.
- Ease of Preparation: With a straightforward mixing process and no need for specialized equipment, even beginners can achieve professional results.
- Make‑ahead Potential: The mochi can be prepared ahead of time and stored in the fridge or freezer, making it a convenient option for busy weeks.
- Visual Appeal: The deep purple swirls of ube against the golden butter crust create an Instagram‑worthy dessert that impresses at any gathering.
Alright, let’s break down exactly what goes into this masterpiece…
Inside the Ingredient List
The Flavor Base
Ube puree is the star of the show, providing a natural sweetness and a striking color that turns every bite into a visual delight. When you choose fresh ube, you’re guaranteed a richer flavor profile compared to frozen or canned options. Skipping ube entirely will strip the mochi of its signature taste, so don’t even consider it.
The Texture Crew
Tapioca flour is essential for that chewy, slightly gummy texture that defines mochi. It’s the secret that keeps the dessert from becoming too dense or cakey. If you can’t find tapioca flour, arrowroot powder is a decent substitute, but the chew will be slightly different.
The Unexpected Star
Butter isn’t just for flavor; it adds a silky mouthfeel and a golden crust that contrasts beautifully with the soft interior. The butter also helps bind the dough, giving it a cohesive structure. If you’re looking for a dairy‑free version, try coconut butter, but be prepared for a subtle coconut taste.
The Final Flourish
Coconut milk balances the richness of the butter and the earthiness of the ube, creating a smooth, creamy texture that melts in your mouth. The vanilla extract adds a warm, aromatic note that ties all the flavors together. Salt, though minimal, enhances the sweetness and prevents the dessert from feeling flat.
Everything’s prepped? Good. Let’s get into the real action…
The Method — Step by Step
- Preheat your oven to 350°F (175°C) and line a 9×9 inch baking pan with parchment paper. Grease the parchment lightly with butter so the mochi doesn’t stick. This step is crucial; a properly greased pan prevents the mochi from tearing when you remove it. The aroma of butter roasting will begin to permeate your kitchen, setting the stage for a fragrant experience.
- In a medium bowl, whisk together 1 cup all‑purpose flour, 1 cup tapioca flour, 1/2 tsp salt, and 1 tsp baking powder. Sift the dry mixture to eliminate lumps and create an airy base. This dry blend will help the mochi rise slightly and maintain its chewy texture. Keep this mixture aside while you prepare the wet ingredients.
- In a separate bowl, combine 1 cup ube puree, 1 cup coconut milk, 1/2 cup melted butter, 1/2 cup sugar, 1 tsp vanilla extract, and 2 large eggs. Whisk until the mixture is smooth and glossy. The eggs act as a binder, ensuring the mochi holds together without becoming too dense. The butter will later give that golden crust you love.
- Pour the wet mixture into the dry ingredients and stir gently until just combined. Be careful not to overmix; a few lumps are acceptable and will help maintain the mochi’s characteristic chewiness. The batter should be thick but pourable, similar to pancake batter. This is the moment of truth, so stay focused.
- Transfer the batter into the prepared pan, spreading it evenly with a spatula. Tap the pan gently on the counter to release any trapped air bubbles. A smooth surface ensures even baking and a uniform crust. The batter should look glossy, hinting at the moist interior that awaits.
- Bake for 25–30 minutes, or until the edges turn a golden brown and a toothpick inserted in the center comes out clean. The smell of toasted coconut and butter will fill the kitchen, making you feel like you’re on a beach vacation. Keep an eye on the color; if it browns too quickly, tent the pan with foil.
- Remove the pan from the oven and let the mochi cool in the pan for 10 minutes. This resting period allows the structure to firm up, making it easier to slice. After 10 minutes, transfer the mochi onto a wire rack to cool completely. This step ensures the mochi doesn’t become soggy from residual steam.
- Once cooled, cut the mochi into squares or wedges with a sharp, butter‑coated knife. Serve immediately, or store in an airtight container at room temperature for up to 3 days. If you’re planning ahead, refrigerate for up to a week or freeze for longer storage. The mochi remains delicious even after reheating.
That’s it — you did it. But hold on, I've got a few more tricks that'll take this to another level. These insider tips will help you achieve a flawless mochi every single time.
Insider Tricks for Flawless Results
The Temperature Rule Nobody Follows
Baking at the right temperature is essential. If you bake too hot, the mochi will brown too quickly on the outside while remaining undercooked inside. Aim for a steady 350°F (175°C) and use an oven thermometer to confirm accuracy. This ensures a golden crust without compromising the chewy interior.
Why Your Nose Knows Best
Smell is a powerful indicator of doneness. When the mochi starts to emit a nutty, buttery aroma, it’s almost ready. If the scent is overwhelmingly sweet, give it a few more minutes. Trust your senses; they’re your best judge of perfection.
The 5‑Minute Rest That Changes Everything
After baking, let the mochi rest in the pan for exactly five minutes before transferring it. This brief pause allows the internal structure to set, preventing the dessert from collapsing when you cut it. I’ve seen mochi crumble after cutting if it’s still too hot, so this step is non‑negotiable.
The Butter‑Coated Knife Trick
Using a butter‑coated knife prevents the mochi from sticking and tearing. Lightly brush the knife with melted butter before slicing. The buttery coating creates a smooth cut, preserving the mochi’s shape and texture. It also adds a subtle buttery flavor to each slice.
The Sweet‑and‑Savory Balance
Don’t be tempted to over‑sweeten the batter. A pinch of salt is all you need to enhance the natural sweetness of ube. Too much sugar can overpower the delicate flavors and result in a heavy dessert. Keep it balanced, and your mochi will shine.
Creative Twists and Variations
This recipe is a playground. Here are some of my favorite ways to switch things up:
Coconut‑Crusted Delight
Roll the mochi squares in toasted coconut flakes before baking. The coconut adds a crunchy texture and a subtle tropical flavor that pairs well with the ube. This variation is perfect for guests who love a little extra crunch.
Chocolate‑Infused Surprise
Add 1/2 cup dark chocolate chips to the batter for a decadent twist. The chocolate complements the ube’s earthy sweetness, creating a rich, indulgent dessert. Serve with a drizzle of melted chocolate for an extra wow factor.
Minty Freshness
Stir in a teaspoon of fresh mint extract or finely chopped mint leaves. The mint provides a refreshing contrast to the sweet, buttery mochi, making it a perfect dessert after a spicy meal.
Spiced Ube
Add 1/4 teaspoon of ground cinnamon or a pinch of nutmeg to the batter. The warm spices enhance the ube’s natural flavor profile and add depth to the dessert. This version is especially cozy during the cooler months.
Vegan Version
Replace the butter with coconut oil and the eggs with flaxseed meal soaked in water. The result is a fully vegan mochi that still delivers on texture and flavor. This adaptation is great for plant‑based diners.
Mini Mochi Pops
Pipe the batter into silicone mini muffin tins and bake until golden. Serve them on skewers for a fun, bite‑size treat. This version is ideal for parties or as a sweet snack for kids.
Storing and Bringing It Back to Life
Fridge Storage
Store the mochi in an airtight container in the refrigerator for up to 3 days. The moisture will keep the mochi soft and chewy. When ready to serve, let it sit at room temperature for 15 minutes to bring back its original texture.
Freezer Friendly
Wrap the mochi squares individually in plastic wrap, then place them in a freezer bag. They can be frozen for up to 2 months. When you’re ready to enjoy, thaw them at room temperature for 30 minutes before serving.
Best Reheating Method
Reheat the mochi in a microwave at 30% power for 20–30 seconds, or in a preheated oven at 300°F (150°C) for 5 minutes. Adding a tiny splash of water before reheating will create steam that restores the mochi’s soft interior. This trick keeps the dessert from drying out.