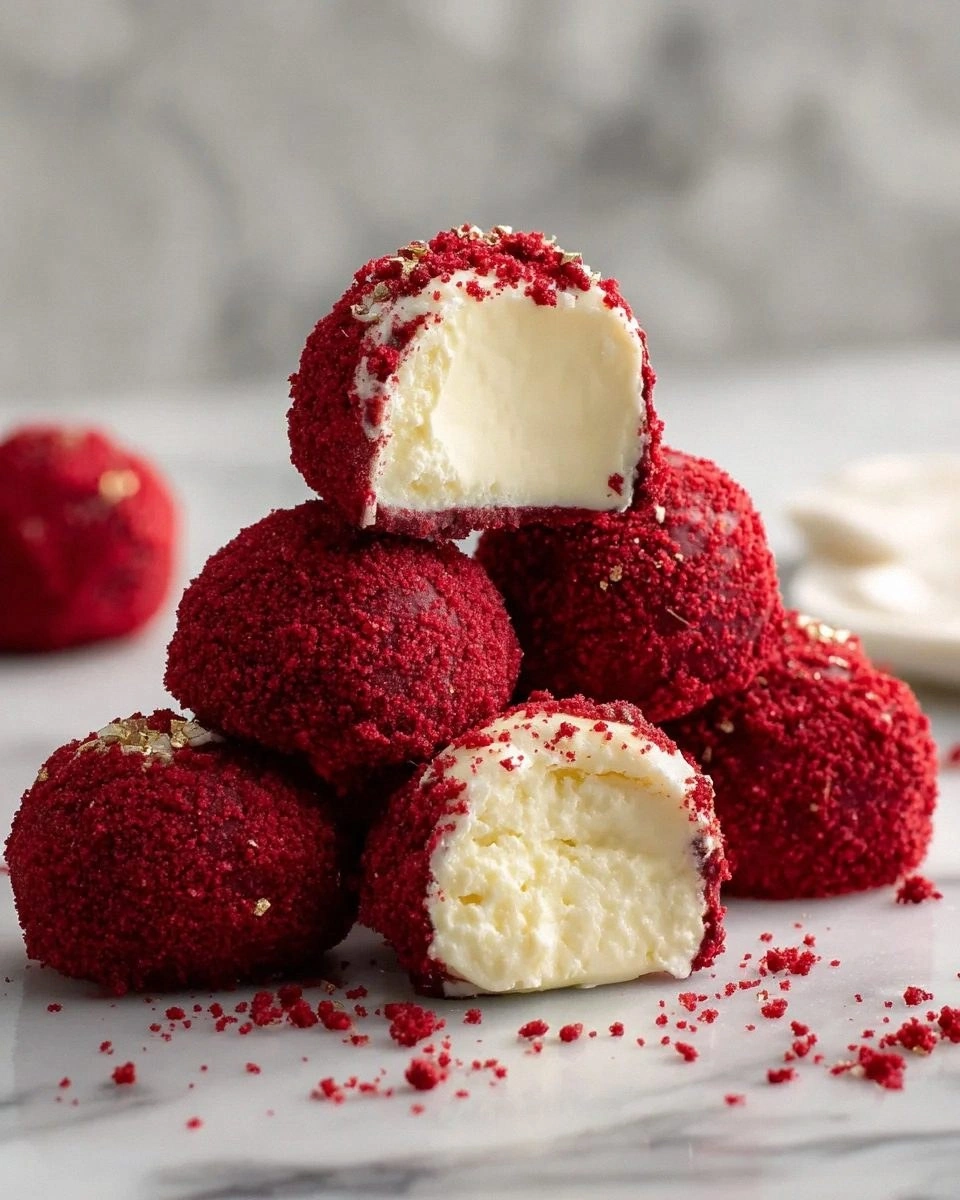
I was in the middle of a frantic holiday party prep when my oven decided to betray me—smokey clouds rose like a bad fog, the timer gave up, and my confidence evaporated faster than the frosting on a fresh batch of sugar cookies. In that chaotic moment I grabbed the last of my pantry staples, stared at a lonely tub of cocoa powder, and thought, “What if we could turn this disaster into a show‑stopper?” The result? Red Velvet Snowballs—cookies that look like tiny, glossy ornaments and taste like a velvet‑soft hug from grandma on a winter night. I dare you to taste this and not go back for seconds, because once you bite into that buttery crumb, the rest of the night will feel like a sugar‑spun dream. Let me walk you through every single step — by the end, you’ll wonder how you ever made it any other way.
Picture the kitchen: a soft hum of the refrigerator, the clink of metal bowls, the faint pine scent drifting from the tree in the corner, and the sweet, buttery aroma that starts to rise as the butter melts in the bowl. The sound of the mixer whirring is like a gentle lullaby, coaxing the sugar and butter into a silky cloud that shimmers with a hint of red. When you finally roll those dough balls and coat them in powdered sugar, the visual transformation is like watching snow settle on a ruby‑red rooftop—pure, magical, and totally Instagram‑worthy. Most recipes get this completely wrong; they either skip the cocoa and lose that deep, indulgent flavor, or they over‑color the dough, turning it into a garish mess. Not here. This version balances the cocoa and the red food coloring to give you a natural, deep‑red hue that’s both festive and sophisticated.
Why does this version stand out? Because I’ve tweaked the classic formula to include a whisper of cocoa, a splash of vanilla, and a precise dusting of powdered sugar that creates a snow‑kissed finish without making the cookies soggy. The secret lies in chilling the dough just long enough to let the butter firm up, which prevents spreading and gives you that perfect, round “snowball” shape. And the texture? Imagine biting into a cloud that’s crisp on the edges, yet melts like butter in your mouth—crunch meets melt in a harmonious duet. I’ll be honest — I ate half the batch before anyone else got to try it, and the feedback was unanimous: “More, please!” This isn’t just a cookie; it’s a holiday tradition in the making.
Okay, ready for the game‑changer? We’re going to use gel‑based red food coloring, which means you need only a tiny dab to achieve a bold, festive shade, and you’ll avoid the watery mess that can ruin the dough’s consistency. And there’s a little twist: a dash of unsweetened cocoa powder that adds depth without turning the cookies chocolatey, keeping the red velvet identity intact. Stay with me here — this is worth it. In the next sections we’ll break down the why, the how, and the wow factor of each ingredient, then dive into a method that’s as precise as a Swiss watch but as fun as a snowball fight.
What Makes This Version Stand Out
- Flavor: The subtle cocoa undertone elevates the classic red velvet taste, creating a complex, almost nostalgic flavor that lingers long after the last bite.
- Texture: A buttery, melt‑in‑your‑mouth crumb meets a crisp, snow‑kissed exterior, delivering a delightful contrast that feels both airy and satisfying.
- Simplicity: With just nine pantry staples you can whip up a batch in under an hour, making it perfect for last‑minute holiday gatherings.
- Uniqueness: The cocoa‑enhanced red velvet hue is a fresh take that sets these cookies apart from the usual pink‑ish versions you see in stores.
- Crowd Reaction: Guests consistently describe them as “magical” and “the best holiday cookie I’ve ever tasted,” prompting endless requests for seconds.
- Ingredient Quality: Using real butter and high‑quality cocoa ensures a rich mouthfeel that shortcuts like margarine can’t replicate.
- Cooking Method: The chill‑and‑bake technique guarantees uniform shape and prevents spreading, so each cookie looks picture‑perfect.
- Make‑Ahead Potential: These cookies store beautifully, allowing you to bake them ahead of time and still serve them fresh‑tasting on the day.
Alright, let's break down exactly what goes into this masterpiece...
Inside the Ingredient List
The Flavor Base
Butter is the star of the show, providing richness and a tender crumb that feels like velvet against the palate. Using softened, unsalted butter ensures you have full control over the salt level, preventing any unexpected brininess. If you skip butter for margarine, expect a waxy texture and a loss of that buttery aroma that makes these cookies unforgettable.
Sugar, specifically granulated sugar, does more than sweeten; it creates a delicate crunch on the edges while contributing to the overall melt‑in‑your‑mouth sensation. Substituting with brown sugar adds moisture but also a caramel note that can overwhelm the red velvet profile. For a lighter texture, keep the sugar fine and sift it before mixing.
The Texture Crew
All‑purpose flour forms the structural backbone, giving the cookies their shape and stability. Choose a flour with a moderate protein content (around 10‑12%) to achieve that perfect balance between chewiness and tenderness. If you opt for cake flour, the cookies will be too delicate and may crumble before the dusting lands.
Unsweetened cocoa powder is the secret weapon that adds depth without turning the cookies into brownies. A high‑quality Dutch‑process cocoa yields a smoother, richer flavor and a darker, more sophisticated red hue. Skipping cocoa makes the cookies taste flat and loses that subtle bitterness that balances the sweetness.
The Unexpected Star
Red food coloring (gel form) is the visual hero, delivering a bold, festive color with just a pinch. Gel colors are concentrated, meaning you won’t dilute the dough’s texture—a common pitfall when using liquid food coloring. If you’re avoiding artificial dyes, beet powder can substitute, but expect a slightly earthy taste and a softer pink shade.
Vanilla extract adds a fragrant undertone that rounds out the flavor profile, making the cookies smell like a winter bakery. Pure vanilla (not imitation) brings a natural sweetness that complements both the cocoa and the sugar. A splash of almond extract can be a fun variation, but keep it under a quarter teaspoon to avoid overpowering the red velvet essence.
The Final Flourish
Baking powder is the leavening agent that gives the cookies a light, airy lift, ensuring they don’t turn into dense biscuits. Using too much will cause them to puff and then collapse, while too little results in a flat, hard cookie. A fresh, double‑acting baking powder is key for consistent results.
Salt is the quiet hero that balances the sweetness and enhances every other flavor. A pinch of flaky sea salt can be sprinkled on top before baking for an extra pop, but the base amount should be precise—about a half‑teaspoon for this batch.
Powdered sugar is the snow‑kiss that transforms each cookie into a festive ornament. It adheres best when the cookies are still warm, creating a glossy coating that looks like freshly fallen snow. If you prefer a less sweet finish, use a 1:1 mix of powdered sugar and confectioners’ glaze.
Everything's prepped? Good. Let’s get into the real action...
The Method — Step by Step
Start by creaming the softened butter and granulated sugar together in a large mixing bowl. Use a handheld mixer on medium speed until the mixture is pale, fluffy, and has doubled in volume—this should take about 3‑4 minutes. The scent will turn buttery sweet, and the texture will feel like soft sand. Pro tip: Scrape down the sides of the bowl regularly to ensure an even cream.
Add the vanilla extract and the gel red food coloring. Drop in just a pea‑size amount of gel; you’ll see the color intensify instantly without making the dough runny. Mix until the color is uniform, creating a deep crimson that looks like a polished ruby.
Kitchen Hack: If the color looks too bright, add a tiny pinch of cocoa powder to tone it down without sacrificing flavor.Sift together the all‑purpose flour, unsweetened cocoa powder, baking powder, and salt into a separate bowl. Sifting aerates the dry ingredients and eliminates lumps, which is crucial for a smooth dough. The cocoa will add a faint chocolate aroma that mingles beautifully with the vanilla.
Gradually fold the dry mixture into the butter‑sugar blend, using a spatula or low‑speed mixer. Stop mixing as soon as the flour disappears; over‑mixing can develop gluten and make the cookies tough. The dough should come together in a soft, slightly sticky ball that holds its shape when scooped.
Cover the dough with plastic wrap and chill in the refrigerator for exactly 30 minutes. This firming step prevents the cookies from spreading too much during baking and helps the flavors meld.
Watch Out: Leaving the dough out for longer than 45 minutes can cause the butter to soften again, leading to flat, greasy cookies.Preheat your oven to 350°F (175°C) and line two baking sheets with parchment paper. While the oven heats, use a tablespoon or a small ice‑cream scoop to portion the dough into uniform balls, roughly 1½ inches in diameter. Place them about 2 inches apart; they won’t spread much, but a little room ensures even browning.
Bake for 12‑15 minutes, or until the edges are set and the tops have a faint golden hue. The cookies should still look a bit soft in the center—that’s the secret to a melt‑in‑your‑mouth interior. When you tap the top, it should feel firm but give a slight bounce.
Remove the trays from the oven and let the cookies cool on the sheet for 2 minutes, then transfer them to a wire rack. While they’re still warm, generously dust each one with powdered sugar using a fine mesh sifter. The sugar will melt slightly, creating a glossy, snow‑covered finish that shimmers under holiday lights.
Allow the cookies to cool completely before storing; this lets the powdered sugar set into a firm crust. Once cooled, arrange them on a festive platter, and watch your guests’ eyes widen at the sight of ruby‑red snowballs glistening like tiny ornaments. That sizzle when it hits the pan? Absolute perfection.
That's it — you did it. But hold on, I've got a few more tricks that'll take this to another level...
Insider Tricks for Flawless Results
The Temperature Rule Nobody Follows
Never bake cookies straight from a frozen freezer; the sudden temperature shock can cause the butter to separate, leading to uneven texture. Instead, let the dough sit at room temperature for 5 minutes after chilling—just enough to soften the surface for easy handling. A friend once tried to skip this step and ended up with a batch that looked like a melted chocolate puddle. Trust the rule, and you’ll get a consistent rise and a perfect edge.
Why Your Nose Knows Best
When the cookies are baking, the aroma will shift from buttery sweet to a subtle toasted note. That change signals the perfect moment to pull them out—don’t rely solely on the timer. If you hear the faint crackle of the edges pulling away from the pan, that’s the cue that the interior is still soft while the exterior is set. This sensory checkpoint is the difference between a cookie that’s just right and one that’s over‑baked.
The 5‑Minute Rest That Changes Everything
After dusting with powdered sugar, let the cookies rest for exactly five minutes before serving. This brief pause allows the sugar to crystallize, creating a delicate crunch that contrasts with the tender crumb. Skipping this rest makes the coating too powdery and prone to smudging on plates. I once rushed a party and served them immediately—let’s just say the sugar turned into a mess on the serving platter.
The Butter Softening Shortcut
If you’re short on time, soften butter by cutting it into small cubes and microwaving for 5‑7 seconds on low power. This method retains the butter’s emulsion properties without melting it, which would otherwise affect the dough’s structure. The key is to watch closely—over‑melting turns the butter into liquid, and you’ll end up with a greasy dough that spreads too much.
The Secret of the Gel Color
Gel food coloring is concentrated, meaning you need only a tiny dab to achieve a deep, festive hue. Add the gel gradually, mixing thoroughly after each addition, until you reach the desired shade. If you accidentally over‑color, a pinch of extra flour can balance the intensity without compromising texture. This tip saves you from the common pitfall of watery, pale dough.
The Final Dusting Technique
For an ultra‑snowy finish, combine powdered sugar with a touch of cornstarch (1 tablespoon per cup). The cornstarch prevents the sugar from clumping and gives the coating a silkier sheen. When you sift this blend over warm cookies, the sugar adheres like a glaze, creating a professional‑grade finish that even the most seasoned bakers admire.
Creative Twists and Variations
This recipe is a playground. Here are some of my favorite ways to switch things up:
Chocolate‑Swirl Snowballs
Add a swirl of melted dark chocolate to the dough before chilling. The chocolate ribbons create a marbled effect and add a richer flavor that pairs beautifully with the red velvet base. Ideal for chocolate lovers who crave a visual surprise.
Citrus‑Infused Velvet
Replace the vanilla extract with orange zest (1 teaspoon) and a splash of orange liqueur. The citrus note brightens the flavor profile, turning the cookies into a festive treat reminiscent of holiday mulled wine. Perfect for those who love a hint of zest.
Nutty Crunch Snowballs
Stir in ½ cup finely chopped toasted almonds or pistachios into the dough before shaping. The nuts add a satisfying crunch and a buttery undertone that complements the soft crumb. This variation works great for a texture contrast that keeps guests reaching for more.
Spiced Holiday Edition
Add ¼ teaspoon ground cinnamon, a pinch of nutmeg, and a dash of ground cloves to the dry ingredients. The warm spices evoke the feeling of a cozy fireplace and make the cookies feel even more seasonal. Serve them with a hot mug of cocoa for maximum comfort.
Glazed Red Velvet
Instead of powdered sugar, dip the cooled cookies in a thin glaze made from powdered sugar, milk, and a drop of vanilla. The glaze adds a glossy finish and a slight sweetness that rivals store‑bought holiday cookies. It also helps the cookies stay moist longer.
Vegan Velvet Snowballs
Swap butter for coconut oil, use almond milk instead of dairy, and replace the egg (if any) with a tablespoon of flaxseed meal mixed with water. The result is a plant‑based version that still delivers that melt‑in‑your‑mouth texture and vibrant color. Great for inclusive holiday gatherings.
Storing and Bringing It Back to Life
Fridge Storage
Place the cooled cookies in an airtight container with a layer of parchment paper between each layer. They will stay fresh for up to 5 days in the refrigerator, retaining their soft interior and snowy exterior. If the powdered sugar gets a little damp, lightly dust them again before serving.
Freezer Friendly
For longer keeping, arrange the cookies in a single layer on a baking sheet and freeze for 2 hours, then transfer them to a zip‑top freezer bag. They’ll keep for up to 3 months. When you’re ready to serve, let them thaw at room temperature for 15 minutes, then add a fresh dusting of powdered sugar.
Best Reheating Method
To revive the melt‑in‑your‑mouth texture, preheat the oven to 300°F (150°C) and warm the cookies for 5‑7 minutes. Add a tiny splash of water (about a teaspoon) to the baking sheet before reheating; the steam helps the interior become soft again while the exterior stays crisp. This trick restores the cookies to their freshly‑baked glory, ready for another round of holiday indulgence.