Basque Cheesecake Loaf Pan: The Ultimate Guide to Baking Perfection
I still remember the first time I tried to make a Basque cheesecake in a springform pan like all the fancy cookbooks told me to. What a disaster. The batter leaked through the seam, the top burned before the center set, and I ended up with a volcanic mess that looked like it had been through a small earthquake. Fast forward through three failed attempts, a mountain of cream cheese containers, and one very dramatic kitchen meltdown (okay, maybe two), and I discovered the game-changing secret: ditch the springform, grab your trusty loaf pan, and prepare to witness dessert magic.
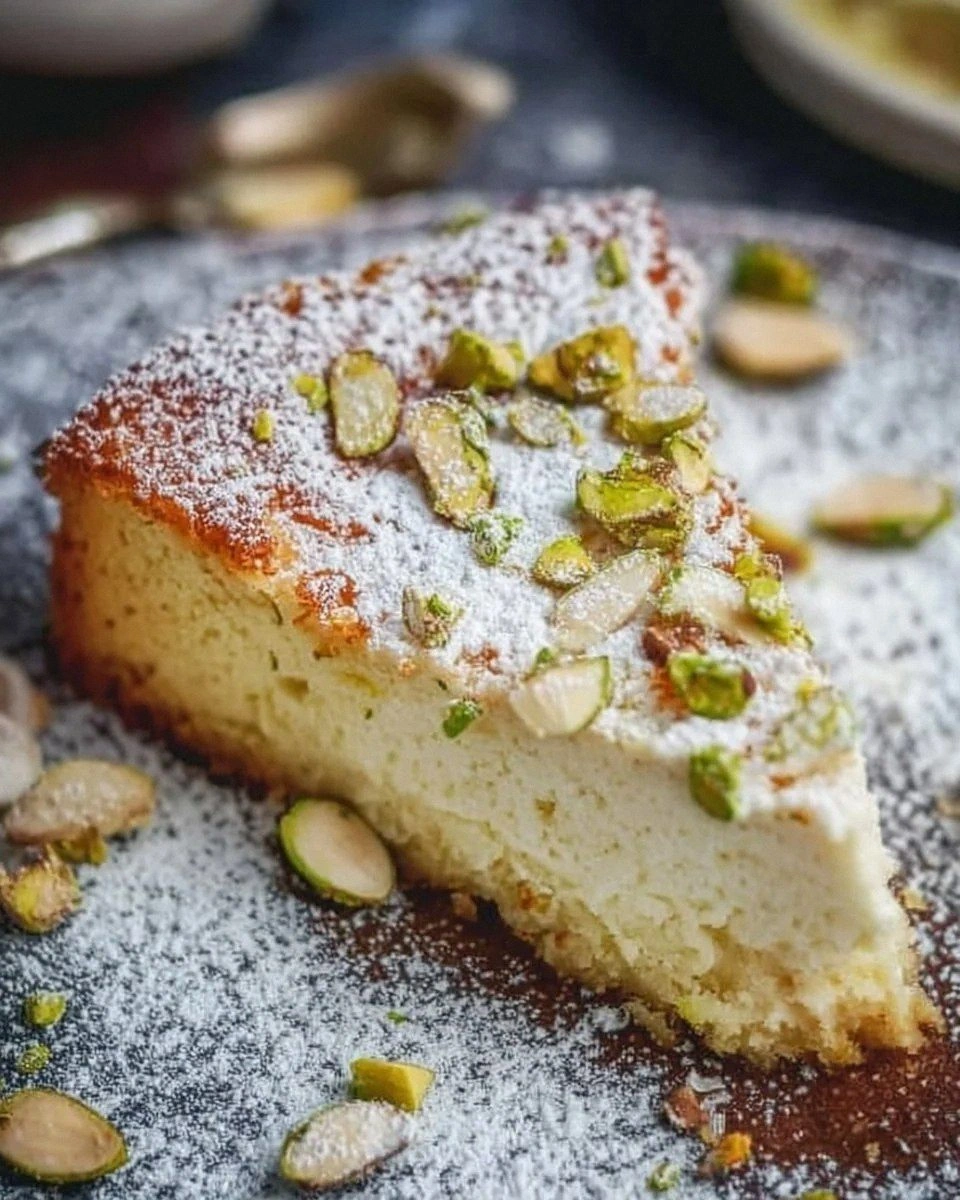
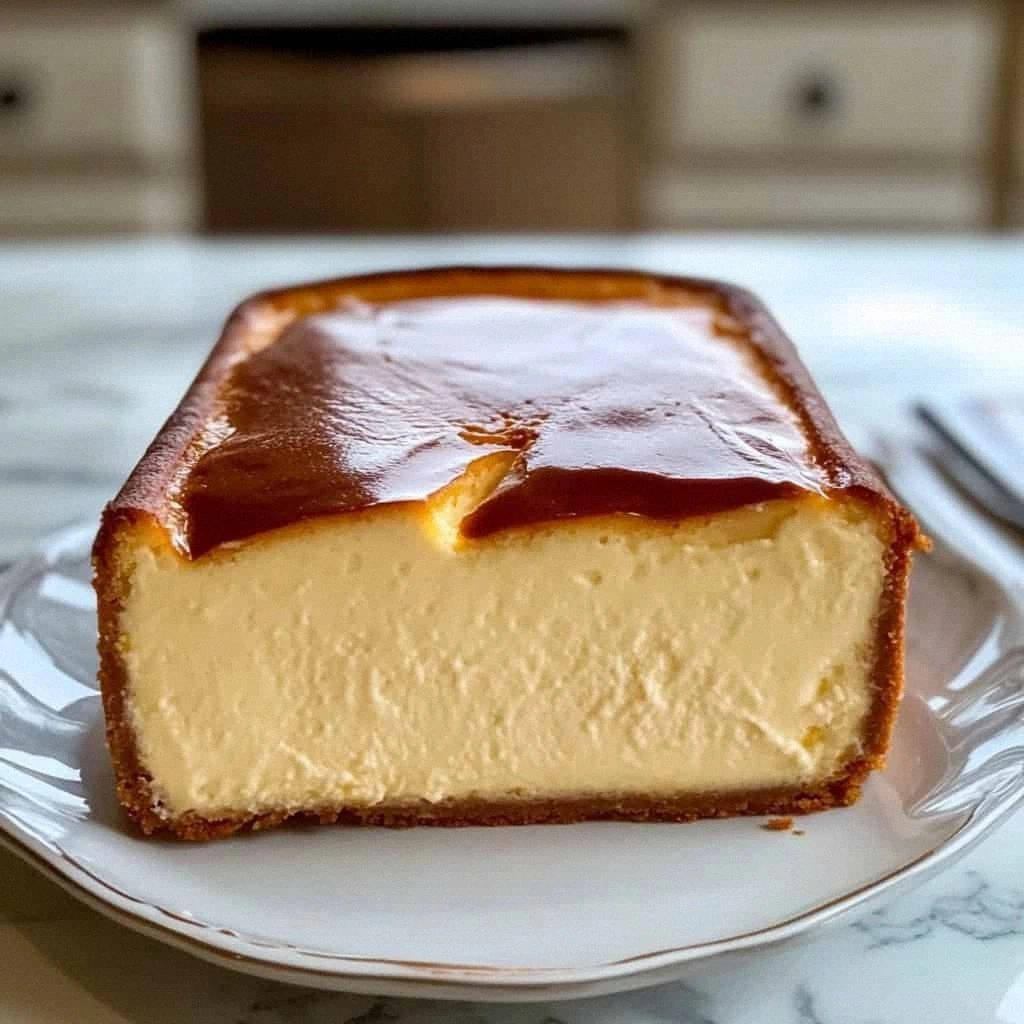
Picture this: it's 11 PM on a Tuesday, you're in your pajamas, and suddenly the craving hits. You want that caramelized, almost burnt top giving way to a custardy, barely-set center that jiggles like a gentle whisper. The classic Basque burnt cheesecake from San Sebastián, but here's the twist — we're making it loaf-pan style, which means better edges, easier storage, and portions that actually make sense for real life. No more wondering what to do with a 9-inch round cake when you're cooking for two or four people.
What makes this version absolutely irresistible is how the loaf pan transforms everything. The high sides create those gorgeous, deeply browned edges that taste like crème brûlée had a baby with your favorite cheesecake. The smaller surface area means you get more of that coveted burnt top per slice, and let's be honest — that's the whole reason we're here, isn't it? Plus, there's something deeply satisfying about pulling a perfect golden loaf from the oven, watching it sink and crack as it cools, knowing you've just created something that looks like it came from a boutique bakery in northern Spain.
The best part? This isn't one of those finicky recipes that requires a water bath, perfectly smooth sides, or any of that nonsense. We're embracing the rustic beauty here, folks. Those cracks on top? They're character. The slightly sunken middle? That's how you know it's going to be creamy beyond belief. Let me walk you through every single step — by the end, you'll wonder how you ever made it any other way.
What Makes This Version Stand Out
Caramelization Heaven: The loaf pan's proportions mean more surface area gets that gorgeous, almost-blackened top that tastes like the best part of a marshmallow roasted over a campfire. We're talking deep, complex flavors that develop as the sugar transforms into something magical under high heat.
Foolproof Portions: No more guessing how big a slice should be or dealing with awkward wedge cuts. This loaf version gives you perfect, even slices every single time, making it ideal for dinner parties, potlucks, or just portion-controlled indulgence (though I won't judge if you go back for seconds).
Weeknight Friendly: From mixing bowl to oven in under 15 minutes, with ingredients you probably already have. No special equipment, no hunting down obscure ingredients, no three-day advance planning required.
Texture Paradise: The loaf pan creates the perfect ratio of creamy center to those coveted burnt edges. Each bite gives you both the cloud-like interior and the slightly chewy, caramelized exterior that makes Basque cheesecake legendary.
Storage Champion: Wrap the whole loaf in plastic wrap, or slice and freeze individual portions. It travels beautifully, making it the ultimate make-ahead dessert for busy hosts who want to impress without the stress.
Flavor Amplification: The concentrated shape intensifies every flavor — the vanilla sings, the cream cheese tastes more luxurious, and that hint of burnt sugar permeates every bite like a sophisticated version of your favorite childhood treat.
Crowd Reaction Guaranteed: Bring this to any gathering and watch people's eyes widen when you slice into it. The dramatic contrast between the blackened top and pale interior never fails to impress, and the first bite always elicits that involuntary "mmmm" sound.
Alright, let's break down exactly what goes into this masterpiece...
Inside the Ingredient List
The Flavor Base
Full-fat cream cheese is the star here, and trust me — this is not the place to get virtuous with the low-fat variety. We're creating something indulgent, and that richness comes from the real deal. Make sure it's properly softened; cold cream cheese will leave you with lumps that no amount of mixing will fix. I've tried every shortcut in the book, from microwaving (disaster) to grating cold cream cheese (tedious), and honestly, just planning ahead and leaving it on the counter for an hour is the only way that works consistently.
Granulated sugar does more than sweeten here — it's the key to that gorgeous burnt top. As it caramelizes under high heat, it creates complex flavors that remind me of the best part of a crème brûlée. Don't substitute brown sugar or honey; you need the clean sweetness of white sugar to achieve that characteristic bitter-sweet balance that makes Basque cheesecake so addictive.
The Texture Crew
Fresh eggs are crucial for that custardy texture we're after. They provide structure while keeping things silky smooth. Room temperature eggs incorporate more easily, preventing those annoying little white flecks that can mar your otherwise perfect cheesecake. If you're like me and rarely remember to take eggs out ahead of time, submerge them in warm (not hot) water for 10 minutes while you prep everything else.
Heavy cream brings the luscious factor, creating that barely-set center that makes each bite feel like eating a cheesecake cloud. The fat content is what gives this dessert its signature texture — don't try to substitute milk or half-and-half unless you want a dense, disappointing result that tastes like regular cheesecake's sad cousin.
The Unexpected Star
All-purpose flour might seem out of place in a cheesecake, but here's the thing — it's the secret to that perfect middle ground between custard and cake. Just two tablespoons stabilize the structure enough that you can slice it cleanly while maintaining that wobbly, just-set center. Skip it, and you'll have a delicious puddle that tastes great but looks like it melted in summer heat.
Vanilla extract might seem basic, but use the good stuff here. The alcohol cooks off, leaving behind those warm, floral notes that make people ask "what's that amazing flavor?" when they taste it. Artificial vanilla will work in a pinch, but the real extract adds depth that elevates this from good dessert to unforgettable experience.
The Final Flourish
Salt is the unsung hero that makes everything else taste more like itself. Just a quarter teaspoon amplifies the sweetness, deepens the cream cheese flavor, and balances the burnt sugar notes. It's like turning up the volume on every other ingredient without anyone being able to identify why this tastes so much better than other cheesecakes they've tried.
Everything's prepped? Good. Let's get into the real action...
The Method — Step by Step
- Preheat your oven to 425°F (220°C) and position the rack in the center. This high temperature is crucial for achieving that characteristic burnt top while keeping the center custardy. While it's heating, line your 9x5-inch loaf pan with parchment paper, letting it overhang on all sides — you'll need these handles later for lifting out your masterpiece. Don't worry about making it neat; the wrinkles and folds actually help the cheesecake climb and create those gorgeous rustic edges that make it look like it came from a Basque bakery.
- Beat the cream cheese and sugar together until completely smooth, about 2-3 minutes. This is where most people rush and end up with a lumpy mess. Scrape down the sides and bottom of your bowl at least twice to ensure no stubborn white streaks remain. The mixture should look like thick frosting and feel luxurious between your fingers. If you still see lumps, keep beating — patience here prevents disappointment later when you slice into your cheesecake and find cream cheese pockets.
- Add the eggs one at a time, beating well after each addition. This gradual incorporation prevents the batter from breaking and keeps everything emulsified. The mixture will start to look thinner and more satiny — that's exactly what you want. Don't panic if it looks slightly curdled at this stage; it'll come back together when you add the cream. Just make sure each egg is fully incorporated before adding the next.
- Pour in the heavy cream and vanilla, mixing just until combined. The batter should now look like thick liquid silk, coating your spatula in a smooth, glossy layer. Resist the urge to overmix — at this point, we just want everything incorporated without incorporating too much air, which can cause excessive puffing and cracking. The batter should pour off your spatula in a thick ribbon, leaving visible trails that slowly disappear.
- Sift the flour and salt directly over the batter, then fold gently with a spatula. Here's where technique matters: cut down through the center, scrape along the bottom, and fold over the top. Rotate the bowl a quarter turn and repeat until no dry streaks remain. This method prevents lumps without overmixing. The batter should be smooth, glossy, and pourable but not thin — think melted ice cream consistency.
- Pour the batter into your prepared pan and give it a gentle tap on the counter to release any large air bubbles. The batter should fill the pan about three-quarters full, leaving room for it to puff up during baking. If you have excess batter (which rarely happens because you'll want to lick the bowl), don't overfill — make mini cheesecakes in ramekins instead. The surface should look smooth and shiny, with tiny bubbles that slowly rise and pop.
- Bake for 50-55 minutes, but here's the thing — don't open that oven door for at least 45 minutes. The cheesecake needs consistent high heat to develop that burnt top and set properly. When it's done, the top should be deeply browned, almost black in spots, and the center should still jiggle like set Jell-O when you gently shake the pan. It will puff up dramatically and look like it's going to overflow, then sink as it cools — this is exactly what you want.
- Cool completely in the pan on a wire rack. This is the hardest part — waiting. As it cools, the cheesecake will sink and crack, creating that characteristic rustic appearance. Don't try to fix the cracks or smooth the top; they're part of the charm. Once cool, refrigerate for at least 4 hours or overnight. This sets the texture and makes slicing cleaner, though I'll be honest — I've eaten it warm and jiggly straight from the pan with a spoon, and zero regrets were had.
That's it — you did it. But hold on, I've got a few more tricks that'll take this to another level...
Insider Tricks for Flawless Results
The Temperature Rule Nobody Follows
Here's what separates the Basque cheesecake wizards from the mere mortals: every single ingredient needs to be at room temperature, not just the cream cheese. Cold eggs hitting warm cream cheese will seize up faster than you can say "lumpy mess." Set everything out at least an hour before you start mixing, or use my impatient baker method: eggs in warm water for 10 minutes, cream cheese microwaved on defrost for 30-second bursts until just soft, and cream warmed slightly to take the chill off. Your future self will thank you when you're slicing into a perfectly smooth cheesecake instead of one that looks like it has cottage cheese mixed in.
Why Your Nose Knows Best
Forget timers — your nose is the best indicator of when this cheesecake is perfectly done. When you start smelling something that reminds you of toasted marshmallows and caramel, that's your cue to check. The aroma should be sweet and slightly nutty, with hints of vanilla and cream. If it smells like burning, you've gone too far, but if you don't smell anything yet, give it more time. This sensory checkpoint has saved me more times than I can count, especially when dealing with oven hot spots or altitude differences that mess with baking times.
The 5-Minute Rest That Changes Everything
After you pull the cheesecake from the oven, let it rest in the pan for exactly 5 minutes before touching it. During this time, it continues cooking from residual heat while the proteins set. Too short, and it'll collapse into a puddle when you try to lift it out. Too long, and it sticks to the parchment like it's been glued there. Five minutes is the sweet spot — set a timer, walk away, and resist the urge to poke, prod, or otherwise fuss with your creation. This brief pause is what gives you clean slices instead of a crumbly mess.
The Salt Secret
That quarter teaspoon of salt isn't just for show — it's the difference between a good cheesecake and one that makes people close their eyes when they taste it. Salt amplifies the sweetness and brings out the subtle tang of the cream cheese, creating a more complex flavor profile. But here's the pro tip: sprinkle the tiniest pinch of flaky sea salt on top right before serving. It creates little flavor explosions that make each bite interesting, like discovering hidden treasure in your dessert.
The Overnight Miracle
I know it's torture, but this cheesecake is immeasurably better after a night in the fridge. The flavors meld and deepen, the texture sets to the perfect consistency, and somehow it tastes more sophisticated. If you absolutely must eat it the same day (been there), chill it for at least 4 hours. But if you can wait until tomorrow, you'll be rewarded with a dessert that tastes like it came from a Michelin-starred restaurant. Plus, cold cheesecake slices cleaner, making you look like a plating genius even if you're serving it on paper plates.
Creative Twists and Variations
This recipe is a playground. Here are some of my favorite ways to switch things up:
Citrus Burst Basque
Add the zest of one orange and half a lemon to the batter, plus replace the vanilla with orange blossom water. The result tastes like sunshine in dessert form — bright, aromatic, and sophisticated. The citrus oils also help cut through the richness, making it dangerously easy to eat twice as much. I brought this version to a dinner party once and witnessed three people fight over the last slice like characters in a soap opera.
Espresso Dream
Dissolve 2 tablespoons of instant espresso powder in the cream before adding it to the batter. The coffee flavor intensifies during baking, creating a mocha-like depth that coffee addicts will worship. The bitterness balances the sweetness perfectly, and the dark top already looks like coffee — it's a match made in dessert heaven. Serve this one after dinner and watch your guests suddenly become very interested in lingering at the table.
Salted Caramel Swirl
Drizzle 3 tablespoons of cooled caramel sauce over the batter in the pan, then use a skewer to create ribbons. As it bakes, the caramel sinks and creates pockets of gooey sweetness that contrast beautifully with the tangy cheesecake. The salt in the caramel also enhances all the other flavors, making each bite a perfect balance of sweet, salty, and tangy. Pro tip: warm the remaining caramel slightly and serve it alongside for those who like to gild the lily.
Chocolate Marble
Melt 3 ounces of dark chocolate and let it cool slightly. Reserve 1 cup of the batter, whisk the chocolate into it, then dollop both batters into the pan. Swirl with a knife for a dramatic black-and-white effect that tastes like the best chocolate cheesecake you've ever had. The chocolate portions get fudgy while the vanilla stays creamy, creating a texture contrast that'll make chocolate lovers weep with joy.
Berry Studded
Gently fold 1 cup of fresh raspberries or blackberries into the finished batter. The berries burst during baking, creating jammy pockets that cut through the richness. The tart fruit also creates beautiful purple marbling that makes each slice look like edible art. Frozen berries work too, but add them frozen to prevent them from turning your batter purple.
Boozy Grown-Up Version
Replace 2 tablespoons of the cream with your spirit of choice — bourbon for warmth, amaretto for almond notes, or framboise for berry elegance. The alcohol cooks off, leaving behind complex flavors that make this taste like a very sophisticated dessert from a fancy restaurant. Serve this one with espresso for the perfect adult ending to a dinner party, but maybe label it clearly so you don't accidentally serve boozy cheesecake to the kids' table.
Storing and Bringing It Back to Life
Fridge Storage
Wrap the completely cooled cheesecake (or individual slices) tightly in plastic wrap, then pop it into an airtight container. It'll keep for up to 5 days in the refrigerator, though I've never seen one last that long. The flavor actually improves after day one, as the vanilla and cream cheese meld into something transcendent. If you notice any condensation on top when you unwrap it, just gently blot with a paper towel — it's perfectly safe to eat, just not as pretty.
Freezer Friendly
This cheesecake freezes like a dream. Cut it into individual portions, wrap each slice in plastic wrap, then aluminum foil, and freeze for up to 2 months. Thaw overnight in the refrigerator or at room temperature for 30 minutes. The texture changes slightly — it becomes more dense, almost like frozen cheesecake candy, which honestly isn't a bad thing. Frozen slices are perfect for sneaking midnight snacks or impressing unexpected guests with "homemade" dessert.
Best Reheating Method
Here's the thing — Basque cheesecake is meant to be served at room temperature or slightly chilled, not warm. But if you've over-chilled it and want to bring back that creamy texture, let it sit out for 30 minutes before serving. If you must warm it (some people like it slightly gooey), microwave individual slices for just 8-10 seconds. Any longer and you'll have cheesecake soup, which while delicious, defeats the whole purpose of that perfect set texture you worked so hard to achieve.