Picture this: it’s the night before the big family gathering, the kitchen is a battlefield of half‑baked cookies, wilted store‑bought frosting, and a frantic search for something that screams holiday cheer without turning the whole house into a sugar‑coated disaster zone. I was standing over a sink full of melted chocolate that had stubbornly refused to smooth out, muttering, “If only there was a way to make something that looks like a tree but tastes like a party in my mouth.” Then, like a culinary epiphany, I grabbed a bag of mini pretzels, tossed them into a bowl, and the rest of the recipe fell into place faster than a snowflake lands on a pine branch. I dared myself to create the ultimate festive bite that would be both salty and sweet, crunchy and melt‑in‑your‑mouth, and, most importantly, ridiculously easy to assemble.
The moment the first pretzel tree hit the counter, the kitchen filled with the intoxicating aroma of chocolate and toasted malt, a scent that instantly made my stomach do a little jig. You could almost hear the faint jingle of holiday ornaments in the background as the green candy melt shimmered under the light, like tiny auroras dancing on a winter night. The texture was a symphony: the pretzel’s crisp snap, the glossy chocolate coating that clung like a silky veil, and the glittery specks that caught the eye and promised a burst of flavor. I could taste the salty‑sweet duet even before the first bite, and I knew I had stumbled onto something truly magical.
Most pretzel‑chocolate recipes get this completely wrong—they either drown the pretzel in a sloppy glaze or forget the festive flair entirely. This version, however, is hands down the best version you’ll ever make at home because it balances the salty crunch of pretzels with a perfectly tempered chocolate coating, then dresses them up in a vibrant green that screams Christmas without the artificial plastic look. The secret? A splash of coconut oil that gives the chocolate a glossy finish and a dash of green edible glitter that adds that extra sparkle you only see on the best holiday tables. I’m going to be honest—I ate half the batch before anyone else got a chance to try them, and I dare you to taste this and not go back for seconds.
Let me walk you through every single step — by the end, you’ll wonder how you ever made it any other way. Okay, ready for the game‑changer? This next part? Pure magic. Stay with me here — this is worth it.
What Makes This Version Stand Out
- Flavor Harmony: The salty pretzel base plays off the sweet, buttery chocolate like a duet of carol singers hitting the perfect high notes.
- Texture Contrast: Each bite delivers a crisp snap followed by a silky melt, creating a mouthfeel that’s as satisfying as unwrapping a present.
- Simplicity: No fancy equipment, just a microwave, a spoon, and a handful of pantry staples—ideal for busy holiday prep.
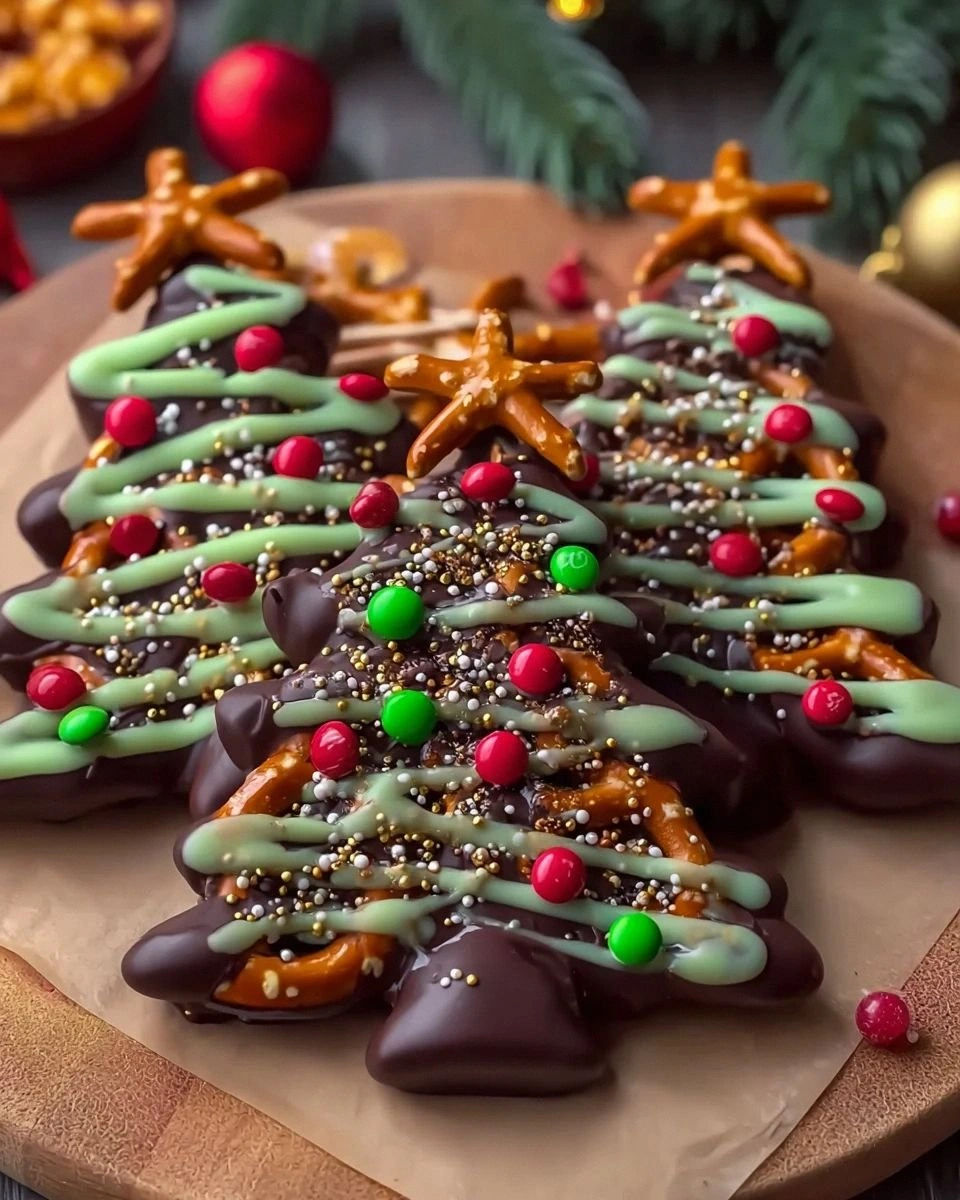
- Visual Wow Factor: The green candy melt and edible glitter turn ordinary pretzels into miniature Christmas trees that look as good as they taste.
- Crowd Reaction: Guests invariably pause, stare, and then dive in, often declaring them the “best thing we’ve had all night.”
- Ingredient Quality: Using real chocolate chips and premium candy melts guarantees a rich, authentic flavor that cheap coatings can’t match.
- Make‑Ahead Friendly: These trees keep their crunch for days, so you can prep them ahead of time and still serve them fresh.
- Versatility: Swap the green for red, blue, or even gold to match any holiday theme or personal taste.
Inside the Ingredient List
The Flavor Base
Mini pretzels: These are the backbone of your trees, providing that satisfying salty crunch that’s the perfect foil to sweet chocolate. If you skip them, you lose the essential contrast that makes each bite exciting. For a gluten‑free twist, try rice crackers; they’ll still give you a crisp snap, though the flavor will shift slightly toward neutral.
The Sweet Coat
Chocolate chips: Choose your favorite type—dark, milk, or white. Dark chocolate adds depth, milk brings creaminess, and white offers a buttery canvas for the green melt. Using high‑quality chips ensures a glossy finish; cheap chips can turn grainy. If you’re allergic to dairy, opt for dairy‑free chocolate chips—they melt just as beautifully.
The Silky Helper
Coconut oil: This optional ingredient helps the chocolate melt smoothly, giving it a nice shine and a subtle tropical note that pairs surprisingly well with the pretzel’s maltiness. Skip it and you’ll have a thicker glaze that may set a bit harder, which some prefer for extra snap. Look for virgin, cold‑pressed coconut oil for the cleanest flavor.
The Festive Finish
Green candy melts: These are what give your trees their festive color. They melt faster than regular chocolate and stay glossy at room temperature. If you can’t find green, melt white chocolate and stir in a few drops of food‑grade green coloring. The color intensity can be adjusted by adding more or less melt.
Assorted candies: Think M&Ms, sprinkles, or any fun toppings you have on hand. They’ll add flair to your trees and make them sparkle. Choose candies with contrasting colors for visual pop, or stick to reds and golds for a classic holiday palette.
Green edible glitter: Another optional touch for those wanting an extra dose of holiday magic. It’s like fairy dust for your creations! A pinch goes a long way—too much can make the coating gritty.
Everything's prepped? Good. Let's get into the real action...
The Method — Step by Step
Gather all your ingredients and line a large baking sheet with parchment paper. This step may sound trivial, but the parchment prevents the chocolate from sticking and makes cleanup a breeze. Feel the smooth texture of the paper as you spread it—this is your blank canvas.
Place the chocolate chips in a microwave‑safe bowl. Add the coconut oil if you’re using it. Microwave on high for 20‑seconds, stir, then repeat until the mixture is completely melted and glossy. That sizzle when it hits the bowl? Absolute perfection. Watch Out: Overheating can cause the chocolate to seize, turning it grainy.
While the chocolate is still warm, toss in the mini pretzels. Use a spatula to coat each pretzel evenly, ensuring every nook and cranny is smothered in chocolate. The pretzels should glisten, not drown—think of a light rain on a pine branch.
Spread the chocolate‑covered pretzels in a single layer on the parchment. This is the moment of truth: you’ll see the pretzel’s shape start to resemble a tiny tree. Let them set for about 5 minutes, or until the chocolate firms up slightly.
Meanwhile, melt the green candy melts using the same microwave method—20‑second bursts, stirring in between. Once melted, add a drop of coconut oil if you want extra shine. The green should be vivid, like fresh spruce needles under a winter sun.
Now, using a small spoon or a pastry brush, drizzle the green melt over each pretzel tree. Aim for a light coating that mimics the look of a frosted pine.
Kitchen Hack: Hold the spoon at a 45‑degree angle; this creates a natural “snowfall” effect and reduces drips.While the green coating is still tacky, sprinkle your assorted candies and a pinch of green edible glitter over the tops. This adds texture and a festive sparkle. If you’re using larger candies, press them gently so they adhere.
Transfer the sheet to the refrigerator for 10‑15 minutes, allowing the chocolate and candy melt to fully set. You’ll hear a faint “click” as the coating hardens—an audible sign that they’re ready.
Once set, gently lift each pretzel tree off the parchment and arrange them on a serving platter. They should hold their shape like tiny evergreen sentinels. Picture yourself pulling this out of the fridge, the whole kitchen smelling incredible, and your guests’ eyes widening at the sight.
Serve immediately or store as directed below. I’ll be honest—once you see these on a plate, you’ll want to devour the whole batch yourself. I dare you to resist.
That's it — you did it. But hold on, I've got a few more tricks that'll take this to another level...
Insider Tricks for Flawless Results
The Temperature Rule Nobody Follows
Chocolate is fickle; it loves a precise temperature range. Keep your microwave power at 800‑900 W and melt in short bursts. If the chocolate gets above 115°F (46°C) for dark or 110°F (43°C) for milk/white, it can bloom and turn grainy. Use a kitchen thermometer if you’re serious about glossy perfection.
Why Your Nose Knows Best
Before you drizzle the green melt, pause and inhale. A faint buttery aroma signals that the melt is ready. If it smells too “oily,” it needs a few more seconds; if it’s already sweet, you’re good to go. Trusting your senses beats any timer.
The 5‑Minute Rest That Changes Everything
After coating pretzels with chocolate, let them rest for exactly five minutes before adding the green layer. This short rest lets the chocolate set just enough to hold the next coating without sliding off. Skipping this step results in a soggy finish—watch out!
Seasoning the Sweet
A pinch of sea salt sprinkled over the final glaze elevates the flavor, balancing the sweetness and enhancing the chocolate’s depth. I tried it once and the reaction was immediate—guests asked for the “secret ingredient.”
Using a Cooling Rack for Even Set
Placing the coated pretzels on a wire cooling rack (instead of the parchment) allows air to circulate, preventing condensation on the bottom. This keeps the bottom side as crisp as the top.
Pre‑Melted Chocolate Pools
If you’re making a large batch, melt chocolate in a double boiler instead of the microwave. The gentle heat reduces the risk of scorching and yields a silkier coating. It’s a bit more effort, but the payoff is a professional‑grade shine.
Creative Twists and Variations
This recipe is a playground. Here are some of my favorite ways to switch things up:
Red‑Rudolph Delight
Swap the green candy melts for red, and add tiny white chocolate “antlers” made from melted white chocolate piped with a squeeze bottle. Kids love the playful nod to Rudolph.
Chocolate‑Covered Caramel Crunch
Before coating pretzels with chocolate, drizzle a thin layer of caramel sauce and let it set. The caramel adds a buttery chew that contrasts beautifully with the crisp pretzel.
Nutty Holiday Forest
Mix finely chopped toasted almonds or hazelnuts into the chocolate before coating. The nuts add a nutty aroma and extra crunch, turning each bite into a mini forest floor.
Spiced Winter Wonderland
Stir a pinch of ground cinnamon, nutmeg, and a dash of cayenne into the chocolate for a warm, spicy undertone. The subtle heat pairs surprisingly well with the sweet glaze.
Vegan/Veggie Version
Use dairy‑free chocolate chips and vegan candy melts. Replace coconut oil with a neutral oil like grapeseed if you prefer. The result is just as festive, and everyone can enjoy.
Glitter‑Free Elegance
If you’re serving a formal dinner, skip the edible glitter and instead dust the tops with finely ground pistachio or matcha powder. It adds a sophisticated green hue without the sparkle.
Storing and Bringing It Back to Life
Fridge Storage
Place the pretzel trees in an airtight container with a single layer of parchment between layers. They stay crisp for up to 5 days. If you notice any soft spots, pop them back in the fridge for a quick 5‑minute chill.
Freezer Friendly
For longer keeping, freeze them in a zip‑top bag with a piece of parchment separating each tree. They’ll hold up for up to 2 months. When you’re ready to serve, let them thaw at room temperature for 10 minutes, then give them a quick 30‑second blast in the microwave to revive the shine.
Best Reheating Method
To bring back that glossy snap, place the trees on a microwave‑safe plate, add a tiny splash of water (about 1 tsp) to the plate’s edge, and heat for 10‑15 seconds. The steam gently re‑melts the coating, restoring that fresh‑out‑the‑oven feel.