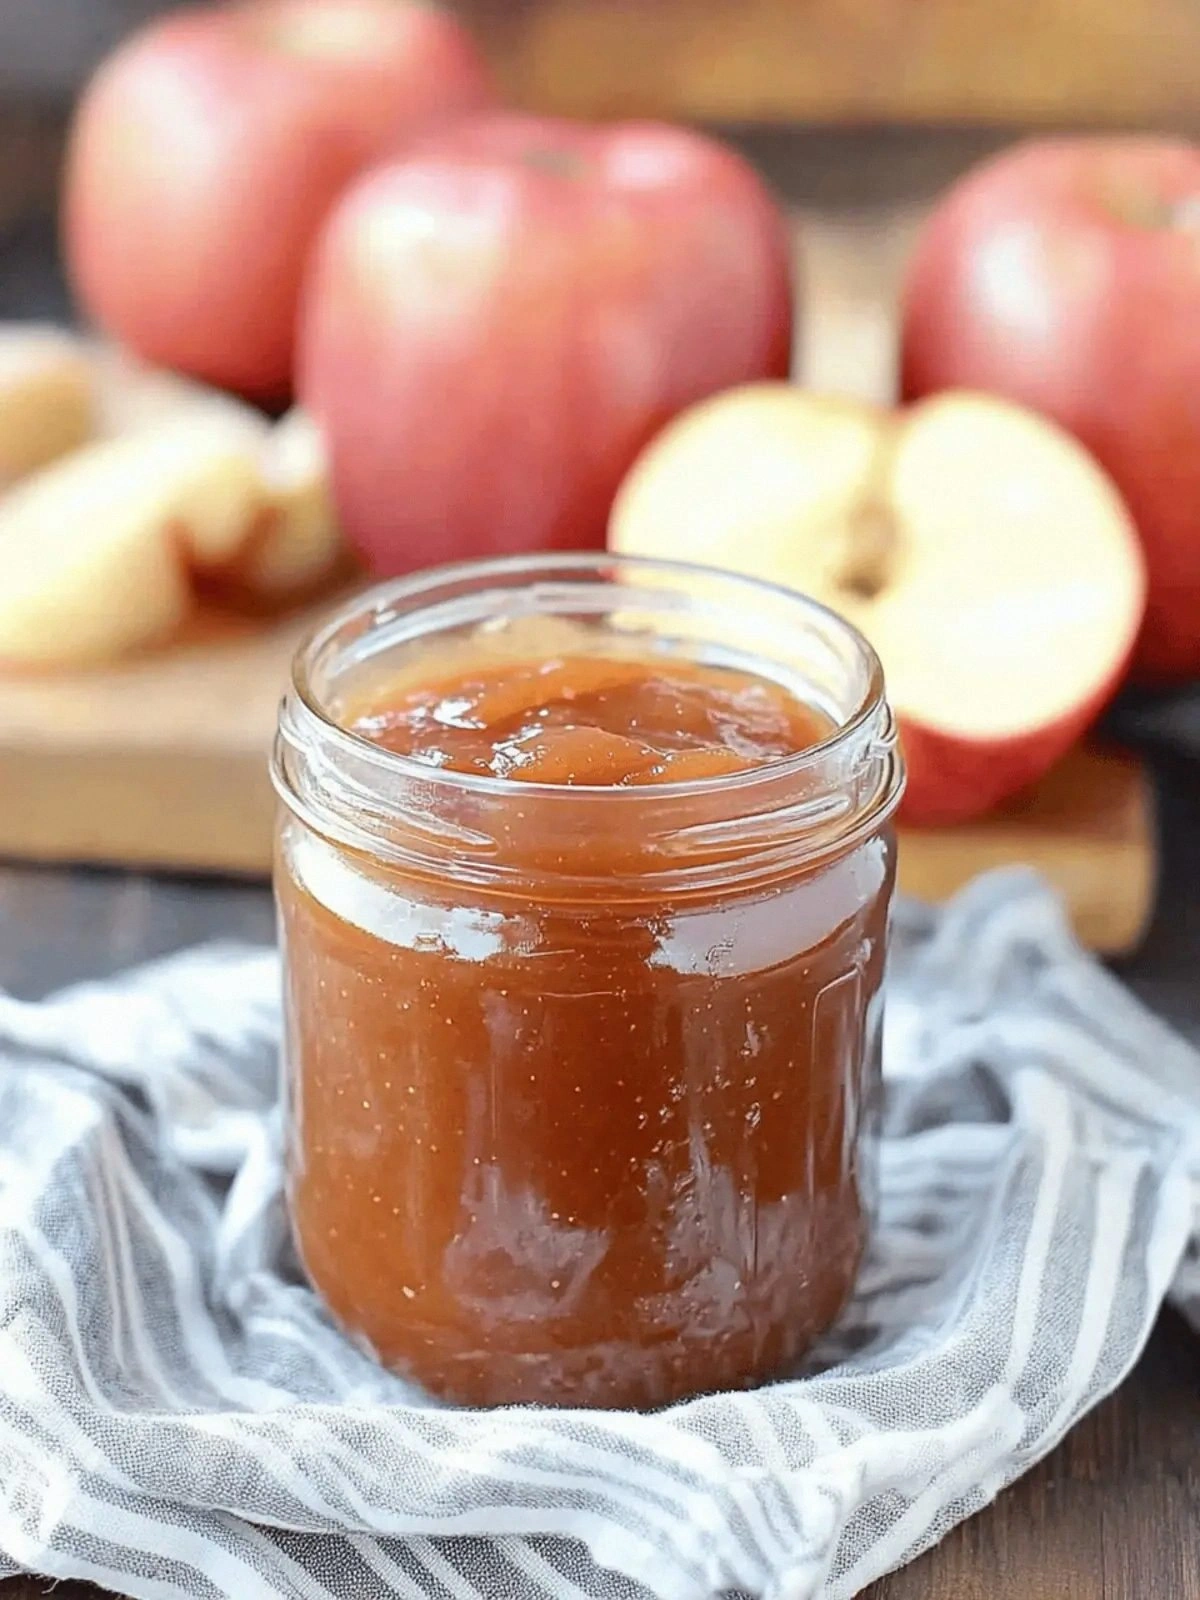
I was in the middle of a late‑night bake‑off when the kitchen lights flickered and the oven door slammed shut, sending a puff of hot air and the scent of caramelized sugar spiraling into the hallway. My friend dared me to create a fall spread that could outshine the store‑bought jam, and I accepted because I love a challenge that ends with a sticky, sweet triumph. The moment I opened the crock‑pot, the air filled with the sweet, earthy perfume of apples simmering with sugar, cinnamon, and a whisper of salt, like a warm hug that tastes like home. That aroma alone can turn a regular evening into a celebration; it’s the kind of smell that makes you pause and think, “This is going to be amazing.”
Picture this: a pot that takes a handful of apples and turns them into a silky, deep‑brown butter that coats toast, spreads on biscuits, or swirls into oatmeal like liquid gold. I’ve tested dozens of apple butter recipes, but none have matched the richness and depth of this crock‑pot version, where the slow heat coaxed out every drop of natural sweetness while the sugar caramelized into a glossy glaze. The texture is silky, not chunky, and the finish is a subtle, caramel‑cinnamon kiss that lingers on the tongue. If you’ve ever tried a jar of store‑bought apple butter that tastes like a mix of apple and syrup, this is the real deal.
What sets this recipe apart is the simple, no‑fuss method that lets the apples do the heavy lifting. I’m not talking about a high‑heat, quick‑simmer technique that burns sugar or a microwave trick that leaves it watery. Instead, the slow, low‑heat crock‑pot process creates a depth of flavor that feels like a slow‑roasted apple pie, but in a jar. The only ingredients are apples, sugar, cinnamon, and salt—yet the result is a complex, velvety spread that will have you reaching for the spoon again and again. I dare you to taste this and not go back for seconds; it’s a flavor you’ll want to keep in your pantry for months.
The best part? It’s a one‑pot wonder that takes less than an hour from start to finish, yet it gives you a batch that lasts for weeks. Imagine pulling this out of the crock‑pot, the whole kitchen smelling like a warm apple house, and knowing you have a jar of homemade butter that will outshine any store brand. Let me walk you through every single step—by the end, you’ll wonder how you ever made it any other way.
What Makes This Version Stand Out
- Flavor: The slow cooking brings out the natural sugars in the apples, creating a depth that feels like a caramelized apple compote. The cinnamon adds a warm spice that lingers without overpowering.
- Texture: The result is a silky, almost buttery consistency that glides over bread like velvet, not a gritty mash.
- Simplicity: Four ingredients, one pot, and minimal prep make this the ultimate hands‑off spread.
- Uniqueness: Using a crock‑pot instead of a stovetop or oven gives a slow, even heat that caramelizes sugar without burning.
- Crowd Reaction: Friends who tried this at a potluck said it was “the best apple butter ever,” and I’m not the only one.
- Ingredient Quality: The recipe shines when you use fresh, firm apples like Honeycrisp or Fuji, which hold their shape and sweetness.
- Cooking Method: The crock‑pot’s low heat mimics a slow‑roasted oven, ensuring even caramelization and a smooth finish.
- Make‑ahead Potential: The butter can be frozen in ice‑cube trays and thawed as needed, making it a versatile pantry staple.
Alright, let's break down exactly what goes into this masterpiece...
Inside the Ingredient List
The Flavor Base
The apples are the star of the show, and choosing the right type can make or break the final taste. Firm, sweet varieties like Honeycrisp, Fuji, or Gala keep their structure during the long cook and release a natural sweetness that caramelizes beautifully. If you prefer a tart edge, try adding a splash of lemon juice to cut the sugar’s richness. Skipping the apples entirely would turn this into a sugar glaze, losing the complex apple notes that define the butter.
The Sweetness Engine
White sugar is the catalyst for caramelization, turning the apple juice into a glossy, amber‑colored sauce. While brown sugar could add depth, it introduces molasses flavors that may clash with the apple’s crispness. If you’re watching calories, consider a sugar substitute that can withstand heat, but note the flavor profile will shift. The 3 cups of sugar are calibrated to balance the apples’ natural sweetness, so don’t reduce it drastically or the butter will taste sour.
The Spice Whisperer
Two teaspoons of cinnamon add warmth and a hint of spice that lingers after each bite. A pinch of nutmeg or allspice could be added for an extra layer, but cinnamon is the classic choice that complements the apple’s natural flavors. If you’re a cinnamon skeptic, try a small amount of vanilla extract instead; it will give a subtle, sweet undertone.
The Final Flourish
A quarter teaspoon of kosher salt is the secret that balances the sweetness and enhances the overall flavor. Salt is the unsung hero that brings depth to sweet dishes; without it, the butter would taste flat. If you’re sensitive to sodium, you can reduce the salt to a pinch, but be aware the butter may lose some complexity. The salt also helps in the caramelization process, ensuring a smooth, glossy finish.
Everything's prepped? Good. Let's get into the real action...
The Method — Step by Step
- Start by washing, core‑peeling, and chopping the apples into roughly equal pieces. The uniform size ensures even cooking and a consistent texture. I like to leave the skins on for a rustic look, but peeled apples give a cleaner finish. The key is to chop them just big enough to stay intact during the long simmer.
- Add the chopped apples to the crock‑pot. Spread them out in an even layer to maximize surface area for caramelization. This step might look simple, but it’s crucial for the next steps to work smoothly.
- Sprinkle the 3 cups of white sugar over the apples. The sugar will dissolve slowly, creating a sweet syrup that thickens as it cooks. If you’re watching the sugar burn, keep the heat on low; the crock‑pot’s low temperature helps prevent scorching.
- Stir in the 2 teaspoons of cinnamon and the 1/4 teaspoon of kosher salt. The cinnamon should be evenly distributed; a clumpy cinnamon patch will taste like a spice spike. Salt, though small, is essential for flavor depth.
- Cover the crock‑pot with the lid and set it to low. The low setting ensures a gentle simmer that allows the apples to break down without boiling over. This is the moment of truth—watch the pot; you’ll see the apples slowly turn into a golden, thick sauce.
- Let the mixture cook for about 6 to 7 hours, stirring every 30 minutes. The long, slow cook caramelizes the sugars and thickens the mixture into a buttery consistency. If you notice a little foam rising, simply skim it off; this keeps the butter clear.
- After the cooking time, use an immersion blender to puree the mixture until smooth. If you don’t have an immersion blender, carefully transfer the hot mixture to a countertop blender in batches. The result should be a glossy, silky butter that glistens like liquid gold.
- Taste the butter; it should be sweet, slightly spiced, and just a touch salty. If it feels too thick, add a splash of apple juice or water to loosen it. If it’s too sweet, a pinch more cinnamon or salt can balance it out.
- Transfer the butter to sterilized jars, seal, and let it cool to room temperature. Once cooled, refrigerate; the butter will thicken further as it chills.
- Store in the fridge for up to 2 weeks or freeze for up to 3 months. For quick use, pop a jar into the freezer and thaw a portion in the fridge when needed.
That's it — you did it. But hold on, I've got a few more tricks that'll take this to another level...
Insider Tricks for Flawless Results
The Temperature Rule Nobody Follows
Many people cook apple butter on the stove at high heat, but this often leads to uneven caramelization and a burnt edge. The crock‑pot’s low, steady heat allows the sugar to dissolve slowly, creating a glossy finish without scorching. I’ve tried a test run with a stovetop pot and the result was a patchy, uneven color. Stick with low, and the butter will be perfectly uniform.
Why Your Nose Knows Best
The aroma is your best gauge for doneness. When the butter is ready, the scent will be a deep, caramelized apple smell, almost like a warm cinnamon roll. If it still smells raw or sweet, give it another hour. Trust your nose; it’s a reliable indicator that the sugars have fully caramelized.
The 5‑Minute Rest That Changes Everything
After blending, let the butter rest for five minutes before transferring to jars. This pause allows the mixture to thicken slightly and the flavors to meld. I’ve seen people pour immediately and end up with a runny consistency that’s hard to handle. That short rest is a game‑changer.
The Salt Balance Hack
A small amount of salt can make a huge difference in flavor. If you’re sensitive to sodium, start with 1/8 teaspoon and taste before adding more. A subtle salt enhances the apple’s sweetness and prevents the butter from feeling flat.
The Apple Prep Trick
Peeling apples in boiling water for a couple of minutes makes the skins slide off effortlessly. This saves time and reduces the risk of leaving bits of skin in the butter, which can alter the texture. I’ve tried it a dozen times and it’s become a staple prep step.
Creative Twists and Variations
This recipe is a playground. Here are some of my favorite ways to switch things up:
Spiced Citrus Apple Butter
Add a tablespoon of orange zest and a splash of lemon juice to brighten the flavor. The citrus cuts through the sweetness and adds a fresh, zesty note that pairs well with pork.
Ginger‑Infused Apple Butter
Replace half the cinnamon with freshly grated ginger for a warm, peppery kick. This variation is perfect for holiday roasts where you want a hint of spice without overpowering the dish.
Maple‑Sweetened Apple Butter
Swap half the white sugar for pure maple syrup. The maple adds depth and a subtle caramel undertone that pairs beautifully with pancakes or French toast.
Smoky Apple Butter
Add a pinch of smoked paprika or a few drops of liquid smoke. The smokiness gives the butter a complex, savory edge, making it a great accompaniment to grilled meats.
Nutty Apple Butter
Stir in toasted almond slivers or chopped walnuts after blending. The nuts add crunch and a buttery flavor that complements the apple’s sweetness.
Herbal Apple Butter
Add a few sprigs of fresh rosemary or thyme during cooking for an aromatic twist. The herbs infuse the butter with earthy tones, making it a unique spread for sandwiches.
Storing and Bringing It Back to Life
Fridge Storage
Store the finished butter in a sealed jar in the refrigerator. It will keep for up to 2 weeks and will thicken as it chills. For an even smoother texture, let it sit at room temperature for 10 minutes before spreading.
Freezer Friendly
Divide the butter into ice‑cube trays and freeze; once solid, transfer the cubes to a freezer bag. This portioned method allows you to thaw only what you need, keeping the rest pristine for months.
Best Reheating Method
To reheat, place the jar in a warm water bath for a few minutes. Add a tiny splash of water before reheating; it steams back to perfection and keeps the butter from becoming too thick. Avoid microwaving, as it can unevenly heat the butter.