Picture this: it’s a rainy Thursday night, the kind that makes you want to hug a blanket and whisper sweet nothings to your stovetop. I was halfway through a bland, soggy potato casserole that tasted like regret when a friend dared me to “make something that actually makes you want to lick the plate clean.” I accepted, but the kitchen turned into a battlefield of burnt edges, watery sauce, and a lingering feeling that I’d just wasted a good batch of potatoes. That disaster sparked a midnight experiment that involved a splash of heavy cream, a generous handful of sharp cheddar, and a secret technique that turns ordinary potatoes into a golden, bubbling masterpiece. This is the version that emerged from that chaotic night, and I’m about to spill every buttery, cheesy secret—so brace yourself, because I dare you to taste this and not go back for seconds.
The moment the sauce hits the pan, you hear a gentle sizzle that’s louder than a whisper but softer than a shout, promising a texture that’s both silky and robust. The aroma of melted cheese mingles with the sweet undertones of caramelized onions, creating a perfume that could coax even the most stoic roommate out of their room. As the potatoes bake, their edges turn a crisp, caramel hue that shatters like thin ice when you pierce them with a fork, while the interior remains buttery soft, hugging each slice like a warm embrace. The first bite delivers a symphony: the sharp cheddar sings, the potatoes provide a mellow bass, and the hint of nutmeg adds a mysterious high note that lingers just long enough to make you close your eyes and sigh. This isn’t just a side dish; it’s a culinary hug that makes you feel like the kitchen itself is cheering you on.
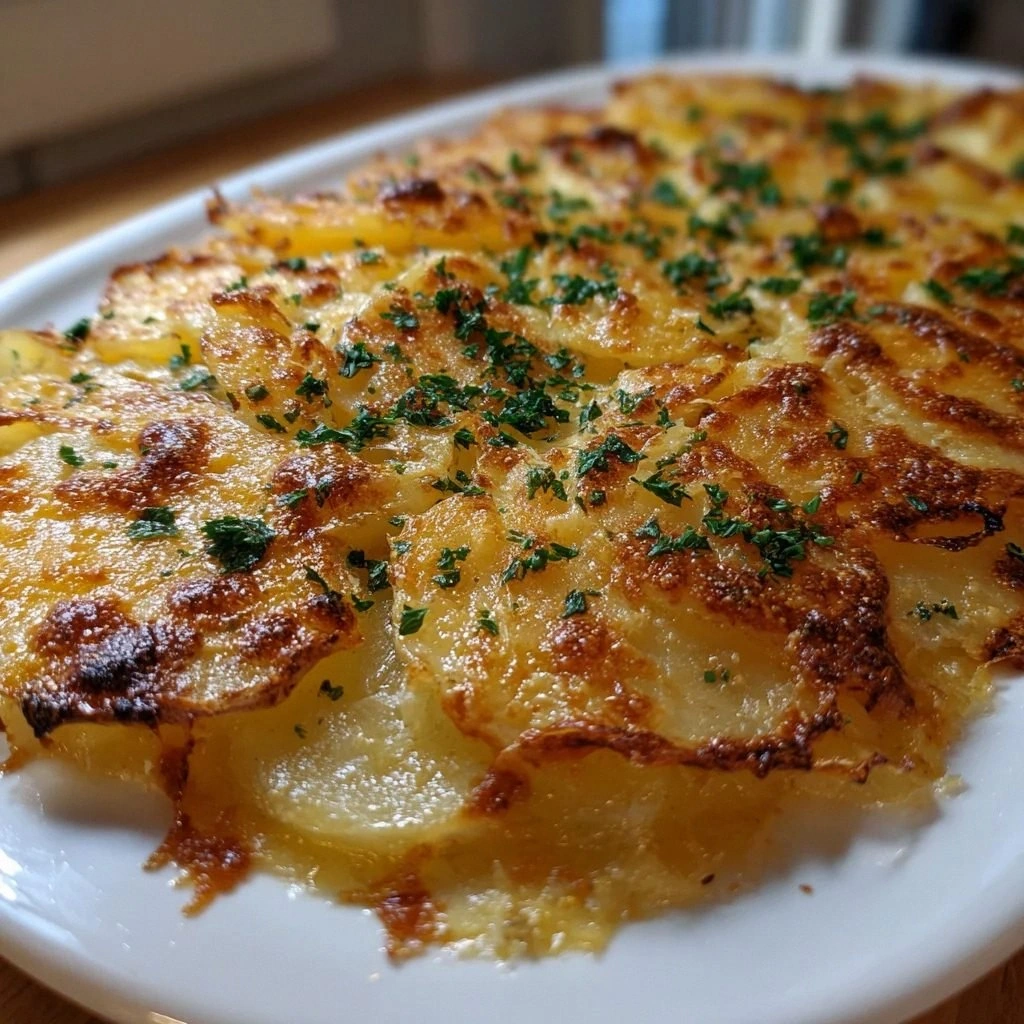
Most scalloped potato recipes get this completely wrong—they either drown the potatoes in a soupy mess or bake them into a dry, rubbery slab that could double as a doorstop. What sets this version apart is the balance of dairy, the precise layering technique, and a dash of fresh parsley that adds a pop of color and a whisper of herbaceous freshness. I’m being honest—I ate half the batch before anyone else could even get a fork, and that’s a testament to how addictive this dish truly is. The secret? A two-step sauce that starts with a roux for thickness, then gets enriched with both whole milk and heavy cream for that velvety mouthfeel you crave. And let’s not forget the final broil that creates those irresistible, golden-brown crusts that crackle under the fork like a promise kept.
Now, let’s walk through every single step—by the end, you’ll wonder how you ever made it any other way. Okay, ready for the game-changer? I’ll start with the ingredients, then we’ll dive into the method, sprinkle in some insider tricks, and finish with creative twists that’ll keep this dish fresh forever. Stay with me here—this is worth it.
What Makes This Version Stand Out
- Flavor Explosion: The sharp cheddar provides a bold, tangy backbone while the butter and cream create a luxurious mouthfeel that coats every potato slice like velvet.
- Texture Harmony: A delicate balance of creamy interior and crispy, caramelized edges ensures each bite is a contrast of silky and crunchy.
- Simplicity Meets Sophistication: Despite the gourmet feel, the recipe uses pantry staples and requires only a single baking dish, making it perfect for weeknight dinners.
- Unique Nutmeg Twist: A pinch of ground nutmeg adds an unexpected warmth that elevates the dish beyond ordinary comfort food.
- Crowd‑Pleaser Factor: This dish consistently gets rave reviews at potlucks; guests often ask for the “secret” and I get to brag about my kitchen wizardry.
- Ingredient Quality: Using large Russet potatoes guarantees a fluffy interior, while fresh parsley adds a burst of color and freshness at the finish.
- One‑Pan Efficiency: The entire process—from sauce to bake—happens in the same dish, cutting down on cleanup time dramatically.
- Make‑Ahead Magic: Assemble the night before, refrigerate, and bake the next day for a hands‑free dinner that still tastes fresh.
Inside the Ingredient List
The Flavor Base
Unsalted butter: This is the silent hero that melts into the flour, creating a roux that thickens the sauce without adding unwanted salt. If you skip the butter, the sauce will be thin and lack that buttery richness that makes the dish feel indulgent. A good quality European butter with a higher butterfat content will give you a silkier texture. Swap tip: Use ghee for a nutty twist, but reduce the amount by half because ghee is more concentrated.
Medium onion: Finely chopped, the onion adds a subtle sweetness that balances the sharpness of the cheddar. Caramelizing it just until translucent releases sugars that deepen the flavor profile. Leaving the onion out will make the sauce taste flat, like a song missing its chorus. Swap tip: Shallots work beautifully if you prefer a milder, more delicate onion flavor.
The Texture Crew
All‑purpose flour: Flour is the thickening agent that transforms the butter and milk into a velvety roux. Overcooking the flour can lead to a bitter taste, while undercooking leaves a raw flour taste. Stir constantly for about two minutes until it turns a light golden hue. Swap tip: For a gluten‑free version, use rice flour in the same quantity.
Whole milk & Heavy cream: The milk provides body without overwhelming richness, while the heavy cream adds that luxurious, velvety finish. Using only milk will result in a thinner sauce; using only cream makes it too heavy. A 2:1 ratio of milk to cream strikes the perfect balance. Swap tip: Substitute half-and-half for the cream if you’re watching calories, but expect a slightly less decadent texture.
The Unexpected Star
Ground nutmeg: Just a pinch of nutmeg adds a whisper of warmth that cuts through the richness, making each bite feel like a cozy autumn evening. It’s easy to overdo, so a little truly goes a long way. If you skip it, you’ll miss that subtle depth that makes the sauce sing. Swap tip: A dash of smoked paprika can provide a smoky undertone for a different flavor direction.
The Final Flourish
Sharp cheddar cheese: This is the star of the show—its bold flavor and excellent meltability create those glorious, stringy pockets of cheese. Using a milder cheese will result in a bland dish, while a pre‑shredded blend often contains anti‑caking agents that affect texture. Grate the cheese yourself for the best melt. Swap tip: Mix in a bit of Gruyère for extra nuttiness, but keep the cheddar as the dominant flavor.
Chopped fresh parsley: Added at the end, parsley brings a fresh, herbaceous pop that brightens the dish and adds visual appeal. Skipping it is like serving a masterpiece without a frame. Swap tip: Use chives for a milder onion‑like note.
Everything's prepped? Good. Let's get into the real action...
The Method — Step by Step
- Preheat your oven to 375°F (190°C). While the oven warms, peel the four large Russet potatoes and slice them thin—about 1/8 inch thick—using a mandoline for uniformity. Uniform slices ensure even cooking; uneven pieces will end up either mushy or undercooked. Lay the slices in a bowl of cold water for five minutes to remove excess starch, then pat them completely dry with a clean kitchen towel. Power transition: This step alone prevents the dreaded gummy texture that ruins most scalloped potatoes.
- In a saucepan, melt 2 tablespoons of unsalted butter over medium heat. Add the finely chopped onion and sauté until translucent, about 3 minutes, then stir in the minced garlic and cook for another 30 seconds until fragrant. Sprinkle the 2 tablespoons of flour over the mixture, whisk continuously, and let it bubble gently—this is your roux. Slowly pour in 2 cups of whole milk while whisking, followed by 1 cup of heavy cream, ensuring the sauce stays smooth and lump‑free. Bring the mixture to a gentle simmer; it will thicken in about 4–5 minutes. Watch Out: If the sauce boils vigorously, it can separate, leaving you with a curdled mess.Kitchen Hack: When making the roux, melt the butter over medium heat, then whisk in the flour and cook for exactly 2 minutes. This eliminates any raw flour taste and creates a golden base that will coat the potatoes beautifully.
- Season the sauce with 1 teaspoon of salt, ½ teaspoon of freshly ground black pepper, and a pinch (about ¼ teaspoon) of ground nutmeg. Taste and adjust—remember, the cheese will add salt, so err on the side of caution. Then, fold in 2 cups of shredded sharp cheddar cheese, stirring until it melts into a glossy, amber‑colored sauce that clings to the back of a spoon. This is the moment of truth: the cheese should be fully incorporated, creating a thick, velvety blanket that will hug every potato slice.
- Grease a 9‑by‑13‑inch baking dish with a thin layer of butter or non‑stick spray. Begin layering the potatoes: start with a single layer of slices, slightly overlapping, covering the bottom of the dish. Pour a generous ladle of the cheese sauce over the first layer, spreading it evenly with a spatula. Repeat the layering—potatoes, sauce—until you run out of ingredients, finishing with a thick layer of sauce on top. Power transition: This staggered layering ensures every bite gets that perfect cheese‑to‑potato ratio.
- Scatter the remaining 2 tablespoons of butter in small dollops across the surface; this will create those coveted golden speckles as the dish bakes. Sprinkle a little extra shredded cheddar (about ½ cup) on top for an extra crunchy crust. Cover the dish tightly with aluminum foil, sealing the edges to trap steam and keep the potatoes tender.
- Place the covered dish in the preheated oven and bake for 30 minutes. After 30 minutes, remove the foil and switch the oven to broil mode. Let the potatoes broil for 3–5 minutes, watching closely—once the cheese turns a deep, caramelized gold and the edges start pulling away from the dish, you’ve achieved that perfect, crackly top. Watch Out: Do not walk away during the broil; the cheese can go from perfectly browned to burnt in seconds.
- Remove the dish from the oven and let it rest for at least 10 minutes. This resting period allows the sauce to set, making the slices easier to cut and preventing a watery mess on the plate. While you wait, the kitchen will fill with a buttery, cheesy aroma that will have everyone gathering around the counter.
- Just before serving, sprinkle the chopped fresh parsley over the top for a burst of color and a hint of herbal freshness. This final garnish not only looks gorgeous but also adds a subtle brightness that cuts through the richness.
- Slice the scalloped potatoes into squares or wedges—whatever you fancy—and serve hot. Pair with a crisp green salad or a simple roasted chicken, and watch as your guests marvel at the depth of flavor. And now the fun part: enjoy every cheesy, buttery bite, and remember that you just nailed the ultimate comfort side dish.
That's it — you did it. But hold on, I've got a few more tricks that'll take this to another level...
Insider Tricks for Flawless Results
The Temperature Rule Nobody Follows
Never bake scalloped potatoes at a temperature lower than 350°F. Lower temps cause the potatoes to steam rather than roast, resulting in a soggy texture. By keeping the oven at 375°F, you ensure the edges caramelize while the interior stays tender. I once tried a low‑and‑slow approach; the dish turned out mushy and the cheese never browned. Trust the heat, and you’ll get that perfect golden crust every time.
Why Your Nose Knows Best
While the timer is handy, your nose is the ultimate gauge of doneness. When the cheese starts to smell nutty and slightly toasty, you’re approaching the sweet spot. If you detect a burnt, acrid scent, pull the dish out immediately. I’ve saved many a batch by trusting my sense of smell over the clock.
The 5‑Minute Rest That Changes Everything
Resting the casserole for exactly 5–10 minutes after baking is non‑negotiable. This short pause lets the sauce thicken and the potatoes settle, preventing a watery spill when you cut into it. Skipping this step is a common rookie mistake that leads to soggy plates and a disappointed crowd.
Butter‑Dot Secret
Adding small butter dots on the surface before the final broil creates those delightful, caramelized flecks that add texture and flavor bursts. It’s a tiny step that makes a massive difference in the final mouthfeel. I once omitted this and the top lacked that satisfying crunch.
Seasoning Layers, Not Just One
Season the sauce, then season the potatoes themselves with a light sprinkle of salt before layering. This double‑seasoning ensures every bite is evenly flavored. If you only season the sauce, the outer layers can end up bland while the inner layers become overly salty.
Creative Twists and Variations
This recipe is a playground. Here are some of my favorite ways to switch things up:
Smoky Bacon Bliss
Cook 6 strips of bacon until crisp, crumble, and fold them into the sauce before layering. The smoky, salty crunch adds a whole new dimension, making the dish perfect for brunch or a hearty dinner.
Herb‑Infused Green
Swap the parsley garnish for a mixture of fresh thyme, rosemary, and chives. These herbs lend an earthy aroma that complements the cheese and makes the dish feel spring‑ready.
Spicy Jalapeño Kick
Finely dice one jalapeño (seeds removed for less heat) and sauté it with the onion. The subtle heat cuts through the richness, ideal for those who love a little zing.
Vegan Velvet
Replace the butter with olive oil, use almond milk and coconut cream, and swap cheddar for a sharp vegan cheese. The texture remains creamy, and the flavor stays indulgent—proof that comfort food can be plant‑based.
Cheddar‑And‑Gruyère Duo
Combine equal parts sharp cheddar and Gruyère for a nutty, complex melt. This blend creates a deeper flavor profile that’s perfect for special occasions.
Sweet Potato Swap
Use a mix of sweet potatoes and Russets for a sweet‑savory contrast. The natural sweetness of the orange flesh pairs beautifully with the sharp cheddar, creating a dish that’s both comforting and unexpected.
Storing and Bringing It Back to Life
Fridge Storage
Allow the casserole to cool to room temperature, then cover tightly with plastic wrap or aluminum foil. Store in the refrigerator for up to 3 days. When reheating, place a splash of milk (about 2 tablespoons) over the top, cover with foil, and bake at 350°F for 20‑25 minutes until heated through.
Freezer Friendly
For long‑term storage, wrap the cooled, uncovered casserole in a double layer of foil, then place it in a freezer‑safe bag. It will keep for up to 2 months. To reheat, thaw overnight in the fridge, add a drizzle of heavy cream, and bake at 375°F for 30‑35 minutes, uncovered, until bubbling and golden.
Best Reheating Method
The secret to reviving that crispy top is to broil for the last 3 minutes after the casserole is heated through. This restores the crunchy, caramelized edges that make each bite unforgettable. Remember, a tiny splash of water or milk before reheating creates steam that prevents the potatoes from drying out.