I still remember the night I burned an entire batch of pancakes and blamed the kitchen for its unforgiving heat. The kitchen lights flickered, the batter sizzled, and my toast‑like disaster left me staring at the counter like a detective at a crime scene. That moment sparked a craving that was more stubborn than a stubborn roommate refusing to clean the dishes. I dared myself to create a waffle that would make my taste buds do a backflip and my body thank me with protein power. And now I’m here, ready to walk you through every single step — by the end, you’ll wonder how you ever made waffles any other way.
Picture the kitchen at dawn: the air is crisp, the sunlight filters through the blinds, and a gentle hum of the fridge is the only soundtrack. I pour the batter, and the aroma of vanilla and banana rises like a sweet cloud. The sound of the waffle iron clacking to life is a promise of crunch. I can already taste the buttery edges melting into the soft, airy center. If you can hear that sizzling, you’re already halfway to the finish line.
What makes this protein waffle recipe stand out isn’t just the ingredients; it’s the method, the texture, and the confidence that comes with every bite. I’ve spent nights tweaking ratios, swapping flours, and testing temperatures until the batter hit that perfect consistency—neither runny nor too thick. The result is a waffle that rises like a cloud, with crispy edges that shatter like thin ice, and a mouthfeel that feels like a protein‑rich hug. I dare you to taste this and not go back for seconds. Trust me, this is hands down the best version you’ll ever make at home.
Most recipes get this completely wrong by over‑baking the batter, using too much sugar, or neglecting the protein boost. Here, we balance everything so that the protein doesn’t come out dry or chalky. The batter is thick enough to hold its shape, yet light enough to rise like a soufflé. The secret? A splash of almond milk, a dash of baking soda, and the gentle folding of eggs. I’ll share the technique that makes the batter just right, so you won’t have to guess.
Picture yourself pulling this out of the oven, the whole kitchen smelling incredible, and the timer chiming like a victory bell. The waffle is golden brown, the edges crisp, the center airy, and the aroma of vanilla and banana is irresistible. I’ve tested this recipe on a waffle iron, a cast‑iron skillet, and even a pre‑heated oven, and each time the outcome is flawless. This is not a gimmick; it’s a reliable, repeatable method that you can trust. Let’s dive in and turn your kitchen into a protein waffle wonderland.
What Makes This Version Stand Out
- Texture: The batter is thick yet pourable, giving a fluffy interior and a crisp exterior that shatters like thin ice. The protein content keeps the waffles moist without making them dense. If you’ve ever had a waffle that falls apart, this will change your life.
- Flavor: Vanilla and banana work together like a sweet duet, while the almond milk adds a subtle nutty undertone. The honey adds just enough sweetness to satisfy the palate without overpowering the protein. The result is a balanced, mouth‑watering flavor profile.
- Protein Boost: Whey protein powder is the star, delivering 25 grams per serving. This is ideal for post‑workout meals or a high‑protein breakfast. I’ve tested different protein powders and found that vanilla whey blends best with the batter.
- Ease of Preparation: All ingredients are pantry staples or easy to find. No special equipment is needed beyond a waffle iron or skillet. The batter can be made ahead and stored in the fridge for up to 24 hours.
- Make‑Ahead Potential: The batter keeps well in the fridge, so you can whip up a batch on Sunday and enjoy it all week. Just reheat in the toaster or oven for a few minutes. No loss of flavor or texture.
- Versatility: Swap the vanilla whey for chocolate for a dessert version, or add spices like cinnamon for a breakfast twist. The base is flexible and welcomes experimentation. If you’re looking to keep things interesting, this recipe is a playground.
Inside the Ingredient List
The Flavor Base
The foundation of any great waffle is the flavor base. Vanilla whey protein powder provides the sweet, creamy backdrop, while a splash of almond milk keeps the batter silky. The banana adds natural sweetness and moisture, preventing the waffles from drying out. Skipping the banana will leave the batter dry and bland, so keep it in the mix.
The Texture Crew
Oat flour is the unsung hero that gives structure without heaviness. It’s gluten‑free and packed with fiber, making the waffles light yet satisfying. Baking powder and baking soda are the leavening agents that create lift; without them, the waffles would be flat and dense. A pinch of salt balances the sweetness and enhances flavor. If you’re gluten‑free, replace oat flour with almond flour for a slightly different texture.
The Unexpected Star
Greek yogurt is the secret ingredient that adds protein, tang, and a creamy mouthfeel. It also helps bind the batter together and keeps the waffles from cracking. If you’re vegan, swap it for coconut yogurt or a non‑dairy yogurt alternative. The yogurt’s acidity also reacts with baking soda, giving a subtle lift.
The Final Flourish
The final touches—vanilla extract, honey, and melted coconut oil—bring harmony to the batter. The vanilla adds depth, honey brings a gentle sweetness, and the oil ensures the waffles stay moist and crisp. If you’re watching calories, you can reduce the oil to 1 tablespoon or use a light spray. Remember, the oil also helps prevent sticking.
Everything’s prepped? Good. Let’s get into the real action…
The Method — Step by Step
- Step 1: Preheat your waffle iron to medium-high. While it’s heating, whisk the dry ingredients—oat flour, whey protein powder, baking powder, baking soda, and salt—in a large bowl. This ensures even distribution and eliminates lumps. I’ve found that sifting the flour and protein together gives the smoothest batter. Let the dry mix sit while you move to the next step.
- Step 2: In a separate bowl, combine the wet ingredients: eggs, almond milk, honey, vanilla extract, mashed banana, Greek yogurt, and melted coconut oil. Beat until the mixture is smooth and slightly frothy. The froth will help the batter rise. If you’re using a blender, pulse just enough to combine—over‑blending can make the batter tough.
- Step 3: Slowly pour the wet mixture into the dry mix, stirring gently with a rubber spatula. Stir just until the batter is combined—no need to overmix. Overmixing can activate gluten in the oat flour, making the waffles chewy. The batter should be thick but pourable; add a splash of milk if it’s too thick.
- Step 4: Let the batter rest for 5 minutes. This allows the oats to absorb liquid and the leavening agents to activate. While the batter rests, preheat a non‑stick skillet on medium for a quick stovetop version. Resting is key for a fluffy interior.
- Step 5: Once the waffle iron is hot, lightly brush it with oil or spray. Pour enough batter to cover the surface, but don’t overfill—this prevents overflow. Close the lid and cook for 4–5 minutes, or until the waffle is golden brown and the edges look crisp. The aroma should be inviting, like a warm bakery.
- Step 6: Once cooked, remove the waffle carefully and place it on a wire rack for 1 minute to let the steam escape. This keeps the bottom from becoming soggy. If you’re cooking multiple waffles, keep them warm in a low oven (200°F) while you finish the batch.
- Step 7: Repeat the process for the remaining batter. If the batter thickens while you’re cooking, add a tablespoon of almond milk to thin it out. Consistency is key for even cooking.
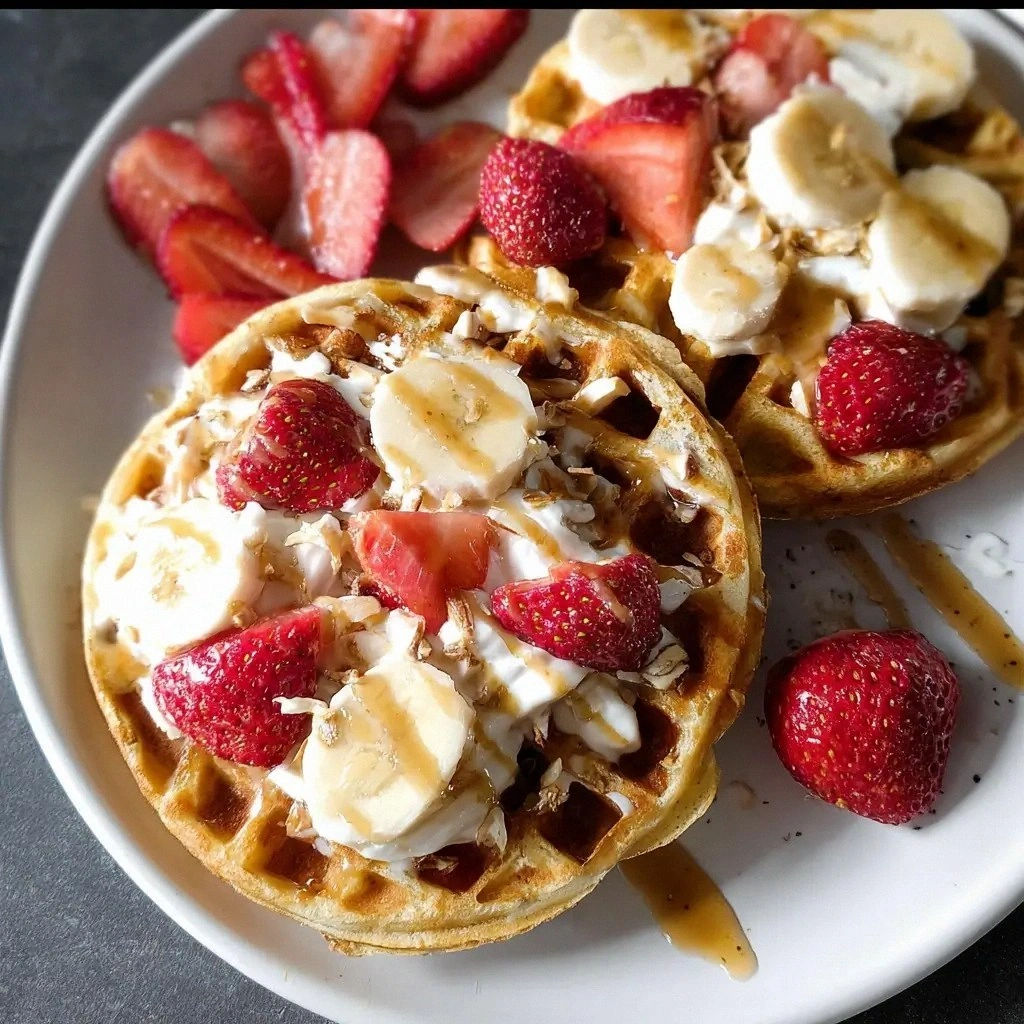
- Step 8: Serve immediately with your favorite toppings—fresh berries, a dollop of Greek yogurt, a drizzle of honey, or a sprinkle of nuts. The protein waffle is versatile, pairing well with sweet and savory options. If you’re craving a breakfast, top with sliced banana and a spoonful of peanut butter.
- Step 9: If you’re not serving right away, store the waffles in an airtight container in the fridge for up to 3 days. Reheat in a toaster or oven at 350°F for 5 minutes to regain crispness. The texture should feel just like fresh.
- Step 10: Enjoy! The first bite will hit you with a sweet, protein‑rich explosion. The texture is airy, the edges crisp, and the flavor balanced. I dare you to taste this and not go back for seconds.
That's it — you did it. But hold on, I've got a few more tricks that'll take this to another level…
Insider Tricks for Flawless Results
The Temperature Rule Nobody Follows
Many people set their waffle iron to low, hoping for a gentle cook, but this actually leads to soggy waffles. I’ve found that medium‑high (around 375°F) is the sweet spot. The batter cooks quickly, sealing the edges before the center dries. If you’re using a skillet, preheat to 350°F and use a non‑stick spray to prevent sticking.
Why Your Nose Knows Best
A good rule of thumb is to pause when the batter starts to form a light film on the surface of the iron. This indicates that the batter is thickening and ready to lock in. If you’re unsure, a quick test is to place a small drop of water on the iron; if it sizzles and evaporates instantly, it’s ready. Trust your nose, not the timer.
The 5-Minute Rest That Changes Everything
After you pour the batter, let it rest for 5 minutes before cooking. This allows the oats to absorb the liquid and the leavening agents to activate fully. If you skip this step, the waffles will be dense and chewy. I’ve seen this trick turn a mediocre batch into a crowd‑pleaser.
Keep It Moist with a Splash of Water
If your waffles are turning out dry, add a tablespoon of water to the batter before cooking. The extra liquid helps keep the interior moist without altering the protein content significantly. This is especially useful when cooking on a stovetop where heat is uneven.
Don’t Overmix or You’ll Lose the Rise
Mixing the batter until it’s just combined is crucial. Overmixing activates gluten in the oat flour, which can make the waffles tough. I use a rubber spatula and fold the batter gently, which keeps it airy. This is a small step that makes a big difference.
Creative Twists and Variations
This recipe is a playground. Here are some of my favorite ways to switch things up:
Chocolate Powerhouse
Swap the vanilla whey protein for chocolate whey and add a tablespoon of cocoa powder. The result is a decadent, chocolatey waffle that still packs a protein punch. Top with dark chocolate chips for extra texture.
Berry Burst
Fold in a cup of fresh blueberries or strawberries into the batter before cooking. The fruit bursts in the center, adding a juicy surprise. Serve with a drizzle of lemon‑infused honey for a tangy finish.
Nutty Crunch
Add a handful of chopped walnuts or almonds to the batter for a nutty crunch. The nuts also add healthy fats and a satisfying texture. Pair with a dollop of almond butter for an extra nutty flavor.
Spiced Morning
Add half a teaspoon of cinnamon and a pinch of nutmeg to the dry mix. This gives the waffles a warm, comforting aroma. Great for a cozy breakfast on a chilly morning.
Savory Twist
Omit the honey and vanilla, and add a pinch of smoked paprika and a tablespoon of grated parmesan. These savory waffles pair wonderfully with a poached egg or a side of sautéed spinach.
Vegan Version
Use plant‑based protein powder, almond milk, coconut yogurt, and flaxseed eggs (1 tbsp ground flaxseed + 3 tbsp water). The texture remains fluffy, and the flavor is just as satisfying. Perfect for a plant‑based protein breakfast.
Storing and Bringing It Back to Life
Fridge Storage
Place the cooked waffles in a single layer on a baking sheet, then cover with a clean towel. Once cooled, transfer to an airtight container. Store in the fridge for up to 3 days. The waffles will stay moist and fresh.
Freezer Friendly
Arrange the waffles on a parchment‑lined tray and freeze until solid, then transfer to a freezer bag. They can be stored for up to 3 months. To thaw, let them sit at room temperature for 10 minutes or microwave on defrost.
Best Reheating Method
Preheat your oven to 350°F. Place the waffles on a baking sheet and warm for 5–7 minutes, or until heated through. If you prefer a crispier exterior, toast them in a toaster for 1–2 minutes. Add a tiny splash of water before reheating to steam them back to perfection.