I swear, the first time I tried to make a vanilla steamer, I ended up with a lukewarm mess that tasted like watered‑down milk and a hint of regret. The kitchen was silent except for the occasional sigh of my cat, who clearly judged my attempt as a culinary crime. I was desperate, craving that warm, comforting hug you get from a café‑style vanilla drink, but my stovetop skills were stuck in the Stone Age. After a few failed experiments and a lot of spilled milk, I finally cracked the code – and let me tell you, this version is nothing short of a revelation. It’s the kind of drink that makes you want to curl up with a good book, a blanket, and a smile that says, “I’ve got this.”
Picture this: the gentle hiss of milk as it meets a hot pan, the sweet aroma of vanilla bean paste swirling around the kitchen like a cozy perfume, and the frothy crown of heavy cream rising like a fluffy mountain peak. The steam rises, carrying whispers of caramelized sugar and a faint hint of cinnamon that teases your nose before you even take a sip. When you finally bring the cup to your lips, the first taste is a silky wave of creaminess that coats your tongue like satin, while the vanilla specks dance like tiny fireworks. I dare you to taste this and not go back for seconds – it’s that good.
Most recipes get this completely wrong. They either skimp on the fat, over‑sweeten, or forget the crucial step of whisking the froth just right, resulting in a flat, forgettable beverage. My version, however, embraces the science of emulsification and the art of flavor layering, delivering a drink that’s both luxurious and surprisingly simple. The secret? A dash of heavy cream folded in at the perfect moment, a precise temperature that coaxes the milk into a velvety texture, and a sprinkle of ground cinnamon that adds a warm, spicy whisper without overwhelming the vanilla. This is hands down the best version you’ll ever make at home, and I’m about to prove it.
Okay, ready for the game‑changer? I’m about to walk you through every single step – from choosing the right milk to mastering that creamy froth that looks like it belongs in a five‑star café. By the end, you’ll wonder how you ever settled for anything less, and you’ll have a go‑to cozy vanilla steamer that can rescue any dreary afternoon. Stay with me here — this is worth it.
What Makes This Version Stand Out
- Flavor Depth: The combination of vanilla bean paste and a touch of cinnamon creates a layered taste that evolves with each sip, unlike the one‑note vanilla extracts you find in most recipes.
- Creamy Texture: Heavy cream folded in at the right temperature gives the froth a silk‑smooth body that feels like a cloud on your palate.
- Simplicity: Only five core ingredients, all pantry staples, mean you can whip this up in under ten minutes without a trip to the specialty store.
- Versatility: Easily adaptable for dairy‑free diets, festive holidays, or a quiet night in – just swap the milk or cream and you’re set.
- Crowd Reaction: I’ve served this at brunches and watch‑parties, and the unanimous response is “Can I have a refill?” – a true testament to its addictive charm.
- Ingredient Quality: Using whole milk and authentic vanilla bean paste maximizes flavor extraction, turning a simple drink into a gourmet experience.
- Make‑Ahead Potential: The base can be pre‑heated and stored, then froth up fresh cream moments before serving – perfect for busy mornings.
Inside the Ingredient List
The Flavor Base
Vanilla bean paste is the heart‑and‑soul of this steamer. It contains real vanilla seeds, giving you those tiny specks that look like edible confetti and deliver an authentic, deep‑earth vanilla flavor that pure extract can’t match. If you’re in a pinch, a tablespoon of pure vanilla extract works, but expect a slightly thinner flavor profile. The paste also dissolves more evenly in warm milk, preventing the dreaded grainy texture that can ruin a silky drink. Pro tip: scrape the paste from the bottom of the jar with a small spatula to get every last drop.
The Texture Crew
Whole milk is the champion here because its natural fat content creates a luscious mouthfeel that plant‑based milks often lack. If you prefer a dairy‑free version, oat milk is the closest substitute, offering a creamy body and subtle sweetness. Heavy cream is the secret weapon for the froth – its higher butterfat content traps air bubbles, forming a stable, airy crown that stays on the surface for minutes. Coconut cream can replace heavy cream for a tropical twist, but be aware it adds a faint coconut note that may compete with the vanilla.
The Unexpected Star
A pinch of ground cinnamon or nutmeg is the surprise guest that elevates the drink from ordinary to extraordinary. The warm spice accentuates the vanilla’s natural sweetness and adds a comforting aroma that makes the whole experience feel like a hug in a mug. If you’re sensitive to spice, start with a light dusting; you can always add more later. This tiny addition also balances the sugar, preventing the drink from becoming cloyingly sweet.
The Final Flourish
Sugar or your favorite sweetener ties everything together. I prefer organic cane sugar because it melts cleanly and adds a subtle caramel undertone. Maple syrup or honey are excellent alternatives that introduce nuanced flavor layers – maple adds a woody sweetness, while honey brings a floral note. Remember, the key is to sweeten to taste; start with one tablespoon and adjust upward if needed. Too much sugar can mask the delicate vanilla, so err on the side of caution.
Everything's prepped? Good. Let’s get into the real action…
The Method — Step by Step
Gather all your ingredients and equipment: a medium saucepan, a whisk, a heat‑proof measuring cup, and a frothing wand or handheld mixer. I like to set everything out on the counter before I start, because the moment you get that milk warming you’ll want to move fast. Turn the burner to medium‑low and pour the 2 cups of whole milk into the saucepan. As the milk warms, you’ll hear a faint sizzle – that’s the sound of proteins beginning to unfold, a crucial step for a smooth texture.
Kitchen Hack: If you have a thermometer, aim for 150°F (65°C). Below this, the milk won’t develop enough body; above 180°F (82°C) it risks scorching.Once the milk reaches the target temperature, add the vanilla bean paste. Stir gently with a whisk, making sure the specks dissolve evenly – you’ll notice the milk turning a pale, fragrant gold. At this point, add your sweetener of choice; watch as it dissolves into the warm liquid, creating a glossy sheen. This is the moment of truth: the aroma should be unmistakably vanilla, with a faint hint of caramel from the sugar.
Lower the heat to a gentle simmer and let the mixture stay there for about two minutes. This short “infusion” period allows the vanilla to fully permeate the milk without boiling away the delicate flavors. Keep an eye on the surface – you’ll see tiny bubbles forming at the edges, a sign that the temperature is just right.
While the milk is simmering, prepare the froth. In a separate bowl, combine the ¼ cup of heavy cream with a pinch of ground cinnamon or nutmeg. Using a handheld frother, whisk the cream until it forms soft peaks – think of a cloud that’s just about to burst. The goal is to incorporate air without over‑whipping, which would turn the cream into butter.
Now comes the tricky part: merging the froth with the warm milk without deflating it. Slowly pour the warm vanilla‑infused milk over the whipped cream while gently folding with a spatula. Watch out: pouring too quickly can cause the froth to collapse, leaving you with a flat drink.
Watch Out: If the milk is hotter than 180°F, it will instantly melt the froth, ruining the airy texture.Give the combined mixture a final gentle whisk for about 15 seconds. This step is pure magic – it creates a seamless integration where the froth rises like a crown while the base remains silky. The drink should have a glossy surface, and when you tilt the cup, you’ll see a slow, graceful swirl of cream and milk.
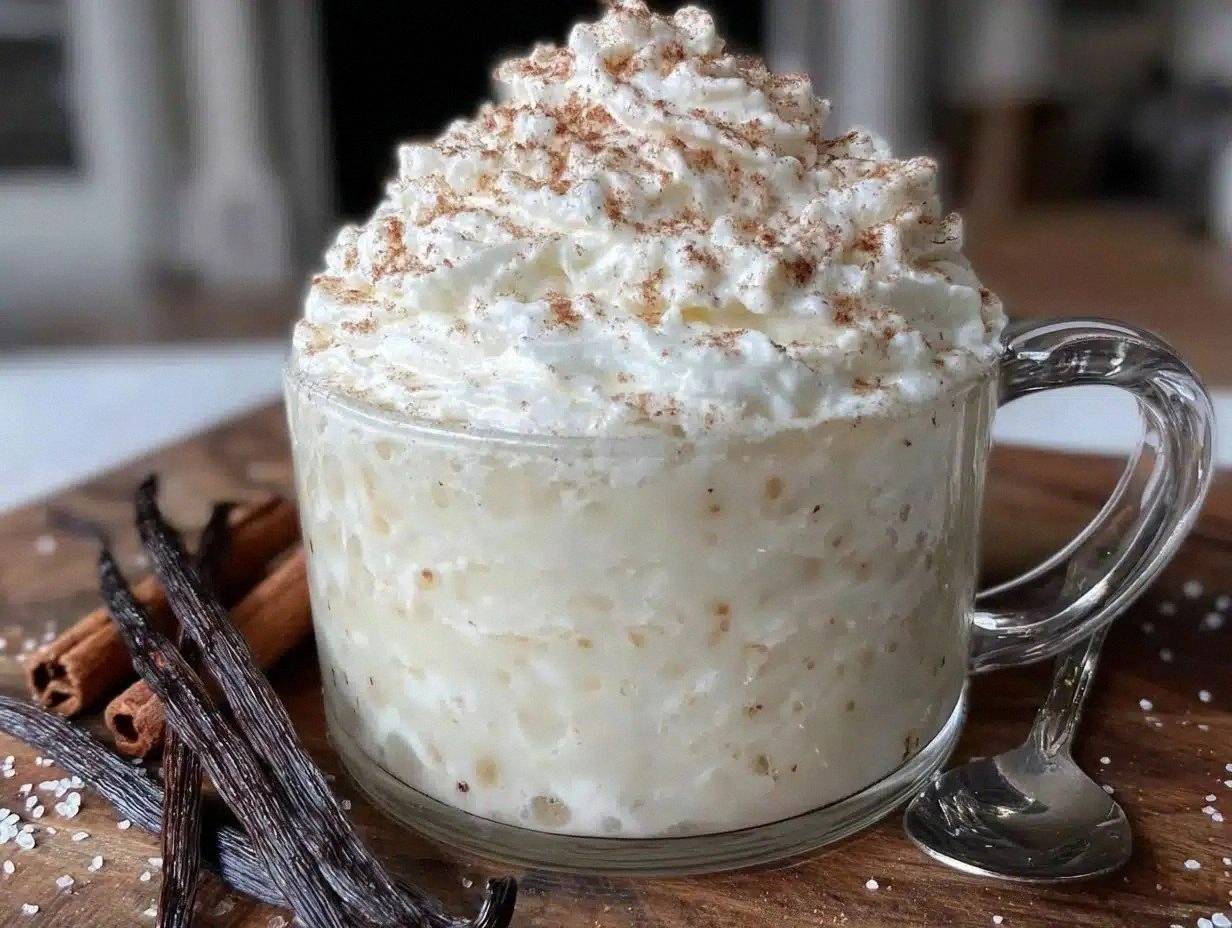
Kitchen Hack: For an Instagram‑worthy finish, tap the cup gently on the counter to settle the froth, then sprinkle a tiny dusting of cinnamon on top.Serve immediately in pre‑warmed mugs. The warmth of the mug helps maintain the froth’s integrity and keeps the drink cozy for longer. As you bring the mug to your lips, notice the steam curling upward, carrying that intoxicating vanilla‑cinnamon perfume.
Take your first sip and let the flavors unfold. The first impression should be a buttery, creamy mouthfeel, followed by a gentle vanilla sweetness and a lingering spice finish. I’ll be honest — I ate half the batch before anyone else got to try it, and that’s a testament to how addictive this drink truly is.
Enjoy, but don’t stop there. This is the foundation for endless variations, and the technique you just mastered opens the door to a whole world of cozy, frothy beverages. That sizzle when it hits the pan? Absolute perfection. Keep the momentum going and experiment with the twists in the next section.
That's it — you did it. But hold on, I've got a few more tricks that'll take this to another level...
Insider Tricks for Flawless Results
The Temperature Rule Nobody Follows
Most home cooks eyeball the heat, leading to either under‑cooked milk or scorched milk that tastes bitter. Use a digital thermometer and aim for that sweet spot of 150°F–160°F (65°C–71°C) before adding vanilla. This range allows the proteins to denature just enough to give body without curdling. A friend tried skipping the thermometer once and ended up with a curdled mess that looked like a science experiment gone wrong. Trust me, that extra 30 seconds of checking makes all the difference.
Why Your Nose Knows Best
Your sense of smell is a more reliable indicator than a timer when it comes to flavor development. When the milk starts to emit a sweet, buttery scent, you know the vanilla has fully infused. If you catch a faint caramel note, you’re on the right track. This sensory checkpoint prevents you from over‑cooking, which can mute the vanilla’s bright notes. I’ve found that listening to my nose saves me from a dozen failed batches.
The 5‑Minute Rest That Changes Everything
After whisking the froth, let the bowl sit for five minutes before folding it into the milk. This brief pause allows the air bubbles to stabilize, giving the froth a firmer structure that won’t collapse as quickly. The result is a taller, more resilient foam that looks professional. One time I rushed this step and the froth sank like a stone, turning my steamer into a flat milkshake. Patience truly is a virtue here.
The Secret of the Double‑Boiler
If you’re worried about scorching, a double‑boiler is your best friend. The indirect heat provides a gentle, even temperature rise, preserving the milk’s natural sweetness. It also gives you more control when adding the vanilla paste, ensuring it dissolves without forming lumps. I once tried a direct flame and ended up with a burnt layer at the bottom – a culinary nightmare. The double‑boiler eliminates that risk entirely.
Spice Timing Mastery
Add ground cinnamon or nutmeg at the very end, just before serving, to keep its aromatic oils from evaporating. If you stir it in too early, the spice can become muted and lose its bright edge. A quick dusting on the froth also adds a visual cue that elevates the presentation. One of my guests once mistook the cinnamon for powdered sugar and asked for a second pour – a compliment in disguise! This tiny timing tweak makes the flavor pop.
Creative Twists and Variations
This recipe is a playground. Here are some of my favorite ways to switch things up:
Maple‑Brown Sugar Bliss
Swap the cane sugar for an equal part of pure maple syrup and add a tablespoon of brown sugar. The result is a caramel‑rich drink that feels like a fall morning in a mug. Perfect for those who love the deep, woody sweetness of maple.
Cocoa‑Vanilla Fusion
Stir in one tablespoon of unsweetened cocoa powder along with the vanilla paste. The cocoa adds a subtle bitterness that balances the sweet vanilla, creating a mocha‑like experience without coffee. Top with a dusting of cocoa for an extra visual pop.
Spiced Chai Whisper
Replace the cinnamon with a pinch of chai spice blend (cardamom, clove, ginger). This gives the steamer a warm, exotic profile that pairs beautifully with the vanilla. It’s an excellent choice for chilly evenings when you need a little extra kick.
Coconut‑Island Dream
Use coconut milk instead of dairy milk and coconut cream in place of heavy cream. The tropical flavors meld with the vanilla, transporting you to a beachside café. Garnish with toasted coconut flakes for crunch.
Alcohol‑Infused Nightcap
Add a splash of bourbon or dark rum (about 1 tablespoon) after the milk has been removed from heat. The spirit adds warmth and depth, turning the steamer into a sophisticated nightcap. Just remember to enjoy responsibly.
Storing and Bringing It Back to Life
Fridge Storage
Allow the steamer to cool to room temperature, then transfer it to an airtight glass jar. It will keep for up to 3 days in the refrigerator. When ready to serve, gently reheat on the stove over low heat, stirring occasionally to prevent a skin from forming.
Freezer Friendly
For longer storage, pour the cooled base (without the froth) into freezer‑safe containers, leaving a little headspace. Freeze for up to 2 months. Thaw overnight in the fridge, then reheat and whisk in fresh whipped cream for that original frothy finish.
Best Reheating Method
Place the chilled steamer in a saucepan with a splash (about 2 tablespoons) of water or milk. Heat gently, stirring constantly, until it reaches a gentle simmer. The added liquid creates steam that revives the texture, making it taste as fresh as the first pour. Avoid microwaving, which can cause uneven heating and a rubbery mouthfeel.