I still remember the night my kitchen turned into a battleground and the only thing that kept me from spiraling into culinary despair was a single, stubborn craving: cheesy, savory, bite‑sized comfort that could be plated in minutes. I was halfway through a pizza dinner when the dough slipped from my fingers and landed on the counter like a soggy pancake, and I stared at the mess, thinking, “Why does everything have to be so complicated?” The frustration was palpable, the smell of melted cheese still clinging to the air, the sound of my own sighs echoing against the tiles. I was determined to turn that disaster into a triumph, and I dared myself to create something that would make the whole house smell like a cozy bakery on a rainy day.
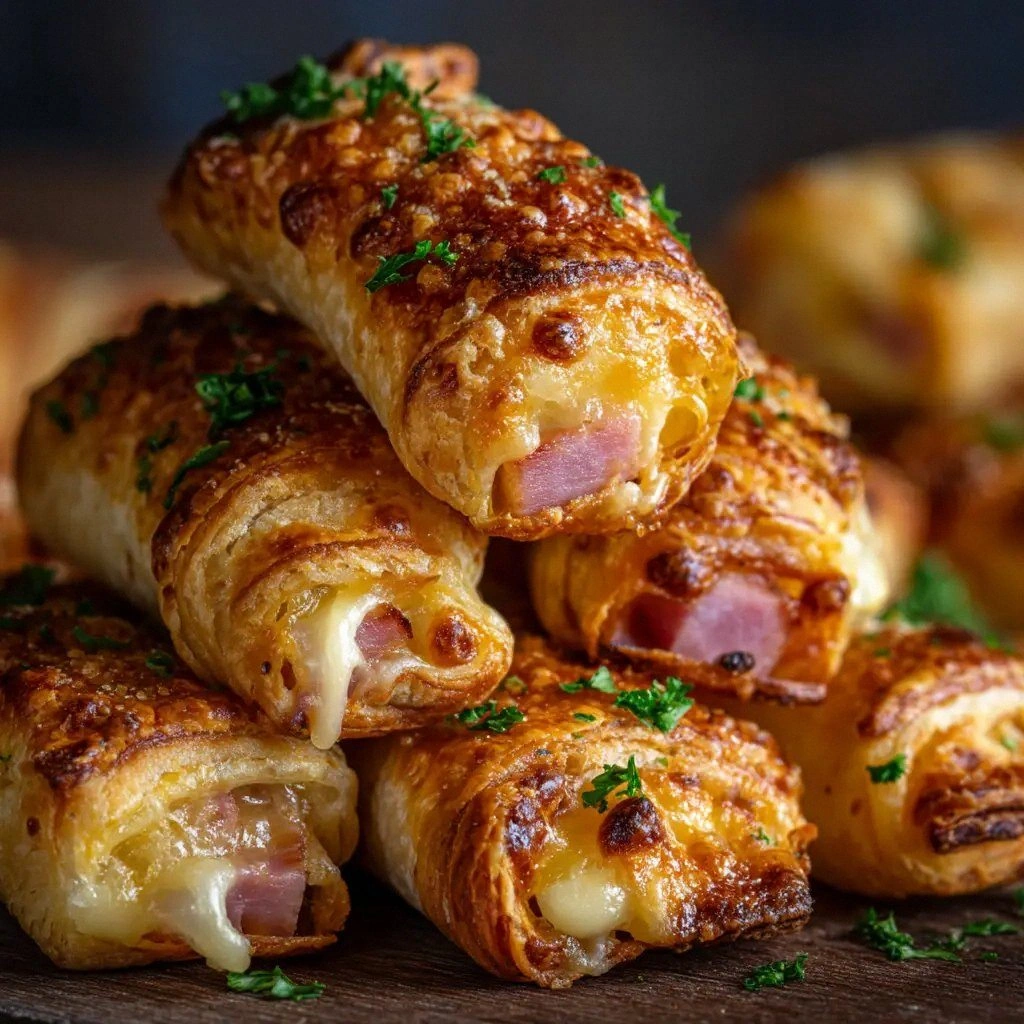
Picture this: the dough, now a smooth, pliable slab, glistening with a light sheen of melted butter as it slides across the counter. The ham slices, still fragrant from the deli, sit proudly beside the sheets of provolone and cheddar, their colors contrasting like a painter’s palette. The air is thick with the buttery aroma of garlic and parsley, a subtle hint that this isn’t just another snack but a symphony of flavors. The sound of the oven’s preheat cycle, the hiss of steam as the sticks bake, and the gentle crackle of the crust all combine into a sensory overture that promises something extraordinary. The anticipation is almost as delicious as the final product.
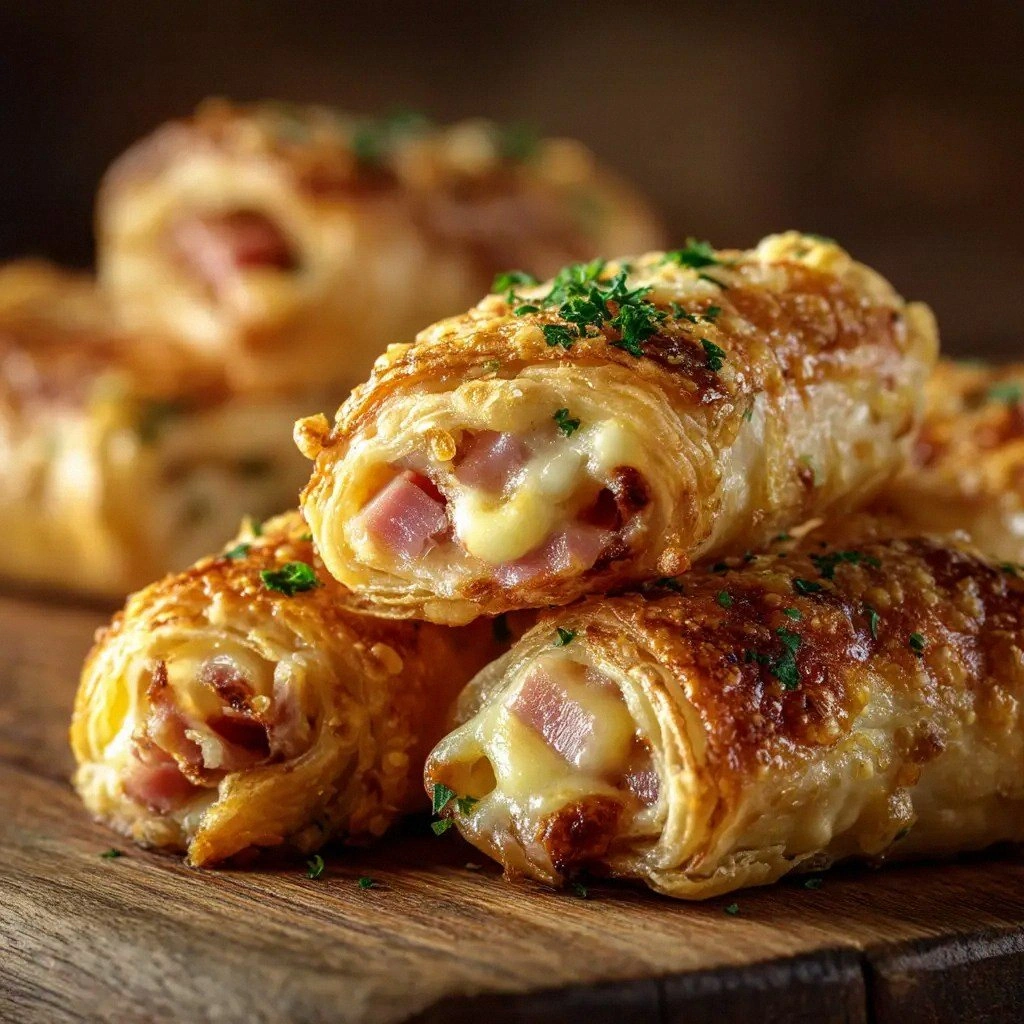
What makes this version stand out is not just the combination of ingredients but the way each element is treated. The dough is pre‑topped with a buttery garlic‑parsley spread that melts into a glossy, savory crust. The cheeses are layered in a deliberate order—cheddar for sharpness, provolone for meltiness—creating a melty, gooey center that oozes with every bite. The ham is thinly sliced, preserving its delicate flavor without overpowering the cheese. The egg creates a golden, slightly crunchy top that contrasts perfectly with the soft interior. And the final touch of a light dusting of dried parsley adds a burst of freshness that lifts the entire dish.
I dare you to taste this and not go back for seconds. I’ll be honest—I ate half the batch before anyone else got to try it. Most recipes get this completely wrong. Here’s what actually works: the dough needs to be rolled thin enough to allow the cheese to melt through, and the baking time must be carefully monitored to keep the sticks crisp on the outside while molten on the inside. Picture yourself pulling this out of the oven, the whole kitchen smelling incredible, the sticks shimmering with a golden crust. Let me walk you through every single step—by the end, you’ll wonder how you ever made it any other way.
What Makes This Version Stand Out
- Flavor: The garlic‑parsley butter creates a savory base that elevates the dough, turning a plain pizza base into a fragrant canvas.
- Melt: Cheddar’s sharpness balances the mild provolone, giving a layered melt that’s both creamy and robust.
Using high‑quality cheese and fresh ham ensures a depth of flavor that store‑bought versions can’t match.
Inside the Ingredient List
The Flavor Base
The pizza dough is the silent hero of this dish. It provides the structure that holds the cheese and ham together while also absorbing the buttery garlic‑parsley spread. A slightly under‑baked dough keeps the interior tender, while the outside crisps to a golden finish. If you skip the garlic powder, the sticks will lack that subtle depth that makes each bite memorable. A pinch of dried parsley not only adds color but also a hint of herbal brightness that cuts through the richness of the cheese. Swapping the butter for olive oil changes the flavor profile to a lighter, slightly peppery note; however, butter gives the classic melt and sheen.
The Texture Crew
Cheddar and provolone are the dynamic duo that delivers the gooey, melty center. Cheddar’s sharpness introduces a tang that balances the mildness of provolone, creating a layered flavor experience. The ham’s thin slices keep the sticks airy, preventing a dense, meat‑heavy feel that can overwhelm the cheese. Butter, when melted and brushed over the dough, adds a glossy sheen and a crispness that contrasts the soft interior. If you omit the butter, the sticks will still bake, but they’ll be less golden and slightly drier on the edges. The combination of these textures ensures that every bite has a satisfying crunch followed by a luscious melt.
The Unexpected Star
The large egg is a secret weapon that locks everything together and adds a subtle richness. When whisked and brushed over the assembled sticks, the egg creates a golden crust that’s both visually appealing and flavorful. The egg’s protein structure also helps the cheese set, preventing it from sliding off. Skipping the egg will result in sticks that are less cohesive and may lose their shape during baking. If you’re allergic or simply prefer to avoid eggs, you can use a small amount of water or milk as a light binder, but the texture will differ slightly.
The Final Flourish
The garlic powder and dried parsley are the finishing touches that elevate the dish from ordinary to unforgettable. Garlic powder infuses the dough with a warm, aromatic base that permeates every bite. Dried parsley adds a pop of color and a fresh, herbal note that cuts through the richness of the cheese and ham. Together, they create a harmonious balance of savory, sweet, and herbal flavors. If you prefer a stronger garlic flavor, increase the amount to 1 tsp; if you’re sensitive to herbs, reduce parsley to a quarter teaspoon. The final flourish ensures that each stick is not just a snack but a small, flavorful masterpiece.
Everything’s prepped? Good. Let’s get into the real action.
The Method — Step by Step
- Preheat your oven to 425°F (220°C). A high temperature ensures a crisp exterior while the interior remains molten. Let the oven reach the target temperature before placing the sticks inside. This step is crucial; a cold oven will lead to uneven cooking. The oven’s preheat light should glow steadily, signaling readiness.
- Prepare the dough. Unroll the pizza dough onto a lightly floured surface. Roll it out to a thickness of about 1/8 inch; too thick and the cheese won’t melt through; too thin and the dough will tear. Pat the dough gently to remove any excess flour. This creates a uniform base for the sticks.
- Spread the butter‑garlic‑parsley mixture. In a small bowl, mix melted butter with garlic powder and dried parsley. Brush a thin layer over the entire dough surface. The butter will caramelize during baking, giving a golden crust. The garlic adds depth, while the parsley provides a bright, herbal finish. This step is where the magic begins.
- Layer the cheeses. Place a sheet of cheddar on top of the dough, followed by a sheet of provolone. The order matters: cheddar’s sharpness needs a layer of provolone to soften, preventing a harsh bite. Arrange the cheeses so they overlap slightly, ensuring every bite contains both flavors. This layering technique creates a melt that’s both creamy and complex.
- Add the ham. Distribute the thin ham slices evenly over the cheeses. The ham should cover the entire surface but not pile up. This ensures each stick receives a balanced amount of meat. The ham’s moisture will help the cheese melt smoothly. Watch out: too much ham can make the sticks soggy.
- Wrap the dough. Carefully roll the dough into a tight cylinder, ensuring the filling stays inside. Use a piece of parchment paper to keep the roll from sticking to the surface. This step requires a gentle touch; too tight and the dough will tear, too loose and the filling may spill.
- Cut the sticks. Slice the rolled dough into 1-inch thick sticks. Aim for uniformity so each piece cooks evenly. A serrated knife works best for clean cuts. Place the sticks on a parchment‑lined baking sheet, spacing them slightly apart.
- Brush with egg. Beat the egg and lightly brush it over the tops of the sticks. The egg will brown, creating a glossy, golden crust. It also helps bind the cheese to the dough. This step adds a subtle richness and an attractive sheen. Remember to keep the brush strokes thin.
- Bake the sticks. Slide the sheet into the preheated oven. Bake for 18–20 minutes, or until the edges are golden brown and the cheese has melted into a bubbly, golden center. The sticks should emit a savory aroma that fills the kitchen. Keep an eye on the top; if it browns too quickly, tent with foil.
- Cool and serve. Remove the sticks from the oven and let them cool for 5 minutes. This short rest allows the cheese to set slightly, preventing it from oozing onto your fingers. Serve hot with a side of marinara or your favorite dipping sauce. The first bite will reveal a crispy edge and a molten, cheesy center that melts in your mouth.
That’s it— you did it. But hold on, I’ve got a few more tricks that will take this to another level.
Insider Tricks for Flawless Results
The Temperature Rule Nobody Follows
Many home cooks bake at 400°F, but the optimal temperature for these sticks is 425°F. The higher heat creates a crisp crust while keeping the interior molten. If you bake at a lower temperature, the edges may stay pale and the cheese might not melt fully. Use a reliable oven thermometer to verify the actual temperature inside the cavity, as many ovens run 10–15°F lower than indicated. This trick ensures that every stick is golden on the outside and creamy on the inside.
Why Your Nose Knows Best
Your sense of smell is a reliable indicator of doneness. When the sticks start to emit a strong, buttery aroma, the crust is forming. The scent of melting cheese signals that the center is ready. If the smell is faint, give them a couple more minutes. Relying on aroma saves you from over‑baking and keeps the sticks from becoming dry.
The 5‑Minute Rest That Changes Everything
After removing the sticks from the oven, let them rest for exactly five minutes. This brief pause allows the cheese to set, preventing it from oozing onto your fingers or the plate. The heat continues to cook the interior slightly during this rest. If you cut into them too early, the cheese will spill out, ruining the presentation. A short rest also helps the dough firm up, giving each bite a satisfying bite.
Use a Baking Sheet with a Riser
A baking sheet with a slight rim prevents the sticks from sliding off during baking. It also ensures even heat distribution across the surface. If you don’t have a rimmed sheet, line the pan with parchment paper and use a small piece of foil as a makeshift barrier. This simple trick keeps your sticks from moving, which can cause uneven cooking.
Keep the Egg Lightly Whisked
A lightly beaten egg creates a thin, even glaze that browns beautifully. Over‑whisking creates a thick mixture that can puff up and make the sticks uneven. Aim for a runny consistency, similar to a thin pancake batter. This ensures the glaze stays smooth and glossy, enhancing both appearance and flavor. The egg also acts as a natural binder, keeping the cheese and ham in place.
Creative Twists and Variations
Spicy Jalapeño Jalopy
Add thin slices of jalapeño to the ham layer for a fiery kick that pairs perfectly with the creamy cheeses. The heat will cut through the richness, creating a balanced bite. Serve with a cool yogurt dip to tame the heat. This variation is ideal for a summer barbecue or a spicy game‑night snack. The jalapeños also add a pop of color that makes the sticks visually appealing.
Herb‑Infused Mediterranean
Swap the provolone for feta and sprinkle dried oregano over the dough before rolling. The tangy feta contrasts with the sharp cheddar, while the oregano adds a fragrant, herbaceous note. A drizzle of olive oil before baking gives a glossy finish. This Mediterranean twist works well with a side of tzatziki or hummus. It’s a great way to bring a different flavor profile to a classic favorite.
Sweet & Savory Maple Bacon
Replace the ham with crispy maple‑bacon strips for a sweet‑savory explosion. The maple glaze caramelizes on the outside, adding a subtle sweetness that balances the sharpness of the cheddar. The bacon’s smoky flavor enhances the overall depth. Pair these sticks with a light salad for a complete meal. This version is a crowd‑pleaser at holiday gatherings.
Vegan Cheese & Tempeh
Use a plant‑based cheddar and provolone alternative, and replace the ham with marinated tempeh slices. The tempeh’s nutty flavor and firm texture complement the cheeses beautifully. Brush the sticks with a vegan egg substitute before baking to achieve a golden crust. This variation is perfect for vegan guests or those looking to reduce dairy. The result is a delicious, plant‑based version that still delivers on flavor.
Crispy Parmesan Crunch
After baking, sprinkle freshly grated Parmesan over the hot sticks. The Parmesan will melt slightly, creating a crunchy, cheesy crust. The nutty flavor adds a new dimension to the dish. Serve with a side of marinara for dipping. This extra step turns the sticks into a crispy, savory snack that’s hard to resist.
Truffle‑Infused Gourmet
Brush the dough with truffle oil before adding the fillings. The earthy aroma of truffle oil elevates the dish to gourmet status. Pair with a light salad or a glass of crisp white wine. The truffle adds a luxurious touch that transforms a simple snack into an elegant appetizer. This version is ideal for special occasions or dinner parties.
Storing and Bringing It Back to Life
Fridge Storage
Store leftover sticks in an airtight container in the refrigerator for up to 3 days. The cheese may firm up, but the sticks will retain their shape. When ready to serve, reheat in a preheated oven at 350°F for 8–10 minutes until warmed through. This method preserves the crispness of the crust while melting the cheese again. Keep the container sealed to avoid drying out the sticks.
Freezer Friendly
To freeze, place the sticks on a parchment‑lined tray and freeze until solid, then transfer to a freezer bag. They can be stored for up to 2 months without losing quality. When you’re ready to enjoy, bake from frozen at 425°F for 12–15 minutes. The dough will rise slightly, and the cheese will melt beautifully. Freezing is a great way to have a quick, tasty snack ready to go.
Best Reheating Method
The best way to reheat sticks is in an oven or toaster oven, not a microwave, to maintain crispness. If you must use a microwave, wrap each stick in a damp paper towel to keep them from drying out. Add a splash of water to the baking dish before reheating; this steams the sticks back to perfection. Reheat at 350°F for 5 minutes, then let them cool briefly before serving. The result is a warm, melty center with a crispy exterior.