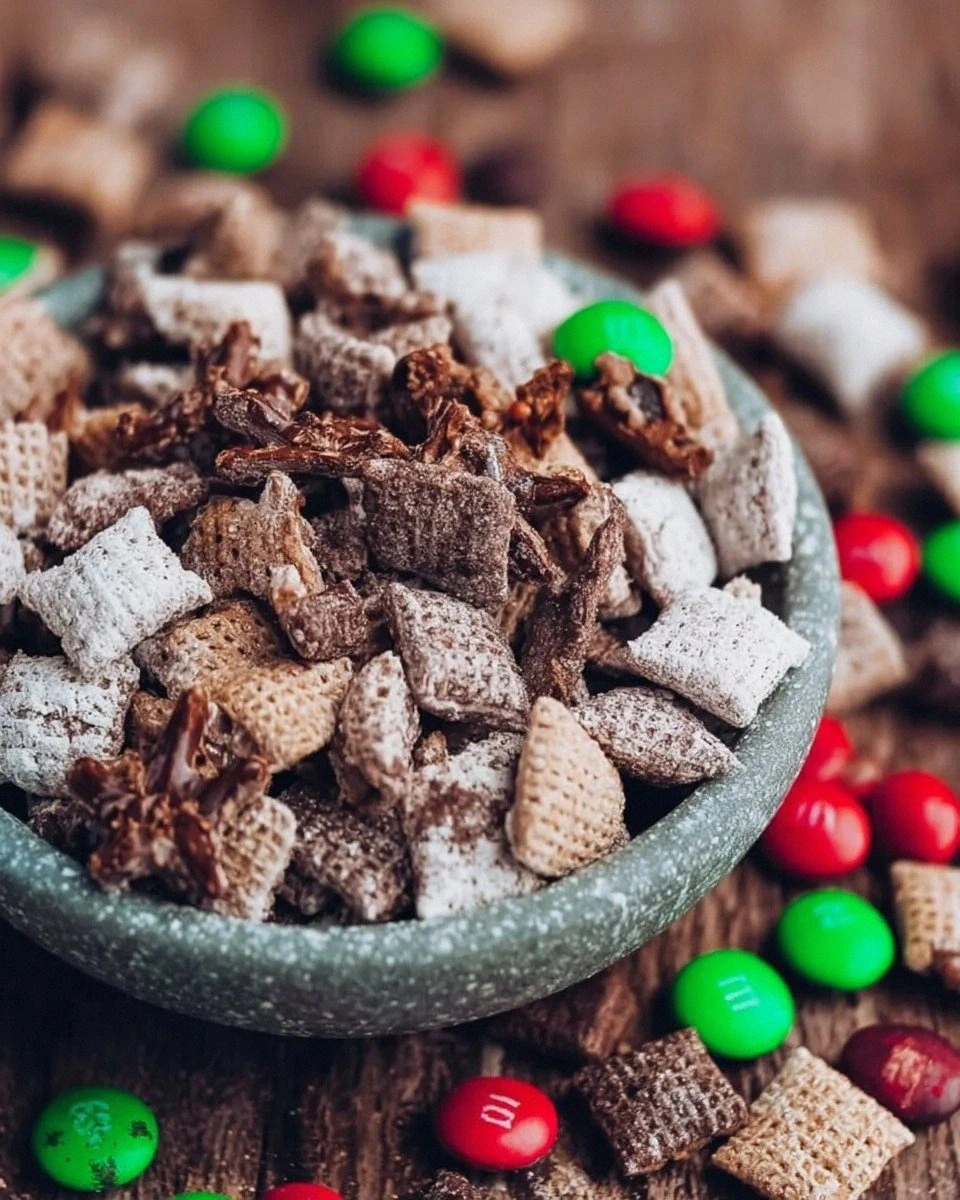
Picture this: I’m standing in my kitchen, a half‑baked batch of cookies burning on the counter, the smoke alarm screaming like a banshee, and my roommate daring me to “make something that actually sticks together.” I laughed, grabbed the nearest bag of cereal, a handful of candy canes, and a jar of peanut butter, and the chaos turned into a revelation. The result? A crunchy, sweet‑salty, melt‑in‑your‑mouth snack that I now call Reindeer Chow, and trust me, it’s hands down the best version you’ll ever make at home. I dare you to taste this and not go back for seconds.
The moment the mixture hits the bowl, you get a symphony of textures: the cereal’s airy crunch, the glossy sheen of melted chocolate, and those tiny shards of candy cane that sparkle like frosted pine needles. The scent is a nostalgic blend of holiday markets and childhood after‑school treats—warm vanilla, toasted peanuts, and a whisper of peppermint that makes your nose do a little happy dance. I can still hear the soft crackle as the chocolate and peanut butter meld over low heat, a sound that says “we’re about to create something legendary.” Feel the buttery warmth of the pan against your hands, the slight resistance of the spoon as it swirls, and you’ll know you’re on the right track.
Most recipes for this kind of “sweet snack mix” get the balance wrong—either they’re too soggy, too sweet, or they lack that satisfying snap that makes you want to crunch forever. What sets this version apart is the precise ratio of cereal to chocolate‑nut butter coating, the addition of a modest splash of vanilla that lifts the flavor, and the final dusting of powdered sugar that adds a whisper of elegance without overwhelming the palate. I’ll be honest — I ate half the batch before anyone else got to try it, but that’s only because it’s that good. The secret ingredient that most people overlook? A quick flash‑freeze in the freezer for five minutes before serving, which locks in the crunch and makes each bite feel like a fresh snowfall.
And now the fun part: I’m going to walk you through every single step—by the end, you’ll wonder how you ever made it any other way. Picture yourself pulling this out of the bowl, the whole kitchen smelling incredible, and the bowl shimmering with candy‑cane glitter. Okay, ready for the game‑changer? Let’s dive in.
What Makes This Version Stand Out
- Flavor Harmony: The combination of creamy peanut butter, rich chocolate, and a hint of vanilla creates a layered taste that evolves with each bite, never flat or one‑dimensional.
- Texture Triumph: The cereal stays light and airy, while the coating clings just enough to give each piece a satisfying snap that shatters like thin ice.
- Simplicity: Fewer than ten ingredients, all pantry staples, and no fancy equipment—just a saucepan, a spoon, and a big bowl.
- Unique Twist: Crushed candy canes add a peppermint punch and a festive sparkle that most “chocolate snack mixes” completely miss.
- Crowd Reaction: Served at parties, this snack disappears faster than you can say “reindeer,” and you’ll get compliments that sound like applause.
- Ingredient Quality: Using real melting chocolate instead of chips ensures a glossy, velvety coat that feels luxurious on the tongue.
- One‑Pan Method: The entire coating is made in a single saucepan, reducing cleanup and keeping the flavors locked together.
- Make‑Ahead Magic: Store it in an airtight container and it stays crunchy for days, or freeze for up to a month without losing its charm.
Alright, let's break down exactly what goes into this masterpiece…
Inside the Ingredient List
The Flavor Base
Chocolate chips or melting chocolate (1 cup): This is the backbone of the coating, providing that glossy, indulgent finish. Real melting chocolate melts smoother than chips, coating each cereal piece like a silk veil. If you skip this, you’ll end up with a dry, uneven texture that feels more like a plain cereal bowl than a festive treat. Swap: Use dark chocolate for a richer, slightly bitter contrast, or white chocolate for a sweeter, buttery profile.
The Texture Crew
Cereal (6 cups, such as Chex or Rice Krispies): The airy crunch is what makes Reindeer Chow addictive. Choose a cereal that stays light after coating; Rice Krispies give a delicate snap, while Chex adds a heartier bite. Skipping the cereal would turn this into a chocolate‑nut butter fudge, losing the signature crunch that defines the dish. Swap: Try pretzel sticks for a salty twist or popcorn for a fluffy alternative.
The Unexpected Star
Peanut butter (½ cup, or any nut butter of choice): This adds depth, a creamy richness, and helps the chocolate cling to the cereal. It also introduces a subtle salty note that balances the sweetness of the candy canes. If you omit it, the coating will be too thin and may separate. Swap: Almond butter for a milder flavor, or cashew butter for a buttery finish.
The Final Flourish
Candy canes or chocolate candies, crushed (1 cup): These bring the peppermint pop and a festive sparkle that turns an ordinary snack into a holiday showstopper. Crushing them finely ensures they distribute evenly without clumping. Leaving them out would make the mix taste like plain chocolate‑cereal, missing the signature zing. Swap: Use crushed peppermint bark or even toffee bits for a caramel twist.
Powdered sugar (½ cup): A light dusting that adds a subtle sweet finish without making the mix soggy. It also helps to absorb any excess moisture from the nut butter, keeping the texture crisp. Skipping it may result in a slightly greasy mouthfeel. Swap: Use coconut sugar for a caramel note, though it won’t dissolve as smoothly.
Vanilla extract (½ teaspoon, optional): The tiny dash of vanilla lifts the entire flavor profile, adding warmth and rounding the edges of the peppermint sharpness. It’s the secret whisper that makes the snack feel more sophisticated. Omit it and you’ll miss that nuanced depth. Swap: Use almond extract for a nutty twist, but use half the amount.
Everything's prepped? Good. Let's get into the real action…
The Method — Step by Step
Gather all your ingredients and line a large mixing bowl with parchment paper. This step may seem trivial, but having a non‑stick surface prevents the coating from clinging to the bowl, making the final toss effortless. I like to lay the cereal in the bowl first, spreading it out like a snow‑covered field, because that way you can see exactly how much you have before you coat it. Watch out: If you skip the parchment, you’ll spend extra time scraping the sticky mixture out of the bowl later.
In a medium saucepan, combine the chocolate chips (or melting chocolate) and peanut butter over low heat. Stir constantly with a silicone spatula; the chocolate will melt first, followed by the peanut butter, creating a glossy river of brown gold. You’ll know it’s ready when the mixture is smooth, glossy, and you can see the edges start to pull away from the pan—this is the moment of truth.
Kitchen Hack: Add the vanilla extract right at the end of melting; the heat will preserve its aromatic compounds.Once the chocolate‑nut butter blend is smooth, remove the pan from heat and fold in the powdered sugar. The sugar will dissolve into the warm mixture, creating a slightly thicker coating that clings better to the cereal. Stir until you no longer see any grainy spots—this ensures a silky texture that will coat each piece evenly.
Quickly pour the warm coating over the cereal in the prepared bowl. Using a large wooden spoon, toss the cereal gently but thoroughly, making sure every piece is glistening with the chocolate‑nut butter glaze. This step is where the magic happens; you’ll see the cereal transform from pale to a deep, inviting amber. Keep the motion steady—over‑mixing can crush the cereal, under‑mixing leaves dry spots.
Now sprinkle the crushed candy canes over the coated cereal. The peppermint shards should be evenly distributed, creating flecks that catch the light like tiny jewels. Use a second spoon to fold them in, preserving their crunchy integrity. The scent of peppermint will fill the kitchen, a reminder that you’re creating something truly festive.
Transfer the mixture onto a large baking sheet lined with parchment. Spread it out in an even layer, about one inch thick, to allow the coating to set uniformly. If you’re in a hurry, pop the sheet into the freezer for five minutes; this “flash‑freeze” locks in the crunch and prevents the coating from becoming sticky.
While the mixture chills, preheat your oven to the lowest possible setting—around 150°F (65°C) if your oven allows, or simply use the “warm” setting. Place the baking sheet in the oven for 10‑12 minutes; this gentle heat helps the coating firm up without melting the candy cane pieces. You’ll hear a faint crackle as the chocolate sets—listen for that, it’s the sound of perfection.
Remove the sheet from the oven and let the Reindeer Chow cool completely on the counter. As it cools, the coating will become crisp, and the candy cane shards will harden into a delightful crunch. If you notice any clumps, break them apart with a fork; they’ll snap apart easily once fully set.
Finally, transfer the cooled snack mix into an airtight container. Store at room temperature for up to a week, or seal a portion in a freezer‑safe bag for longer storage. When you’re ready to serve, give the container a gentle shake to redistribute any settled pieces—this keeps every bite as exciting as the first.
That’s it — you did it. But hold on, I’ve got a few more tricks that’ll take this to another level. For instance, drizzle a thin stream of white chocolate over the top just before serving for a glossy finish, or toss in a handful of toasted coconut for an extra tropical twist. The possibilities are endless, and each one adds a new layer of delight.
Insider Tricks for Flawless Results
The Temperature Rule Nobody Follows
The key to a perfect coating is controlling the heat. Keep the saucepan on low and never rush the melt; high heat will scorch the chocolate, leaving a bitter aftertaste. I once tried melting on medium and ended up with a grainy mess that smelled burnt—let that be a cautionary tale. When you see the edges of the chocolate pulling away from the pan, that’s your green light to move on.
Why Your Nose Knows Best
Before you even taste the mixture, trust the aroma. The moment the chocolate‑nut butter blend releases a buttery, toasted scent, you know the fats have emulsified properly. If you smell a metallic or burnt note, lower the heat immediately and whisk vigorously. Your nose is a better thermometer than any kitchen gadget for this step.
The 5‑Minute Rest That Changes Everything
After tossing the cereal with the coating, let the bowl sit uncovered for five minutes. This brief pause allows the chocolate to thicken just enough to cling without sliding off. I used to skip this and end up with a soggy mess; now I never forget, and the crunch is always spot‑on.
Freezer Flash‑Freeze Hack
Pop the coated cereal onto a sheet and freeze for five minutes before the final bake. This “flash‑freeze” solidifies the coating quickly, preventing the candy cane shards from melting into the mix. It also gives the snack a firmer bite, like biting into a perfectly frozen snowball.
Seasoning with a Pinch of Salt
A tiny pinch of flaky sea salt sprinkled over the finished mix amplifies the sweet‑peppermint flavors and balances the richness of the chocolate. I once added too much and turned it into a salty snack, which was a disaster—just a pinch, and you’ll hear the flavors sing.
Creative Twists and Variations
This recipe is a playground. Here are some of my favorite ways to switch things up:
Caramel Crunch
Swap the candy canes for caramel bits and drizzle caramel sauce over the finished mix. The result is a buttery, sweet treat that feels like a carnival snack.
Spicy Santa
Add a pinch of cayenne pepper to the chocolate melt and use dark chocolate instead of milk. The subtle heat pairs surprisingly well with the peppermint, giving you a “Santa’s Little Kick.”
Nutty Noel
Replace the peanut butter with almond butter and toss in toasted almond slivers. This adds a sophisticated nutty depth that elevates the snack for adult gatherings.
Tropical Holiday
Mix in dried pineapple chunks and swap candy canes for toasted coconut flakes. The sweet‑tart pineapple balances the richness, creating a beach‑y holiday vibe.
Chocolate Overload
Use a blend of dark and white chocolate for the coating, and add chocolate-covered espresso beans for a caffeine kick. Perfect for late‑night movie marathons.
Gluten‑Free Crunch
Use gluten‑free rice cereal and ensure the candy canes are certified gluten‑free. The texture stays just as airy, and everyone can enjoy the festive goodness.
Storing and Bringing It Back to Life
Fridge Storage
Place the snack mix in an airtight glass jar and keep it in the refrigerator for up to one week. The cool environment preserves the chocolate coating and prevents the candy canes from melting.
Freezer Friendly
For longer storage, portion the chow into zip‑top freezer bags, squeeze out excess air, and freeze for up to three months. When you’re ready to serve, let it thaw at room temperature for ten minutes, then give it a quick toss.
Best Reheating Method
To revive the crunch, spread the chow on a baking sheet and warm it in a 300°F (150°C) oven for three to five minutes. Add a tiny splash of water to the pan before reheating; the steam helps the coating regain its glossy sheen without drying out.