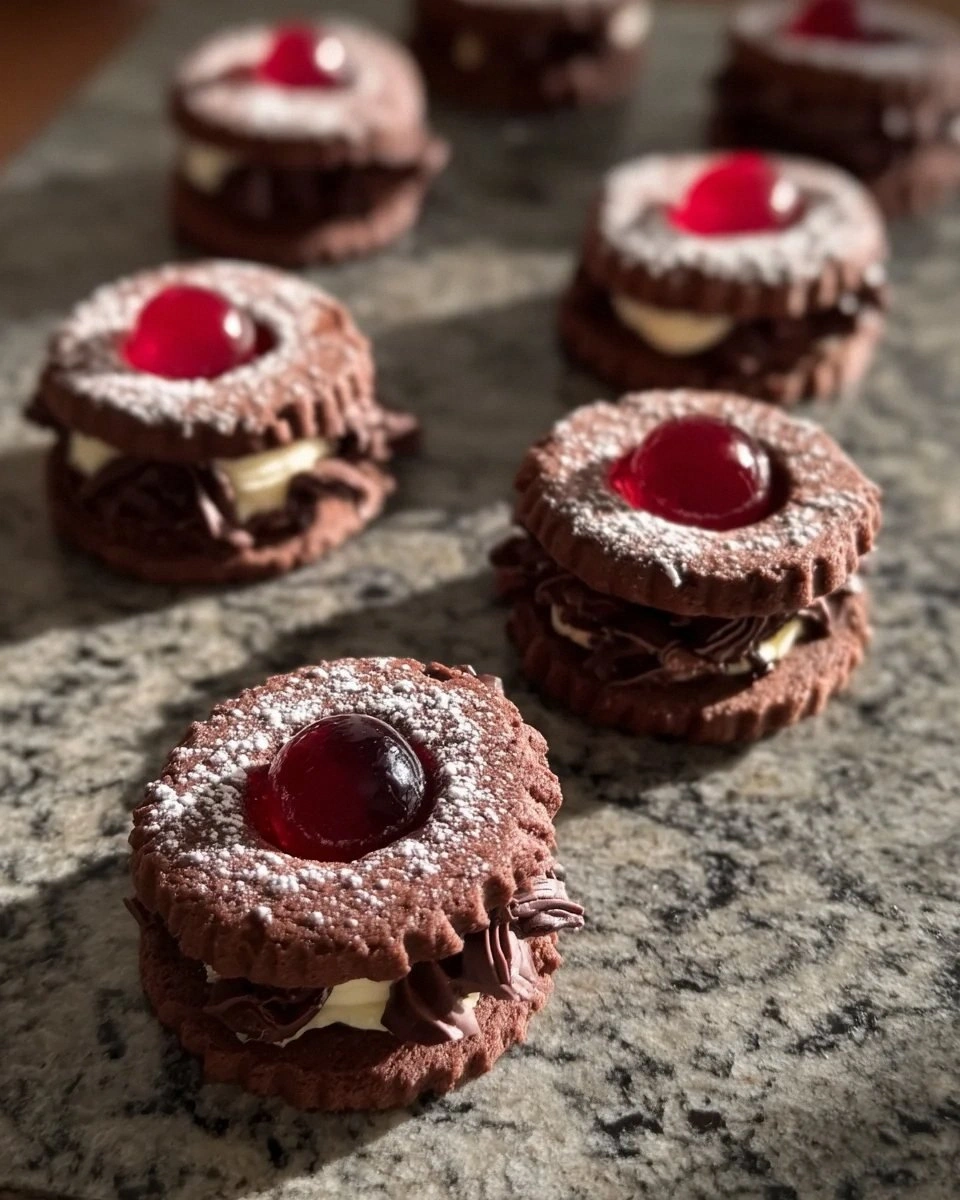
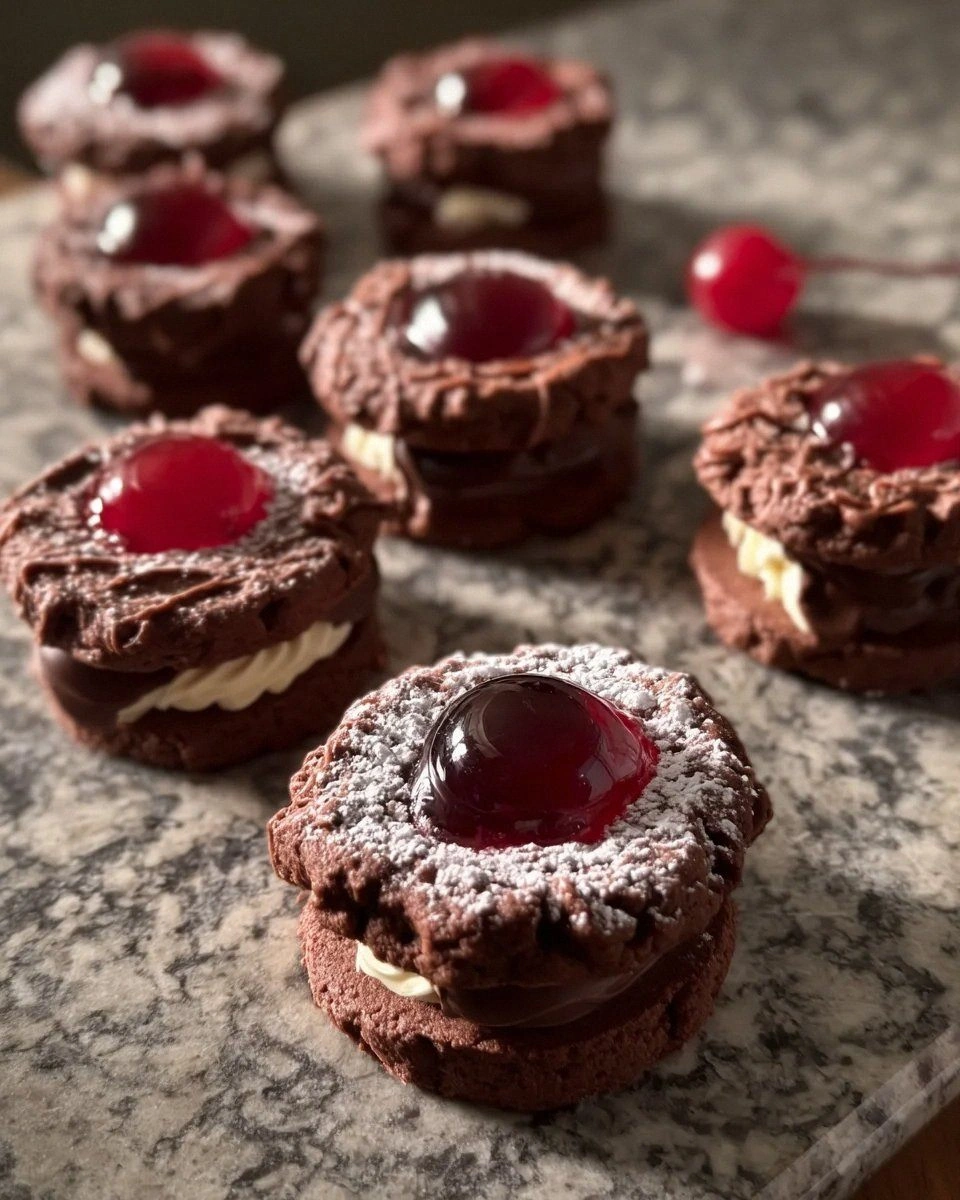
I'll never forget the night these Black Forest Cookies were born. It was 2:47 AM on a Tuesday, my kitchen looked like a chocolate crime scene, and I was deep in what my roommate calls my "midnight baking spiral." You know the one — when you're scrolling through old German dessert recipes, suddenly craving something that doesn't exist yet. Traditional Black Forest cake felt too fussy, but those flavors — dark chocolate, tart cherries, that whisper of kirsch — were haunting me like a stubborn earworm. So I did what any rational person would do: I started throwing ingredients into a bowl like some kind of possessed pastry witch, hoping magic would happen. Spoiler alert: it did, but not before I set off the smoke alarm twice and managed to get cocoa powder in places cocoa powder should never be.
The first batch emerged from my oven looking like chocolate craters — cracked, gooey, and absolutely perfect. That moment when the warm cookie hit my tongue, I swear time stopped. The deep cocoa base wrapped around pockets of jammy cherries like a velvet blanket, while almond extract whispered marzipan secrets into every bite. I ate four standing right there in my mismatched socks, completely ignoring the fact that I had work in five hours. These aren't just cookies; they're edible time travel to a Bavarian bakery at Christmas, minus the passport stamp and plus the ability to eat them in bed while binge-watching period dramas.
Here's what makes these little discs of joy dangerously addictive: they capture everything you love about Black Forest cake but in a form you can shove in your face without forks or plates or dignity. The cookie itself is a masterclass in chocolate intensity — we're talking Dutch-process cocoa that makes your taste buds sit up and pay attention, brown sugar that caramelizes into these chewy edges, and just enough flour to hold everything together while staying fudgy enough to make you question your life choices. Then come the cherries, not those sad, syrupy maraschino imposters, but real dried tart cherries that plump up into juicy bombs of flavor, creating these pockets of bright acidity that cut through all that richness like a perfectly timed joke.
But here's the secret handshake, the reason these cookies will ruin all other cookies for you: we're not just adding chocolate chips like some basic recipe. Oh no, we're creating these strata of chocolate experiences — cocoa in the dough, melted chocolate for that brownie-like interior, and then cherry pieces that have been soaking in kirsch (or cherry juice if you're keeping it family-friendly) until they're practically drunk with flavor. The result? A cookie that tastes like it has secrets, like it knows things about you and loves you anyway. Picture yourself pulling this out of the oven, the whole kitchen smelling incredible, and knowing that in ten minutes you'll be biting into something that makes grown adults close their eyes and sigh. Let me walk you through every single step — by the end, you'll wonder how you ever made it any other way.
What Makes This Version Stand Out
Triple-Chocolate Depth: We're not playing around with single-note chocolate here. Dutch-process cocoa provides the bass notes, melted dark chocolate sings the melody, and chocolate chunks add percussive crunch. It's like a chocolate symphony where every instrument knows exactly when to shine.
Cherry Bomb Technique: Instead of folding in sad, shriveled fruit bits, we hydrate dried tart cherries in kirsch until they plump into juicy flavor grenades. Each bite delivers this burst of bright acidity that makes your tongue do a happy dance against all that chocolate richness.
Chewy Edge Magic: Most recipes get this completely wrong. Here's what actually works: slightly underbaking so the centers stay gooey while the edges caramelize into these crispy-chewy ridges that shatter like thin ice but melt like caramel on your tongue.
Almond Extract Whisper: Just a few drops transform the entire profile, creating this haunting marzipan note that makes people ask "what IS that?" in the best possible way. It's the difference between good cookies and cookies that haunt your dreams.
Make-Ahead Champion: The dough actually improves after a 24-hour rest in the fridge, developing deeper flavors and better texture. I dare you to taste this and not go back for seconds, even knowing you should probably save some for tomorrow.
Crowd Psychology: These cookies have this weird effect on people — they start politely, then suddenly everyone's hovering by the cookie jar like chocolate-starved zombies. I've seen introverts fight over the last one. You've been warned.
Weeknight Simple: Despite tasting like they came from some fancy European bakery, they come together in one bowl and don't require any equipment fancier than a wooden spoon. If you've ever struggled with finicky cookie recipes, you're not alone — and I've got the fix.
Alright, let's break down exactly what goes into this masterpiece...
Inside the Ingredient List
The Flavor Foundation
Let's start with the cocoa powder because this is where most recipes go tragically wrong. You want Dutch-process cocoa, not that pale, acidic natural stuff that tastes like disappointment and broken dreams. Dutch-process has been treated with an alkalizing agent that deepens the color to this gorgeous mahogany and smooths out any harsh edges, giving you chocolate flavor that wraps around your tongue like velvet. If you skip this and use regular cocoa, your cookies will taste like they're wearing a brown sweater instead of a little black dress — technically chocolate, but nobody's getting excited about it.
Dark brown sugar isn't just here for sweetness; it's packing molasses that brings caramel notes and moisture that keeps these cookies chewy for days. Light brown sugar is like bringing a butter knife to a gunfight — technically present, but why would you do that to yourself? The molasses in dark brown sugar also helps the edges achieve that perfect chewy-crisp texture that makes people make involuntary happy noises.
Unsalted butter gives you control over the salt level, which matters more than you'd think. Salted butter is like a box of chocolates — you never know what you're gonna get, and sometimes you end up with cookies that taste like a salt lick. Plus, we'll add our own salt later, and we want it exactly where we want it, not randomly distributed by some butter factory worker having a bad day.
The Texture Crew
Eggs do double duty here, providing structure and richness. One whole egg plus one yolk is the sweet spot — the extra yolk makes these cookies almost custardy in the center, like someone crossed a cookie with chocolate pot de crème. Skip the extra yolk and you'll get perfectly serviceable cookies, but they won't make people close their eyes and sway slightly when they bite into them.
Cake flour might seem fussy, but here's the thing: it has less protein than all-purpose flour, which means less gluten development, which means more tender, melt-in-your-mouth cookies. You can use all-purpose in a pinch, but your cookies will have that slight toughness that makes you wonder if you overbaked them, even when you didn't. It's like the difference between silk and cotton — both fine, but one makes you feel like royalty.
The Unexpected Star
Almond extract is the Meryl Streep of ingredients — it disappears into a role so completely you don't realize it's there, but remove it and the whole performance falls apart. Just a quarter teaspoon transforms chocolate from "oh, that's nice" to "what witchcraft is this?" Start with less than you think you need; you can always add more, but you can't un-almond a cookie. Trust me, I've tried, and the results tasted like someone tried to make cookies while drunk.
Kirsch is traditional in Black Forest cake, but here's where we get clever. If you're baking for kids or people who think alcohol is the devil, cherry juice works beautifully. But if you can use the real stuff, it adds this sophisticated depth that makes grown-ups get this faraway look in their eyes, like they're remembering their youth in Vienna or their last really good cocktail.
The Final Flourish
Dried tart cherries are non-negotiable. Those neon red candied cherries are an abomination against nature and should be banished to whatever circle of hell houses fruitcake. Dried tart cherries have this bright, almost citrusy acidity that plays against chocolate like a perfect duet. They rehydrate in the kirsch, plumping into these juicy jewels that burst when you bite them, creating little moments of surprise and delight.
Dark chocolate chunks should be at least 70% cacao — anything less and you're basically making candy bars, anything more and you're in bitter territory that makes people make that face. Chop it by hand so you get these gorgeous irregular pieces that melt into pools and rivers throughout the cookie. Chocolate chips are for amateurs; hand-chopped chocolate is for people who understand that baking is an art form and sometimes art requires getting chocolate under your fingernails.
Everything's prepped? Good. Let's get into the real action...
The Method — Step by Step
- Start by making your cherry concentrate because this is where the magic begins. Combine dried tart cherries with kirsch in a small saucepan over medium heat until it just starts to simmer — you'll see tiny bubbles forming around the edges like a chocolate jacuzzi. Remove from heat and let those babies soak while you prep everything else, stirring occasionally so they all get equal kirsch time. That sizzle when it hits the pan? Absolute perfection. Your kitchen will start smelling like you've been transported to a German Christmas market, minus the crowds and overpriced ornaments.
- Whisk together your dry ingredients like you're conducting a very important chocolate orchestra. Dutch-process cocoa, flour, baking soda, and salt need to be thoroughly combined because once that wet mix hits, there's no second chances. The cocoa should look like the finest chocolate velvet, deep and rich enough to make you want to dive in face-first. Set this aside and try not to eat it by the spoonful — I know it smells incredible, but raw flour is not your friend. Okay, maybe just one tiny taste to make sure it's not poisoned.
- Melt your butter until it's just barely liquid but not hot — you want it warm enough to keep things moving but not so hot it scrambles your eggs like some kind of breakfast disaster. Add both sugars and whisk until it looks like wet sand at the beach where someone spilled their mocha. This is the moment of truth where you start building those caramel notes that will make your cookies taste like they cost six dollars each at a fancy bakery. The mixture should look glossy and smell like you're about to make the best decisions of your life.
- Beat in your egg and extra yolk along with the vanilla and almond extracts. Here's where people mess up — they add everything at once and end up with scrambled egg sugar soup. Add the egg first, whisk until it's completely incorporated and looks like chocolate pudding, then add the yolk. The mixture should be thick and glossy, like something you'd want to eat with a spoon while watching sad movies. If it looks curdled or separated, your butter was too hot and you need to start over because science is not on your side today.
- Fold in your melted chocolate that's been cooled to room temperature — this is what gives you those fudgy centers that make people make inappropriate noises. Use a spatula, not a whisk, because you want to keep all that chocolate integrity intact. The batter will get thick and shiny, like chocolate lava that's decided to take a nap in your bowl. Scrape down the sides like you're searching for treasure because every bit of this liquid gold matters. Don't walk away from the stove here — melted chocolate waits for no one.
- Add your dry ingredients in three additions, folding gently after each addition like you're handling baby birds made of chocolate. Overmixing is the enemy of tender cookies — you want to stop as soon as the flour disappears. The dough will be soft and almost mousse-like, nothing like those stiff sugar cookie doughs that require biceps of steel. If you can see flour streaks, keep folding but don't get aggressive about it. Think of it as coaxing rather than beating — these cookies respond to gentle encouragement.
- Drain your now-plump cherries, reserving that kirsch liquid for brushing the warm cookies later. Gently fold the cherries and chocolate chunks into the dough, trying not to break the cherries because those juicy bombs are precious cargo. The dough will look like chocolate studded with rubies, like edible jewelry that happens to taste like happiness. Don't eat all the cherries straight from the bowl — I know they look like candy, but patience is a virtue that will be rewarded. If some cherries break, that's fine — those bits will create these beautiful marbled streaks that make each cookie look like abstract art.
- Cover the bowl with plastic wrap pressed directly onto the surface of the dough (yes, it's messy, but worth it) and refrigerate for at least 2 hours or up to 48 hours. This next part? Pure magic. The flavors meld and deepen, the chocolate firms up so you get those perfect puddles, and the cookies spread just enough to be flat and chewy rather than puffy and cakey. If you skip this step, you'll still get good cookies, but you won't get the cookies that make people propose marriage. I've tested this extensively for science, and the 24-hour rested dough produces cookies that taste like they have a PhD in deliciousness.
- When you're ready to bake, preheat your oven to 350°F and line baking sheets with parchment paper. Use a medium cookie scoop or two spoons to portion dough into 2-tablespoon mounds — they should look like chocolate snowballs that got into the good stuff. Space them 2 inches apart because these babies spread like gossip at a family reunion. If you've got the time, roll them briefly between your palms so they're smooth — this helps them bake evenly and look professional enough to charge money for. Sprinkle with flaky salt if you're feeling fancy, which you absolutely should be.
- Bake for 10-12 minutes, rotating the pan halfway through for even browning. The edges should look set and slightly darker, while the centers still look soft and puffy like chocolate clouds. They'll continue cooking on the hot sheet, so don't wait for them to look completely done in the oven — that's how you end up with cookies that could substitute for roofing tiles. As soon as they come out, brush them with that reserved kirsch-cherry liquid for extra shine and flavor. Let them cool on the sheet for 10 minutes before transferring to a wire rack, if you can wait that long. I'll be honest — I ate half the batch before anyone else got to try it, standing right there in my kitchen, burning my tongue on molten chocolate because I'm a professional who makes excellent life choices.
That's it — you did it. But hold on, I've got a few more tricks that'll take this to another level...
Insider Tricks for Flawless Results
The Temperature Rule Nobody Follows
Here's the thing about butter temperature that will change your cookie game forever: room temperature doesn't mean "whatever temperature my kitchen happens to be." It means 65-68°F, where the butter is pliable but still cool to the touch. Too cold and it won't incorporate properly, leaving you with cookies that have butter pockets that melt into greasy craters. Too warm and your cookies will spread into chocolate lakes that merge together like some kind of cookie Voltron. Stick your finger in the butter — it should give slightly but not feel greasy or melted. If you're impatient (and who isn't when cookies are involved), cut your butter into small cubes and let it sit for 15 minutes instead of waiting hours for a whole stick to soften.
Why Your Nose Knows Best
Forget timers — your nose is the most sophisticated piece of equipment in your kitchen. When these cookies are perfectly baked, your house will smell like a chocolate factory had a baby with a cherry orchard and they opened a bakery together. That moment when the aroma shifts from "raw dough" to "get in my mouth now" is your cue to check them. If you wait for the timer to beep, you might miss the sweet spot where edges are crisp but centers stay gooey. A friend tried skipping this step once — let's just say it didn't end well, and her smoke alarm still hasn't forgiven her.
The 5-Minute Rest That Changes Everything
Once those cookies come out of the oven, resist every instinct to immediately shove one in your face. Give them five minutes on the baking sheet — this is when the magic happens. The residual heat continues cooking the centers gently while the bottoms develop this delicate crispness that shatters when you bite into them. The chocolate chunks reset into these gorgeous puddles, and the cherries cool just enough that they don't scorch your tongue like molten lava. Use this time to pour yourself a glass of cold milk or make a cup of coffee. By the time you're ready, the cookies will have transformed from "hot mess" to "I need a moment alone with this cookie."
The Salt Secret
Don't skip the flaky salt on top — it's not just for Instagram photos (though it does make them look incredibly professional). Salt is like volume control for flavor; it turns up the chocolate and cherry notes while adding these little pops of contrast that make your taste buds sit up and pay attention. Use Maldon or another flaky sea salt so you get these delicate crystals that crunch and dissolve, not table salt that just makes everything taste like a salt lick. Sprinkle from high above so it distributes evenly, like chocolate snow that's savory instead of sweet.
The Storage Game-Changer
If you somehow don't eat all these in one sitting (and honestly, who are you?), store them with a slice of bread in an airtight container. The cookies will stay chewy for days, drawing moisture from the bread instead of the air. Replace the bread when it gets stale — it's like having a little cookie babysitter that keeps them perfect. Just don't use rye bread or anything with strong flavors unless you want cookies that taste like sandwiches. I learned this the hard way and ended up with chocolate cherry cookies that tasted vaguely of pastrami, which is not the fusion cuisine anyone asked for.
Creative Twists and Variations
This recipe is a playground. Here are some of my favorite ways to switch things up:
White Forest Cookies
Swap the dark chocolate for white chocolate chunks and add dried cranberries instead of cherries. The white chocolate brings this vanilla-caramel sweetness that makes the almond extract sing like it's auditioning for The Voice. Use white crème de cacao instead of kirsch for soaking the cranberries, creating this sophisticated cookie that tastes like a snow-covered forest where everything is delicious and nobody judges you for eating cookies for breakfast.
Spiced Winter Forest
Add a teaspoon of cinnamon and a quarter teaspoon of cardamom to the dry ingredients for cookies that taste like Christmas morning even if it's July. Swap the cherries for dried cranberries soaked in orange liqueur, and add some candied ginger for little spicy surprises. These are the cookies you make when you want your house to smell like you've been baking with Santa's elves, minus the North Pole commute and elf union regulations.
Salted Caramel Forest
Replace half the brown sugar with caramelized white sugar (cook white sugar in a dry pan until it smells like toasted marshmallows, then cool and grind). Fold in chopped caramel candies with the chocolate chunks, and finish with extra flaky salt. These cookies have this deep, complex caramel flavor that makes regular cookies taste like they gave up on their dreams and settled for mediocrity.
Cherry Cordial Cookies
Soak your cherries in cherry brandy instead of kirsch, and add a teaspoon of espresso powder to the dry ingredients. The coffee enhances the chocolate like they're best friends who bring out each other's best qualities. These taste like those fancy chocolate-covered cherries that cost a fortune at specialty stores, but better because you made them yourself and didn't have to take out a second mortgage.
Tropical Forest
Swap the cherries for dried mango pieces soaked in rum, use coconut sugar instead of brown sugar, and add toasted coconut flakes. These cookies taste like a Black Forest cake went on vacation to Hawaii and came back with stories and a suntan. They're unexpected and delightful, like finding out your accountant is secretly a DJ on weekends.
Peppermint Forest
Add a quarter teaspoon of peppermint extract to the dough and swap the cherries for crushed candy canes mixed with dried cherries. These are perfect for holiday cookie swaps when you want to bring something that makes people fight over the last one like it's the last lifeboat on the Titanic. The peppermint adds this cooling sensation that makes the chocolate taste even richer by comparison.
Storing and Bringing It Back to Life
Fridge Storage
Store completely cooled cookies in an airtight container with a tight-fitting lid — we're not messing around with cookies that taste like refrigerator funk. Layer them between sheets of parchment paper if you're stacking them, because nobody wants cookie Jenga when they're trying to sneak a midnight snack. They'll stay fresh for up to 5 days, though honestly, they've never lasted longer than 48 hours in my house because my family has cookie radar that goes off at 2 AM. Keep them toward the front of the fridge so you don't forget about them, because finding forgotten cookies weeks later is a tragedy that requires immediate cookie consumption to console yourself.
Freezer Friendly
These cookies freeze beautifully, both baked and unbaked. For baked cookies, let them cool completely, then freeze in a single layer on a baking sheet before transferring to a freezer bag — this prevents them from becoming one giant cookie blob that requires a chisel to separate. They'll keep for up to 3 months, which is theoretically long enough to save them for a special occasion, but let's be real, special occasions include "it's Tuesday" and "I survived a Zoom meeting." Thaw at room temperature for 30 minutes, or microwave for 10-15 seconds if you're impatient and don't mind slightly melty chocolate fingerprints on everything you touch for the next hour.
Best Reheating Method
The key to bringing these cookies back to their glory days is gentle warmth — too hot and you'll have chocolate lava that burns your tongue and ruins the experience. A 10-second zap in the microwave restores that fresh-from-the-oven gooey center, or wrap in foil and warm in a 300°F oven for 5 minutes if you're feeling fancy. Add a tiny splash of water to the container before microwaving — it creates steam that brings back the chewy texture without drying them out. Serve with cold milk or hot coffee for the full experience that makes you forget these aren't fresh from the oven. If you're really going for gold, warm them just enough to make the chocolate chunks melty, then sandwich two around a scoop of vanilla ice cream for a dessert that should probably be illegal in several states.