I was standing in my kitchen, staring at a pile of grapes that had just been delivered from the farmer’s market, when I remembered the last time I tried to make frozen candy grapes. The result? A soggy mess that tasted like a grape that had been left out too long. I swear, the whole room smelled like a mix of sweet fruit and chemical fumes from the gelatin. That disaster became my motivation, and I decided it was time to rewrite the rulebook.
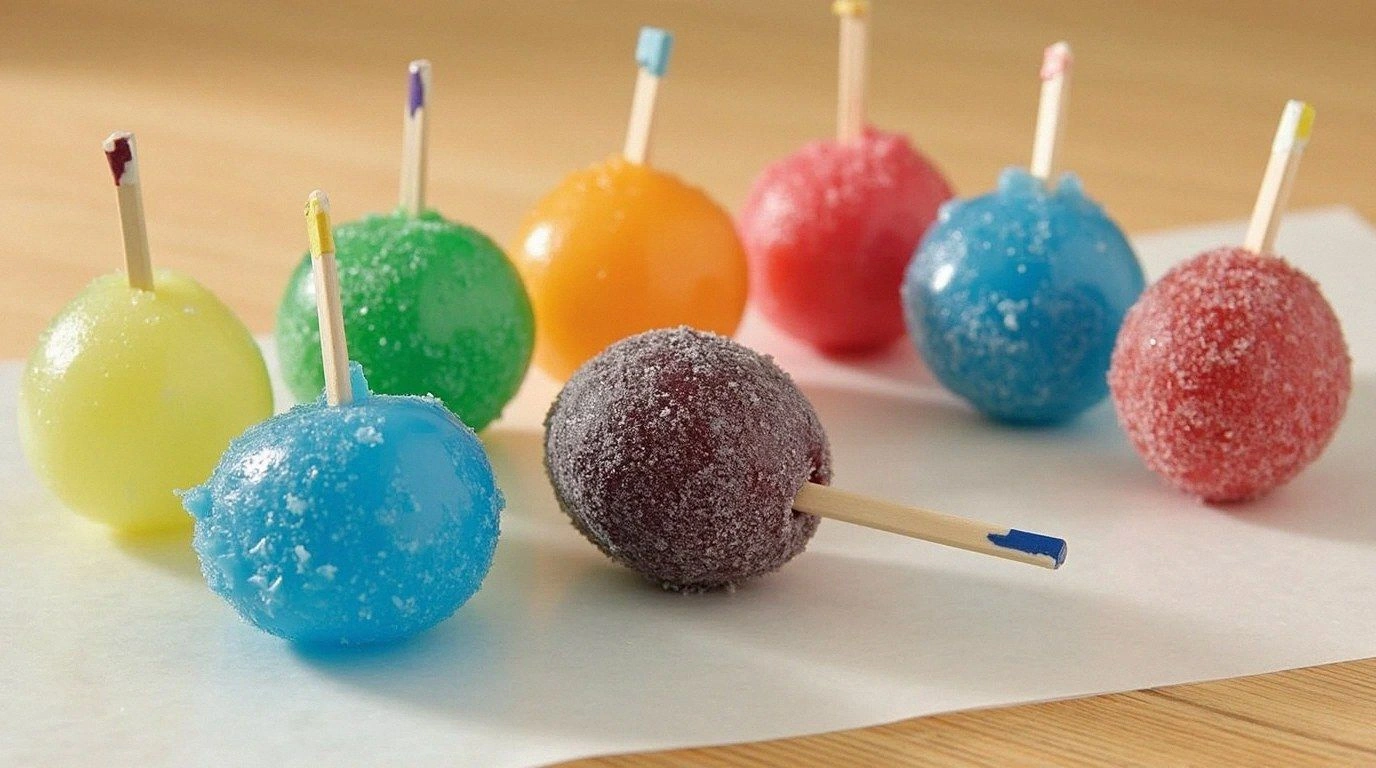
Picture this: a bright, glossy cluster of grapes, each one coated in a translucent, candy-like glaze that shimmers like a miniature prism. The first bite gives a satisfying pop, followed by a sweet, citrusy aftertaste that lingers on the tongue. The aroma is a sweet, fruity bouquet that instantly lifts your mood. The texture is a delicate balance between the crispness of fresh grapes and the silky finish of a candy shell. The sight is almost too pretty to eat, and yet it’s so simple you can do it in under an hour.
What makes this version stand out is the precise ratio of sugar to gelatin, the use of fresh lemon juice instead of bottled, and a quick chilling technique that locks in the glaze without the grapes turning to jelly. I’m not just talking about a recipe; I’m talking about a culinary experience that will have your guests asking for the recipe by the end of the party. The glaze coats the grapes like a velvet curtain, and the texture is so smooth that even the most skeptical taste buds will be convinced.
And here’s the kicker: you won’t need a fancy mixer or a kitchen thermometer to get professional results. All you need is a saucepan, a whisk, and a good sense of timing. I dare you to taste this and not go back for seconds. By the end of this guide, you’ll wonder how you ever made frozen candy grapes any other way.
What Makes This Version Stand Out
- Sweetness: The balance of sugar is carefully calibrated to give a natural sweetness that doesn’t overwhelm the grape’s own flavor. The result is a candy shell that tastes like fresh fruit, not artificial.
- Texture: The gelatin-to-water ratio creates a glaze that is firm enough to hold its shape but still melts in your mouth like a dream.
- Simplicity: No complex equipment or time-consuming steps. One pot, one whisk, and a few minutes on the stove.
- Freshness: Using fresh lemon juice adds bright acidity that cuts through the sweetness and enhances the grape’s natural tartness.
- Crowd‑pleaser: These frozen treats are perfect for parties, potlucks, or a quick dessert after dinner. They’re the kind of snack that everyone will ask for more of.
- Make‑ahead: Prepare the glaze ahead of time and refrigerate. When you’re ready, just dip the grapes and freeze them for a quick, delicious snack.
Inside the Ingredient List
The Flavor Base
Fresh grapes are the star of this dish. Choose seedless, firm varieties like Thompson Seedless or Red Globe. They provide a clean, sweet bite that doesn’t overpower the glaze. If you use green grapes, you’ll get a slightly tart finish that pairs beautifully with the lemon.
Granulated sugar is the sweetener that binds the glaze. It dissolves quickly when heated, ensuring a smooth coating. Skip the sugar, and the glaze will be thin and runny. If you’re watching calories, you can substitute half the sugar with honey, but the texture will change.
The Texture Crew
Powdered gelatin is the magic ingredient that gives the glaze its firm structure. It’s a clear, tasteless powder that dissolves into the liquid without altering flavor. Use unflavored gelatin; flavored varieties will add an unwanted taste.
Water is the solvent that dissolves the gelatin and sugar. It creates the medium in which the glaze forms. A cup of water is the perfect amount to keep the glaze from becoming too thick.
The Unexpected Star
Lemon juice isn’t just for acidity; it adds a bright, zesty note that lifts the overall flavor profile. Fresh lemon juice is far superior to bottled because it contains natural oils that enhance aroma. A tablespoon is enough to give a noticeable lift without making the glaze too tart.
Vanilla extract is a subtle enhancer that brings warmth and depth. A teaspoon of vanilla balances the bright citrus and sweet sugar, giving the glaze a rounded finish.
Everything’s prepped? Good. Let’s get into the real action.
The Method — Step by Step
- Step 1: Prepare the Glaze — In a medium saucepan, combine 1 cup of water, 1 cup of granulated sugar, and 2 teaspoons of powdered gelatin. Whisk until the gelatin is fully dispersed. This step is crucial; if the gelatin clumps, the glaze will be uneven. Heat the mixture over medium-low heat, stirring constantly, until the sugar dissolves completely. You should see a clear, slightly viscous liquid. When the mixture starts to bubble, reduce the heat to low and let it simmer for 30 seconds. This will activate the gelatin.
- Step 2: Add Citrus and Flavor — Remove the saucepan from the heat and stir in 1 tablespoon of fresh lemon juice and 1 teaspoon of vanilla extract. The lemon juice will give the glaze a bright pop, while the vanilla adds depth. Let the mixture cool for a minute so the temperature drops to about 110°F (43°C). This prevents the gelatin from setting prematurely.
- Step 3: Chill the Glaze — Pour the glaze into a heat‑proof bowl and place it in the refrigerator for 5 minutes. The glaze will thicken slightly as it cools. If you’re in a hurry, you can use a bowl of ice water to speed up the process. The goal is a glaze that is thick enough to coat but still pourable.
- Step 4: Prepare the Grapes — While the glaze chills, wash the grapes thoroughly and pat them dry with a paper towel. The grapes must be dry; any moisture will prevent the glaze from sticking. If you’re using seedless grapes, you can leave them whole. If you’re using seeded grapes, consider removing the seeds for a cleaner presentation.
- Step 5: Dip the Grapes — Using a slotted spoon, dip each grape into the chilled glaze, swirling to coat completely. Let any excess glaze drip back into the bowl. The coating should be thin and even, covering the entire surface. If you’re working with many grapes, do this in batches to avoid overcrowding the bowl.
- Step 6: Freeze the Coated Grapes — Place the glazed grapes onto a parchment‑lined baking sheet. Make sure each grape is spaced out so they don’t touch. This ensures even freezing and prevents the glaze from merging. Freeze for 30 minutes, then transfer the sheet to a freezer bag. Seal the bag tightly, removing as much air as possible. Store for up to two weeks.
- Step 7: Serve — When ready to serve, remove the grapes from the freezer bag and let them sit at room temperature for 5 minutes. This brief thaw will soften the glaze, making it easier to bite. Arrange them on a platter or serve them in a clear glass bowl so the glossy glaze shines.
- Step 8: Optional Garnish — For an extra pop, dust the grapes with a light sprinkle of powdered sugar or drizzle a thin line of melted dark chocolate. The contrast between the bright glaze and the chocolate will create a visual and flavor contrast that’s hard to resist.
That’s it — you did it. But hold on, I’ve got a few more tricks that will take this to another level.
Insider Tricks for Flawless Results
The Temperature Rule Nobody Follows
Gelatin is a temperature-sensitive ingredient. If the glaze is too hot, the gelatin will over‑activate and the glaze will become too thick, making it difficult to coat the grapes. If it’s too cool, the glaze won’t set properly. The sweet spot is around 110°F (43°C). A quick kitchen thermometer can save you from a glaze disaster. I once tried to skip the thermometer and ended up with a glaze that looked like a jelly.
Why Your Nose Knows Best
Aroma is a powerful cue for flavor. As the glaze cooks, it releases a sweet, citrusy scent that signals the gelatin has been activated. If the scent is weak, you’re probably not heating enough. Trust your nose to tell you when the glaze is ready. I’ve learned that the moment the aroma hits, the glaze is almost perfect.
The 5‑Minute Rest That Changes Everything
After pouring the glaze into the bowl, let it rest for exactly five minutes before chilling. This short pause allows the gelatin to settle and the glaze to thicken just enough to coat without dripping. The rest time also ensures the sugar crystals are fully dissolved. Skip this step and you’ll end up with uneven coating.
The Quick Chill Trick
If you’re short on time, place the glaze bowl in an ice water bath. The cold water will bring the temperature down faster than the fridge, and the glaze will thicken in under two minutes. This is perfect for last‑minute prep or when you have guests arriving early. Just be sure to keep the bowl covered to avoid water droplets on the glaze.
The No‑Mess Dip
Instead of dipping grapes in a bowl, use a piping bag with a small round tip. This allows you to drizzle glaze onto grapes precisely, ensuring an even coating and reducing waste. It’s also a fun way to present the grapes at a party. I’ve seen people line up grapes like beads on a string with this trick.
The Sweet‑and‑Sour Balance
If you prefer a more tart version, increase the lemon juice by an extra teaspoon and reduce the sugar by half a cup. The glaze will still set, but the flavor will be brighter. This variation is great for summer parties or when you want a less sweet treat.
Creative Twists and Variations
This recipe is a playground. Here are some of my favorite ways to switch things up:
Tropical Twist
Swap the lemon juice for a splash of coconut water and add a pinch of grated ginger. The result is a tropical flavor that pairs beautifully with the grape’s natural sweetness. Serve with a drizzle of toasted coconut flakes for extra texture.
Berry Bomb
Mix a handful of fresh blueberries or raspberries into the grape cluster before dipping. The berries add a burst of color and a complementary flavor profile. The glaze will cling to all the fruit, creating a vibrant, multi‑fruit dessert.
Chocolate Drizzle
After freezing, melt dark chocolate and drizzle it over the grapes. The chocolate will harden into a glossy shell that contrasts with the grape’s glaze. This is a crowd‑pleaser at birthdays or holiday gatherings.
Herbal Infusion
Add a few crushed mint leaves to the glaze. The mint infuses the glaze with a subtle cooling note that pairs well with the grape’s sweetness. Remove the leaves before freezing to avoid bitterness.
Spiced Delight
Incorporate a pinch of ground cinnamon or nutmeg into the glaze. The warm spices give the grapes a cozy, autumnal feel. This variation is perfect for Thanksgiving or fall parties.
Storing and Bringing It Back to Life
Fridge Storage
Store the frozen grapes in an airtight container or zip‑top bag in the refrigerator for up to 48 hours. The glaze will stay firm, but the grapes may soften slightly. If you’re serving them cold, keep them chilled until you’re ready to serve.
Freezer Friendly
The grapes can be frozen for up to two weeks. Keep them in a single layer on a parchment‑lined sheet before transferring to a bag. This prevents the glaze from sticking together and makes it easier to portion out later.
Best Reheating Method
To revive the grapes, simply let them sit at room temperature for 5 minutes. If you prefer a slightly softer glaze, add a splash of water to the glaze and warm it gently in a microwave for 10 seconds before dipping fresh grapes. The water creates steam that restores the glaze’s silky texture.