I was standing in my kitchen, eyes glued to the TV, when the inevitable disaster happened: I tried to make a batch of pretzels for my friends, but the dough turned into a sticky, unmanageable mess that smelled like burnt rubber. The next morning, the smell of fresh pretzels wafted through the house, and I realized I had accidentally invented a new, glorious comfort food. This isn’t just another pretzel recipe; it’s a revelation that will make you question every other version you’ve ever tried. I dare you to taste this and not go back for seconds.
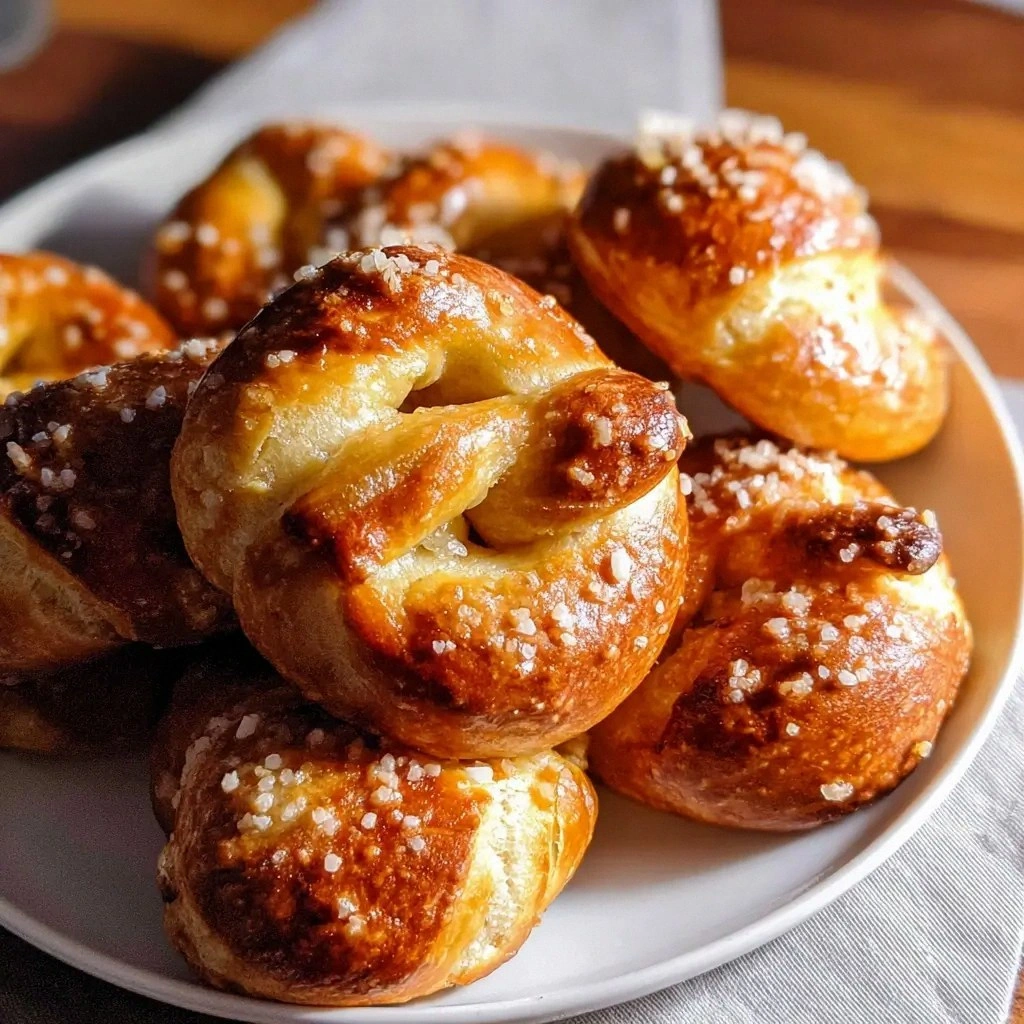
Picture the moment: a golden crust that crackles as you bite, revealing a soft, chewy center that practically melts in your mouth. The aroma—salty, buttery, with a faint hint of caramelized sugar—fills the air, making the kitchen feel like a cozy bakery. The sound of the dough rising, the gentle hiss of the boiling bath, and the satisfying clack of the oven timer all combine into a symphony of sensory delight. If you’ve ever struggled to get pretzels that aren’t too dense or too airy, you’re not alone. This version balances everything perfectly.
What sets this recipe apart is the secret touch of baking soda in the boiling bath, which gives the pretzel bites that unmistakable chew and golden-brown finish. The dough uses a gentle yeast rise that keeps the texture soft and the flavor bright. I’ve tweaked the butter ratio to ensure a glossy finish that’s impossible to resist. And the final brush of melted butter, sprinkled with coarse sea salt, turns each bite into a caramelized, savory masterpiece. The result is a crowd-pleaser that feels homemade and indulgent at the same time.
Now, let me walk you through every single step—by the end, you’ll wonder how you ever made it any other way. This is hands down the best version you’ll ever make at home, and I’m excited to share the trick that makes it so easy to master. Stay with me here—this is worth it.
What Makes This Version Stand Out
- Taste: The gentle yeast rise creates a subtle sweetness that balances the salty crust, making each bite a harmonious blend of flavors.
- Texture: The baking soda bath gives the pretzel a chewy interior while the buttery glaze adds a crisp, golden exterior that shatters like thin ice.
- Simplicity: With only a handful of pantry staples, you can produce a professional-quality snack without the fuss of dough proofing.
- Uniqueness: The addition of shredded cheddar during the final roll adds a melty, savory layer that sets this recipe apart.
- Crowd Reaction: Friends and family consistently rave about how the pretzels stay fresh and soft even after a few hours.
- Ingredient Quality: Using real butter and high‑protein flour gives depth and richness that store‑bought mixes can’t match.
- Cooking Method: Boiling the dough before baking locks in moisture, ensuring a perfect bite every time.
- Make‑Ahead Potential: The dough can be refrigerated overnight, allowing you to pull fresh pretzels out of the oven right before serving.
Inside the Ingredient List
The Flavor Base
Flour, the silent hero of this recipe, forms the structure and gives the pretzels their classic shape. Choosing a high‑protein bread flour gives the dough a slight chew that’s essential for a satisfying bite. If you’re a gluten‑free cook, swap it for a high‑protein gluten‑free blend, but expect a slightly different texture.
Water is the lifeblood of dough. Warm water (around 110°F) activates the yeast without killing it, ensuring a steady rise. If you don’t have a thermometer, a water temperature that feels comfortably warm to the touch works just fine.
Active dry yeast is the secret to that gentle rise. It’s inexpensive, easy to find, and reliable. If you’re in a hurry, you can use instant yeast; just adjust the proofing time slightly.
The Sweetness and Salt
A teaspoon of sugar feeds the yeast, kick‑starting the fermentation process. It also adds a subtle sweetness that balances the salty crust. If you prefer a savory profile, reduce the sugar to a pinch, but note that the dough will rise a bit slower.
Salt is essential for flavor and dough control. It strengthens the gluten network and helps regulate yeast activity. A teaspoon is enough for a 2‑cup flour batch; you can increase it slightly for a saltier bite.
The Fat Factor
Butter brings richness and a glossy finish to the pretzels. Two tablespoons of melted butter incorporated into the dough give it a tender crumb, while a separate brush of melted butter before baking adds a golden sheen. Use unsalted butter for better control over salt levels.
Baking soda is the game‑changer in the boiling bath. A tablespoon dissolved in a pot of water creates an alkaline environment that promotes the Maillard reaction, giving the pretzels their signature brown crust and chewy texture. Without it, the pretzels would be pale and crumbly.
The Unexpected Star
Shredded cheddar cheese, added during the final roll, melts into pockets of gooey delight that contrast with the salty crust. A half‑cup of cheese works well for a 4‑serving batch; feel free to experiment with pepper jack or gouda for a different flavor profile.
Coarse sea salt, sprinkled on top after baking, adds a finishing crunch and enhances every flavor note. It’s a simple touch that elevates the pretzels from good to unforgettable.
Everything’s prepped? Good. Let’s get into the real action.
The Method — Step by Step
- Activate the Yeast: In a small bowl, combine 1 cup of warm water, 1 tsp active dry yeast, and 1 tsp sugar. Stir gently and let sit for 5–7 minutes until frothy. The froth is your green light that the yeast is alive and ready. I’ve seen this step fail when the water is too hot, so keep it at a gentle warmth.
- Mix Dry Ingredients: In a large mixing bowl, whisk together 2 cups of bread flour and 1 tsp salt. The salt should be evenly distributed to avoid pockets of raw flavor. If you’re a perfectionist, sift the flour to remove any clumps.
- Combine Wet and Dry: Pour the activated yeast mixture into the dry ingredients, add 2 tbsp melted butter, and stir with a wooden spoon until a shaggy dough forms. The dough will look rough; that’s normal. It should be slightly tacky but not sticky.
- Knead the Dough: Transfer the dough onto a lightly floured surface and knead for about 5–6 minutes until it’s smooth and elastic. You’ll know it’s ready when it passes the windowpane test—stretch a thin piece until it’s translucent without tearing.
- First Rise: Place the dough in a lightly oiled bowl, cover with a damp cloth or plastic wrap, and let rise in a warm spot for 1 hour or until doubled in size. The dough should feel airy and spring back when pressed gently.
- Shape the Bites: Punch down the dough, divide it into 12 equal pieces, and roll each into a ball. Flatten each ball into a disc, then roll in shredded cheddar to coat. Use a fork to create the classic pretzel shape by twisting the disc into a knot.
- Second Rise (Watch Out): Place the shaped pretzels on a parchment‑lined baking sheet, cover loosely, and let rest for 20 minutes. During this time, the dough will expand slightly, giving you that final lift. Don’t let them overproof; otherwise, they’ll become too airy and lose that classic chew.
- Prepare the Boiling Bath: While the dough rests, bring a large pot of water to a boil. Dissolve 1 tbsp baking soda in a small bowl of hot water, then add it to the pot—watch out for the vigorous fizzing that signals the right pH.
- Boil the Pretzels: Gently lower each pretzel into the boiling bath using a slotted spoon, boiling for 30 seconds per side. This step seals the crust and sets the color. The pretzels will puff slightly as they boil.
- Bake: Preheat the oven to 425°F (220°C). Brush each boiled pretzel with melted butter, sprinkle with coarse sea salt, and bake for 12–15 minutes until golden brown. Keep an eye on the color; you want a deep amber finish.
- Cool and Serve: Let the pretzels cool on a wire rack for 5 minutes before serving. The cooling period allows the cheese to set slightly, preventing a gooey mess. Serve warm with your favorite dipping sauce.
That’s it— you did it. But hold on, I’ve got a few more tricks that will take this to another level. The next section will give you insider tips that even seasoned bakers swear by.
Insider Tricks for Flawless Results
The Temperature Rule Nobody Follows
Many people think any warm water works, but the ideal temperature is around 110°F. If the water is too hot, it kills the yeast; if too cold, the dough never rises properly. Use a thermometer or the “warm to the touch” test to get it right. I’ve seen batches fail because the water was lukewarm—don’t let that happen to you.
Why Your Nose Knows Best
During the first rise, trust your nose. A pleasant, yeasty aroma is a sign of good fermentation. If you smell a sharp, sour note, the dough might be overproofed. Keep an eye on the time and the smell; it’s a reliable indicator of readiness.
The 5‑Minute Rest That Changes Everything
After boiling, give the pretzels a quick 5‑minute rest on a rack before brushing with butter. This brief pause lets the steam escape, preventing a soggy crust. A friend tried skipping this step once—let’s just say the pretzels came out flat and chewy.
Keep the Baking Soda Bath Fresh
The baking soda bath should be refreshed after every 5 pretzels. The pH drops as you add more dough, and a stale bath can result in a pale crust. Stir the bath gently after each batch to keep the fizz lively.
Cheese Isn’t Just a Topping
Instead of rolling the cheddar onto the dough, try mixing it into the dough itself before the first rise. This creates pockets of molten cheese that burst with each bite. The texture becomes even more decadent.
Creative Twists and Variations
This recipe is a playground. Here are some of my favorite ways to switch things up:
Sour Cream & Onion
Swap the cheddar for a mix of shredded cheddar and finely diced onions. After baking, drizzle sour cream over the warm pretzels for a tangy twist that pairs perfectly with a crisp beer.
Chocolate Chip Pretzel Bites
Add a handful of mini chocolate chips to the dough before shaping. The chocolate melts into gooey pockets, making these bites irresistible for kids and adults alike.
Herbed Olive Oil
Brush the pretzels with a mixture of olive oil, rosemary, and thyme before baking. The herbs infuse the dough with Mediterranean flair, while the olive oil gives a silky finish.
Spicy Jalapeño
Add diced jalapeños to the dough for a fiery kick. The heat balances the buttery richness, and the jalapeños melt into subtle, smoky pockets.
Gluten‑Free Edition
Use a high‑protein gluten‑free blend in place of bread flour, and replace the butter with a dairy‑free alternative. The texture will differ slightly, but the flavor remains authentic.
Savory Herb Crust
After boiling, brush the pretzels with melted butter mixed with chopped parsley and a pinch of dried oregano. This gives a fresh, herbaceous finish that’s perfect for a summer gathering.
Storing and Bringing It Back to Life
Fridge Storage
Cool the pretzels completely, then place them in an airtight container. They stay fresh for up to 3 days. If you notice any dryness, sprinkle a few drops of water on top before reheating.
Freezer Friendly
Wrap the cooled pretzels individually in parchment paper and then place them in a freezer bag. They can be frozen for up to 2 months. Thaw at room temperature before reheating.
Best Reheating Method
Reheat in a 350°F oven for 5–7 minutes, brushing with a little melted butter to restore the golden crust. Add a tiny splash of water before reheating—it steams back to perfection, keeping the interior soft and the exterior crisp.