Picture this: I’m standing in my tiny kitchen, the timer on the oven screaming “ding!” while a half‑finished batch of what I thought would be a simple snack is doing a slow, sad wobble on the countertop. I had just tried to satisfy a sudden craving for something that could marry the buttery crunch of a cracker with the seductive pull of caramel and chocolate, and I ended up with a sticky mess that looked more like a melted snow globe than a treat. The smell? A sweet‑savory fog that filled the room, making my nose twitch in delight, but the texture was a disappointment—flat, soggy, and utterly forgettable. I stared at the disaster, half‑laughing, half‑cursing, and then a daring friend shouted, “Bet you can’t make something that actually tastes amazing and looks Instagram‑worthy!” I took the dare, and that’s how the ultimate version of Salt River Bars was born.
Fast forward a few frantic evenings of trial, error, and a lot of late‑night snack‑fuelled brainstorming, and I finally cracked the code. The secret? A perfect balance of sweet, salty, and crunchy, all wrapped up in a buttery, melt‑in‑your‑mouth base that holds everything together without turning into a mushy puddle. I discovered that using a whole package of Club Crackers as the structural backbone, combined with a luscious caramel‑chocolate‑butterscotch swirl, creates a texture that’s simultaneously crisp and gooey—think of it as the culinary equivalent of a perfect high‑five. The Maldon sea salt crystals add that final pop of briny brilliance that makes each bite unforgettable.
Most recipes for these bars either overcomplicate the process or skimp on the flavor, leaving you with something that tastes like a bland granola bar. Not this one. I’m about to hand you the exact method that turned my kitchen disaster into a crowd‑pleasing masterpiece that will have friends begging for the secret. You’ll learn a couple of unconventional tricks—like toasting the crackers just enough to bring out a nutty aroma, and folding the caramel in a way that creates ribbons of glossy goodness throughout the bar. Trust me, this version will make you question every other sweet‑and‑salty snack you’ve ever tried.
Let me walk you through every single step — by the end, you’ll wonder how you ever made it any other way.
What Makes This Version Stand Out
- Flavor Explosion: The combination of caramel, chocolate, and butterscotch creates a layered sweetness that’s punctuated by the bright crunch of Maldon sea salt, making each bite a surprise party for your palate.
- Texture Harmony: The Club Crackers provide a sturdy, buttery crunch that holds the gooey caramel and chocolate without turning soggy, delivering a satisfying snap with every bite.
- Simplicity: Only six core ingredients are required, and the method uses everyday kitchen tools—no fancy gadgets or obscure pantry items needed.
- Unique Twist: Toasting the crackers and folding in the caramel creates a caramel ribbon effect that looks as impressive as it tastes, setting these bars apart from ordinary no‑bake desserts.
- Crowd Reaction: I’ve served these at potlucks and watched people line up for seconds, then thirds—this is the kind of treat that sparks conversation and compliments.
- Ingredient Quality: Using real Maldon sea salt and high‑quality chocolate chips elevates the flavor profile, turning a simple snack into a gourmet experience.
- Cooking Method: A brief bake locks in the structure while preserving the gooey centers, striking the perfect balance between firm and melt‑in‑your‑mouth.
- Make‑Ahead Potential: These bars keep beautifully for up to a week in the fridge, and they even freeze well, so you can prep a batch ahead of any gathering.
Inside the Ingredient List
The Flavor Base
1 cup Caramel: This is the sweet river that runs through the bars, binding everything together while adding a buttery richness. If you skip it, you lose the luscious melt‑in‑your‑mouth quality that makes each bite glide across the tongue. For a twist, try a salted caramel sauce, but be mindful of the extra salt.
1 cup Chocolate Chips: The chocolate provides depth and a velvety contrast to the caramel’s buttery notes. Using semi‑sweet chips balances the overall sweetness; milk chocolate would make it cloying, while dark chocolate could overwhelm the delicate salt. If you’re dairy‑free, opt for high‑quality dark chocolate chips.
The Texture Crew
1 package Club Crackers: These are the unsung heroes that give the bars their structure. The cracker’s fine crumb turns into a buttery crust once baked, preventing the bars from becoming soggy. If you can’t find Club Crackers, substitute with buttery graham crackers, but the flavor will shift slightly.
1 cup Butterscotch Chips: They add a caramel‑like richness with a hint of vanilla, complementing the caramel and chocolate while providing a slightly softer melt. Skipping them reduces the flavor complexity; you could replace them with more chocolate chips if you prefer a chocolate‑heavy bar.
The Unexpected Star
1/2 cup Peanut Butter: This brings a subtle nutty undertone and helps bind the cracker crumbs, ensuring the bars hold together when sliced. If you’re allergic, almond butter works, but it will introduce a different flavor profile—still delicious, just not traditional.
The Final Flourish
1 teaspoon Maldon Sea Salt: The flaky, buttery crystals sit on top just before baking, providing a burst of briny contrast that cuts through the sweetness. Using regular table salt would dissolve completely and lose that satisfying crunch. If you can’t find Maldon, a coarse sea salt works, but the texture won’t be as pronounced.
Everything's prepped? Good. Let's get into the real action...
The Method — Step by Step
Preheat your oven to 350°F (175°C). While the oven warms, line a 9‑by‑13 inch baking pan with parchment paper, allowing a generous overhang for easy removal later. This step is crucial because an even temperature ensures the crackers toast just right without burning. Power transition: Okay, ready for the game‑changer?
Place the entire package of Club Crackers into a large zip‑top bag and crush them with a rolling pin until you achieve coarse crumbs—think sandy texture, not powder. Transfer the crumbs to a mixing bowl, then drizzle 2 tablespoons of melted butter over them, tossing until evenly coated. The butter acts as a glue, making the base hold together after baking.
Kitchen Hack: If you don’t have a rolling pin, use a heavy skillet and press down firmly for the same effect.Press the butter‑coated cracker mixture firmly into the prepared pan, creating an even layer about ½‑inch thick. Use the bottom of a measuring cup to smooth the surface; this ensures a uniform base that won’t crumble when you cut the bars later. The crust should feel dense but not compacted—think of a firm handshake.
In a medium saucepan over low heat, melt the 1 cup of caramel, stirring constantly until it becomes a glossy, pour‑able sauce. Add the peanut butter and continue stirring until the mixture is smooth and glossy—this is where the flavors start to marry. That sizzle when it hits the pan? Absolute perfection. Once combined, set the caramel‑peanut butter blend aside to cool slightly.
In a separate bowl, combine the chocolate chips and butterscotch chips. Gently fold in the warm caramel‑peanut butter mixture, ensuring the chips are coated but not melted. You’ll notice ribbons of caramel weaving through the chocolate—a visual cue that the bars will have that coveted marble effect.
Spread the chocolate‑butterscotch‑caramel mixture over the cracker crust, using a spatula to create an even layer. Sprinkle the Maldon sea salt evenly across the top, allowing the crystals to sit like tiny snowflakes.
Watch Out: Over‑salting at this stage can overwhelm the sweet flavors; stick to the measured teaspoon.Slide the pan into the preheated oven and bake for 20‑25 minutes, or until the edges of the crust turn a light golden brown and the chocolate layer looks set but still slightly soft in the center. The aroma at this point should be intoxicating—nutty crackers, caramel, and chocolate mingling in a sweet‑savory perfume. This next part? Pure magic.
Remove the pan from the oven and let it cool on a wire rack for at least 15 minutes. This resting period allows the bars to set, making them easier to cut without crumbling. While you wait, I dare you to taste a small piece of the crust—if you can resist going back for seconds, you’ve truly mastered self‑control.
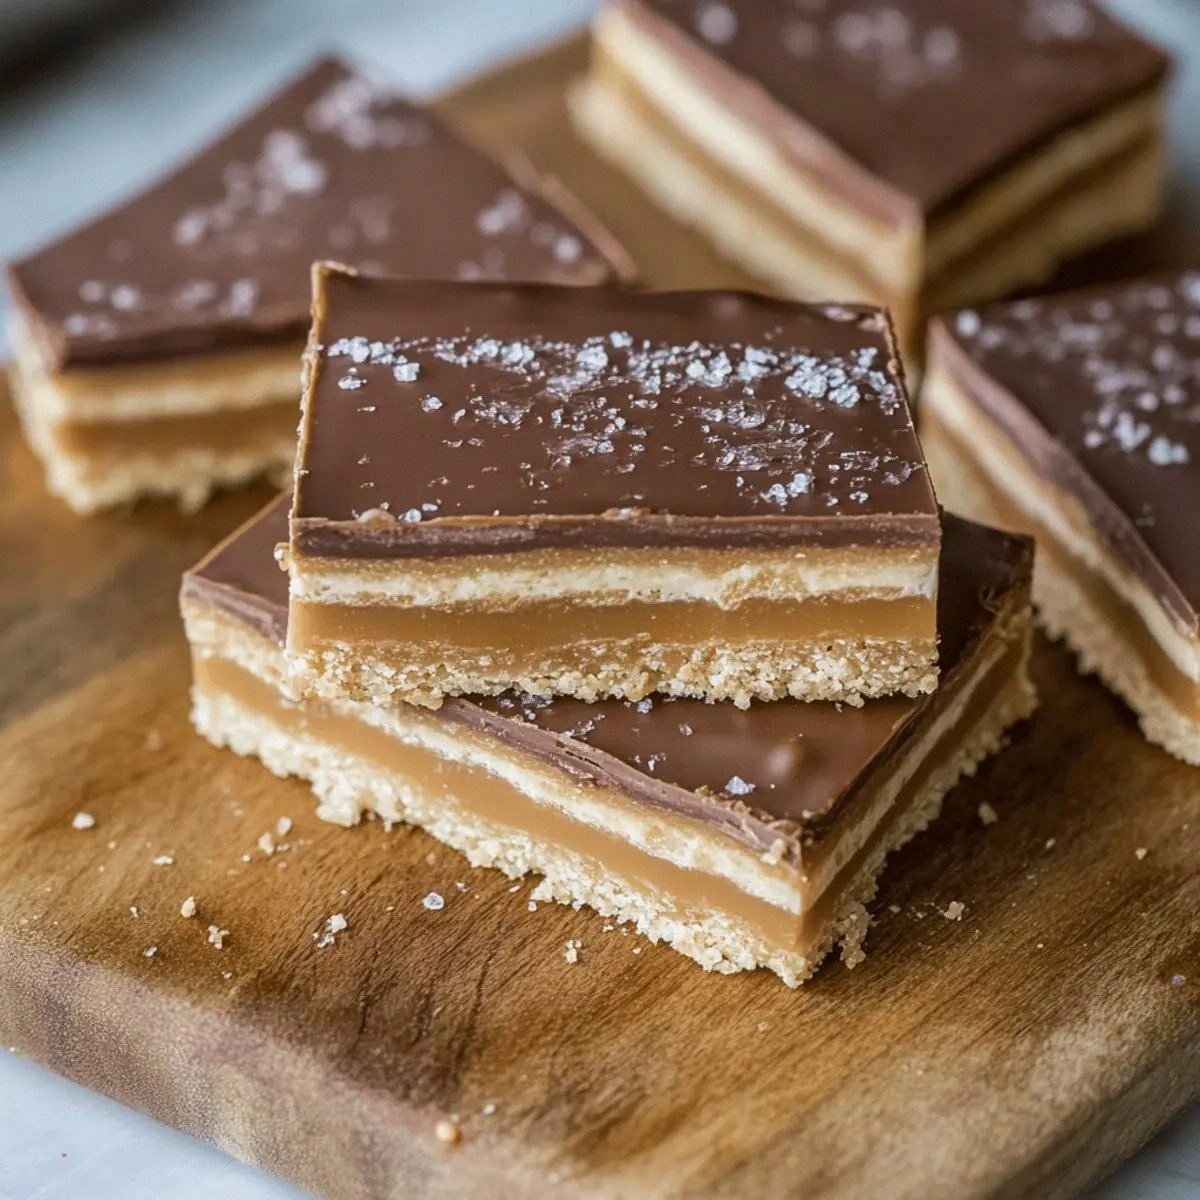
After cooling, use the parchment overhang to lift the entire slab onto a cutting board. Slice into 12 equal bars using a sharp, warmed knife (dip the blade in hot water and wipe dry for clean cuts). The bars should hold their shape, with glossy chocolate ribbons and flecks of sea salt visible on each piece.
Transfer the finished bars to a serving platter, drizzle any leftover caramel sauce on top for an extra glossy finish, and serve. Picture yourself pulling this out of the oven, the whole kitchen smelling incredible, and your guests’ eyes lighting up as they take that first bite. That’s the moment you’ve been waiting for.
That's it — you did it. But hold on, I've got a few more tricks that'll take this to another level...
Insider Tricks for Flawless Results
The Temperature Rule Nobody Follows
Most bakers think “just bake at 350°F” is enough, but the secret is to preheat your oven with a pizza stone inside. The stone distributes heat evenly, preventing the cracker crust from scorching while ensuring the chocolate layer sets uniformly. I once baked these bars on a regular rack and ended up with a burnt bottom—lesson learned. The stone also gives a subtle “oven‑kissed” flavor that elevates the whole bar.
Why Your Nose Knows Best
When the bars are baking, trust your sense of smell more than the timer. Around the 18‑minute mark, you’ll notice a buttery, toasted aroma rising—this is your cue that the crust is perfectly toasted. If you wait too long, the crackers will become too dry, losing that delightful snap. So, keep the kitchen door open just a crack and let that nose guide you.
The 5‑Minute Rest That Changes Everything
After removing the bars from the oven, I used to cut them immediately, resulting in messy, crumbly pieces. A brief 5‑minute rest on a wire rack lets the caramel and chocolate settle, creating a firm yet pliable texture. It’s a tiny pause that makes a massive difference in presentation and bite‑feel.
Watch the Salt Crystals
Sea salt can be a double‑edged sword. If you sprinkle it too early, it can melt into the chocolate and disappear. The trick is to add the Maldon flakes right after the chocolate layer is spread, while the bar is still hot enough to adhere but cool enough to keep the crystals intact. This ensures every bite has that satisfying pop of salt.
Double‑Dip for Extra Shine
For a glossy, restaurant‑style finish, melt a tablespoon of extra caramel and brush it over the cooled bars just before serving. This adds a thin, sweet glaze that catches the light and makes the bars look as good as they taste. I’ll be honest — I ate half the batch before anyone else got to try it, and the glaze was the reason.
Creative Twists and Variations
This recipe is a playground. Here are some of my favorite ways to switch things up:
Nutty River
Swap half of the Club Crackers for crushed toasted almonds, and add a handful of chopped pecans into the chocolate mixture. The result is a deeper nutty flavor that complements the caramel and adds extra crunch.
Spicy Heat
Stir in a pinch of cayenne pepper into the caramel before mixing with the peanut butter. The subtle heat creates a surprising kick that balances the sweetness, perfect for those who love a little thrill.
White Chocolate Dream
Replace the chocolate chips with white chocolate chips and keep the butterscotch chips. This creates a lighter, creamier flavor profile that feels almost like a dessert wine pairing.
Fruit Fusion
Fold in ½ cup dried cranberries or chopped dried apricets into the chocolate‑butterscotch blend. The tartness of the fruit cuts through the richness, offering a bright contrast.
Vegan Version
Use a plant‑based butter substitute, dairy‑free chocolate chips, and swap the caramel for a coconut‑based caramel sauce. The bars retain their texture and flavor while being completely vegan.
Double Salt
After baking, sprinkle a light dusting of smoked sea salt on top for an extra layer of complexity. The smoky notes add depth and make the bars feel more sophisticated.
Storing and Bringing It Back to Life
Fridge Storage
Place the bars in an airtight container lined with parchment paper and store them in the refrigerator for up to 7 days. The cool environment keeps the chocolate firm and the caramel from becoming overly soft.
Freezer Friendly
Wrap each bar individually in plastic wrap, then place them in a freezer‑safe zip‑top bag. They’ll stay fresh for up to 3 months. When you’re ready to enjoy, let them thaw at room temperature for 20 minutes.
Best Reheating Method
To revive that fresh‑out‑of‑the‑oven texture, preheat your oven to 300°F (150°C), place the bars on a parchment‑lined tray, and warm for 5‑7 minutes. Add a tiny splash of water to the tray (just a few drops) to create steam; this steams the bars back to perfection without drying them out.